Results 1 to 5 of 5
  1. #1
    Senior Member Snowball's Avatar
    Join Date
    Oct 2014
    Location
    Denmark
    Hammock
    Several DIY
    Tarp
    DIY
    Insulation
    HG Inc. 20/Bur. 30
    Suspension
    Whoopie
    Posts
    857
    Images
    11

    Lightbulb Venting channel idea

    Lately I have read about venting/condensation problems in various cover constructions for bridge hammocks etc. I am relative sure it also applies gathered end hammock-covers.
    Tents have used venting channels forever in one form or another for the same reason.

    In the picture I have tried to illustrate my idea how to implement it in hammock covers (one in etch end or side).
    You will need some fabric similar to what your cover is made of.
    You will also need some webbing. ½” to 1” will do. The reason for the webbing is to make the bottom edge stiffer so I don’t think Grosgrain can be used. If you have some Dacron it will also do.
    You have to decide how big the venting hole should be. IMO > 3²” otherwise it’s not worth the effort.
    Mark your desired shape for the venting cover on your hammock-cover.
    Mark the hole shape but not too close to your size marking. You need room for stitching! It has to be placed near the top of the hammock-cover for prober ventilation. The hole also have to be placed high in relation to the cover triangle otherwise you will risk creating a draft channel. I would prefer a hole with round edges (less stress and chances for ripping the fabric). Burn it with a hot-knife.
    You could add a patch of netting over the hole if you want to.
    Cut a triangle in your desired shape and size from the extra fabric but remember to add seam allowance for a rolled hem to the sides and 2x the width of the webbing on the bottom not to forget the lower edge MUST be longer.
    For this idea I would roll and sew the webbing like it’s done in DIY bridge hammocks and then hem the edges.
    On my sketch you can see I added 15% in length (bottom edge) to the original triangle measurements. The reason is when its 15% longer and its sewn in on to the original points it will create an arch and because it has webbing inside you or the wind cannot compress it. It will always stay open. 15% is just what looks to me as a good number but be careful not to increase it too much.
    Sew the triangle to your hammock-cover and use the markings you made.

    I haven’t used this idea so please don’t ask for measurements but I intent to use it if and when I decide to make a hammock-cover.

    BTW the illustration is supposed to look something like the end of a WB Spindrift or similar constructions.
    Venting.png

  2. #2
    Herder of Cats OutandBack's Avatar
    Join Date
    Dec 2010
    Location
    Denver, CO
    Posts
    8,761
    Images
    129
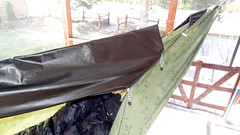
    Excellent idea. The use of bugnet is still unproven. Bugnets can catch, hold, and freeze blocking the vent.

    My frozen bugnet (wbbb) with tarp set and pitched too low to the hammock.


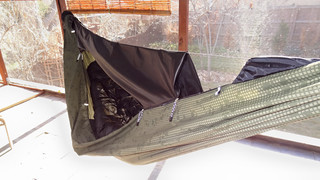
    You also need to experiment with the size of the vent/s. If there is no wind the colder it gets the bigger the vent has to be.

    This is my vent at 40-50F


    My vent between 32-40F


    And below freezing (32-0F) the vent is open 50%
    Sorry I have no pict.

    hth

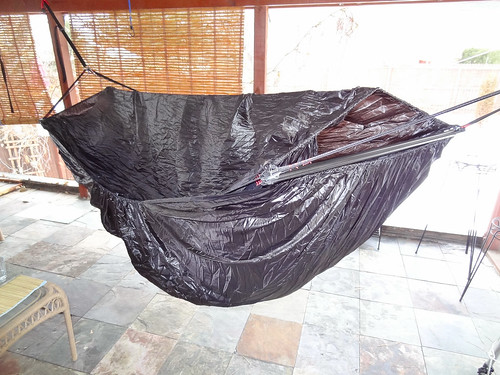
    OH, One last picture to share. Here's a sock I made for my bridge hammock note the rather large head and foot vents.
    I have not tested this below 40F something tells me I would get frost on the cover below freezing if there was no wind.

    Last edited by OutandBack; 12-14-2014 at 13:57.

  3. #3
    Senior Member Snowball's Avatar
    Join Date
    Oct 2014
    Location
    Denmark
    Hammock
    Several DIY
    Tarp
    DIY
    Insulation
    HG Inc. 20/Bur. 30
    Suspension
    Whoopie
    Posts
    857
    Images
    11
    In Danish we have a saying “it’s plague or cholera”. I guess it’s more or less the same with warmth and venting. You can’t have both 100% so we have to compromise.

    I have seen venting channels on tents where this was solved by adding a large venting opening somewhat similar to my sketch and then Velcro was added at the stiff section and the fabric below. The idea is if more venting is needed pull the two sides from each other. Even with Velcro it’s not possible to close it 100%. I can’t say if it works or not because I have never camped in a tent in frosty conditions.

    I do however think it would be a good idea to place one channel high and the other lower (in opposite ends). It should create a kind of natural convection.

  4. #4
    Herder of Cats OutandBack's Avatar
    Join Date
    Dec 2010
    Location
    Denver, CO
    Posts
    8,761
    Images
    129
    Quote Originally Posted by Snowball View Post
    In Danish we have a saying “it’s plague or cholera”. I guess it’s more or less the same with warmth and venting. You can’t have both 100% so we have to compromise.

    I have seen venting channels on tents where this was solved by adding a large venting opening somewhat similar to my sketch and then Velcro was added at the stiff section and the fabric below. The idea is if more venting is needed pull the two sides from each other. Even with Velcro it’s not possible to close it 100%. I can’t say if it works or not because I have never camped in a tent in frosty conditions.

    I do however think it would be a good idea to place one channel high and the other lower (in opposite ends). It should create a kind of natural convection.
    Good saying and so true.
    Even with a rather large vent for your hot moist breath to escape so it doesn't condense and freeze on the inside of
    your cover or sock you still get a good bit of added warmth from the dead air space and or wind block it provides
    and there are other benefits to the sock or winter cover like keeping your quilt in the hammock when you get out.

    Most of my testing has been with one adjustable vent at the highest part of my gathered end hammock.
    As your body and breath radiates/exhales moist warm air it naturally rises so having a vent at the hightest point
    causes a chimney effect allowing this warm moist air to rise and escape thru the vent.

    Having a low vent like you suggest would give you even more air flow.

    I hope you will do some testing and post your results.
    Even though winter socks have been around the forum for a few years now there is still alot of confusion on their proper use.

  5. #5
    Senior Member Snowball's Avatar
    Join Date
    Oct 2014
    Location
    Denmark
    Hammock
    Several DIY
    Tarp
    DIY
    Insulation
    HG Inc. 20/Bur. 30
    Suspension
    Whoopie
    Posts
    857
    Images
    11
    I will post my results but it will be a while before I get the chance.
    I finished my first bridge hammock (Hikingdad design) a few days ago. It is very good but after two nights in it I have some ideas to improve the design and it has first priority but it is a different story. I won’t start a new project before the basics are in place.

    To be honest I never have understood why venting channels haven’t been used more frequently breathable fabric or not?

  • + New Posts
  • Similar Threads

    1. Venting an Underquilt
      By ianders in forum Bottom Insulation
      Replies: 10
      Last Post: 02-14-2019, 10:39
    2. Venting a 3/4 uq..
      By Mountain Gout in forum Under Quilts
      Replies: 5
      Last Post: 05-26-2012, 19:38

    Tags for this Thread

    Bookmarks

    Posting Permissions

    • You may not post new threads
    • You may not post replies
    • You may not post attachments
    • You may not edit your posts
    •