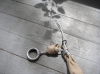
I made a small fixed eye in Amsteel 7/64" line and then
-ran the eye up through the outermost hole
-made a couple of wraps between the holes
-came up through the second hole
-went through the ridgeline end loop (black)
-took the eye down through the outermost hole.
-fed the long end of the line through the eye
-took up any slack and neatened up the line
Once attached to the hammock you can proceed to making the adjustable part of the whoopie sling.
I had originally just tied off the unfinished (no fixed eye) Amsteel to the hammock, just like it comes from the factory, but felt that ending it with the bowline just wasn't a very elegant solution. The fixed eye is much cleaner.
Also, you can actually remove the whole system by feeding the adjustable portion of the sling back through the eye and then work the eye back out of the hammock end and holes.
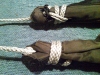
The picture shows top and bottom views of the same method.


 Reply With Quote


 i have a few friends that work there also

Bookmarks