Results 1 to 7 of 7
  1. #1
    New Member
    Join Date
    Dec 2014
    Location
    Sioux lookout, on
    Posts
    30

    Stitching continuous loops

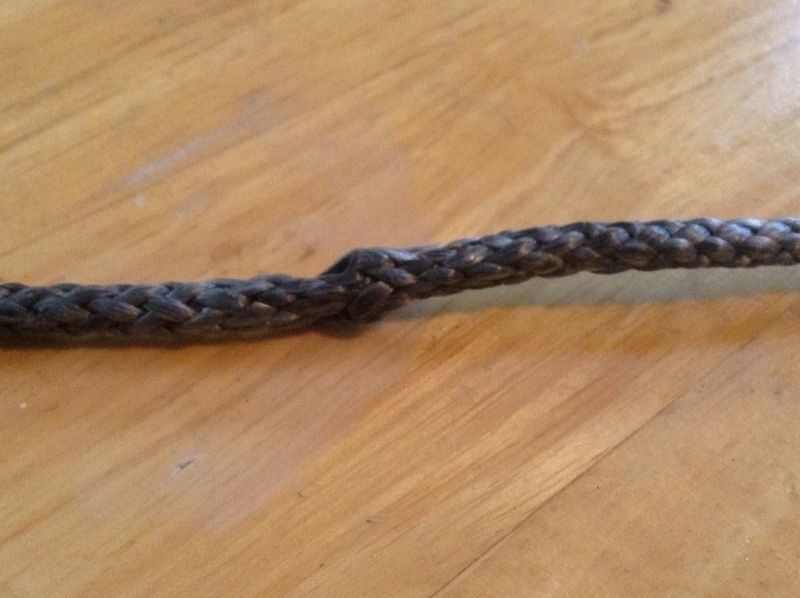
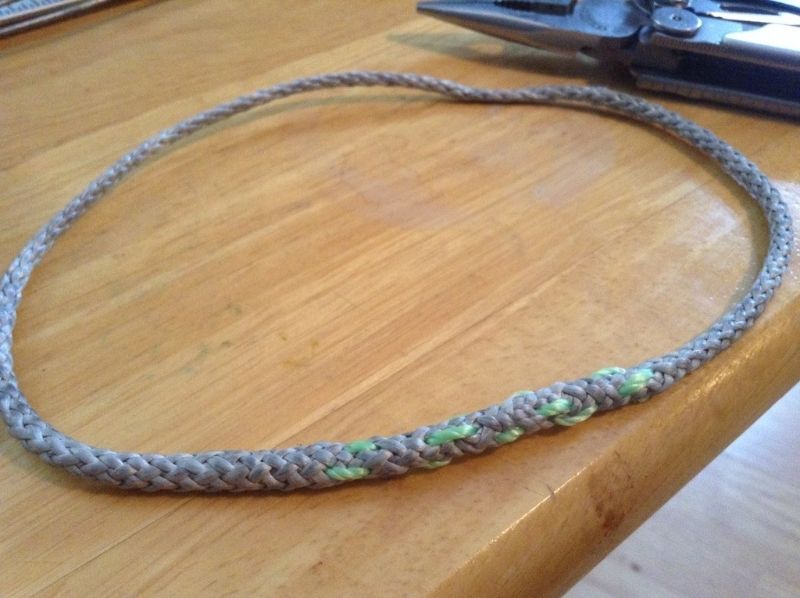
    So I have been whipping up a couple of hammocks lately, and I made some continuous loops to go along with them. I made them according to Opie's excellent tutorial. I noticed that with all of my monkeying around that at least one of them had come apart just a little (about 1/4 inch). I don't think it happened under load, possibly all that loading and unloading, or maybe it was just never totally tight to start.

    Anyway, from what I understand, there are two potential solutions to this. One is creating a lock with a slightly different splice. I actually have a couple of loops like this that have seen some use.


    I'm sure that it is plenty strong, and lots of reputable HF vendors use this method. Personally the feel of that solid little lump of amsteel in the middle of the splice doesn't make me feel warm and fuzzy. In this case the lock is holding everything together and the buries only really serve to hide the ends and keep them from unraveling. I would prefer if the constriction was holding the weight (like in Opie's example), so I decided to lockstitch instead of locksplice.

    I didn't see a tutorial for that here (perhaps those that do it consider it so simple that one would not be needed), so I am going to post a few pictures of what I did, that way those of you with all the experience can tell me if I did something wrong. I'm not trying to reinvent the wheel, I just want to make sure that the wheel I made is okay.

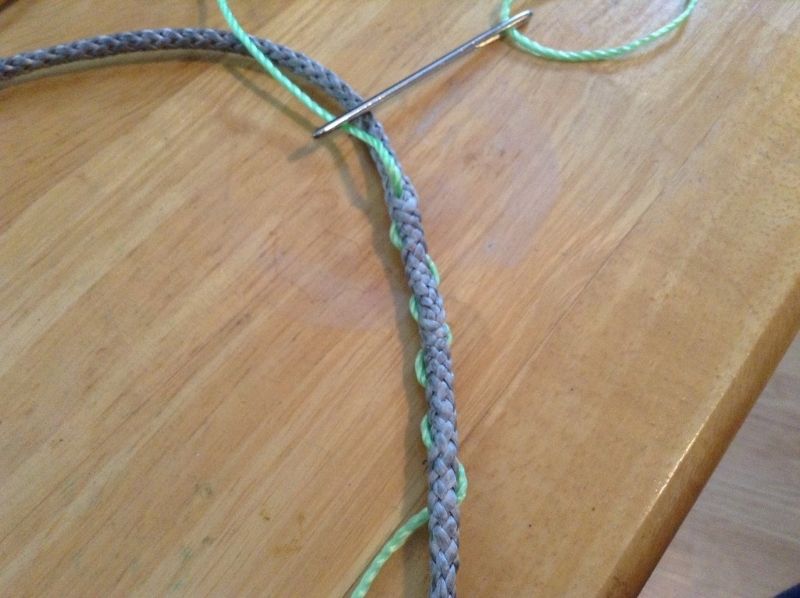
    Samson recommends nylon twine approximately the diameter of one of the strands in the Amsteel you have spliced for the lock stitching. The masons line I had sitting around seemed like it would fit the bill perfectly so that's what I used. I think the needle might have come from Dutchware, or it might be an old darning needle. Either way it is a blunt needle with a large eye.

    I started stitching about 1.5 inches from the middle of the splice, to 1.5 inches on the other side


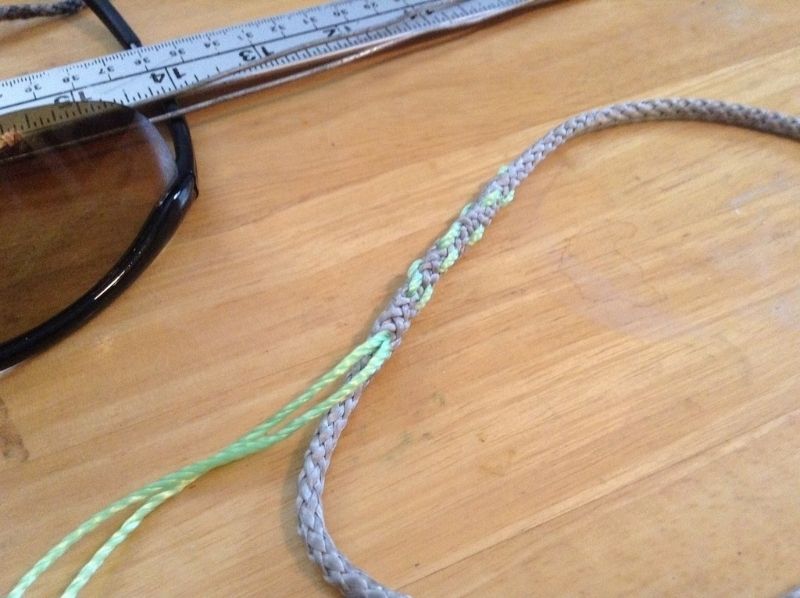
    Then I reversed direction and offset 90 degrees and stitched back to where I started


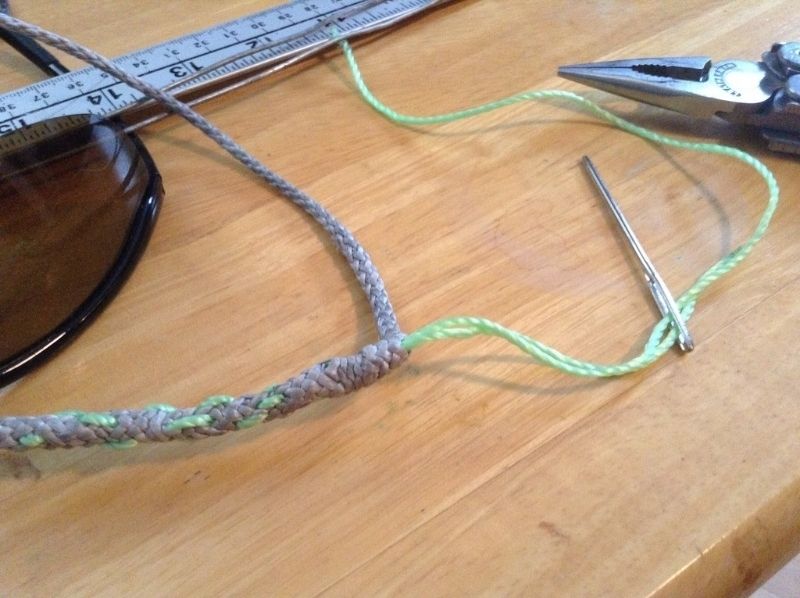
    I then tied a single overhand knot, and buried the tails about 1/2 inch though the Amsteel.


    Last I cut off the ends and massaged the amsteel until the ends of the mason's line disappeared. The result seems clean, and like the bury is going to hold all of the weight. I tried to avoid separating the strands on the outer layer of amsteel as I stitched, but I wasn't always totally successful.


    So for those of you that stitch your buries, does this seem about right? I've only done a couple, so if you have a suggestion to make them better, I am all ears! If I hit the dirt during the learning process I'm okay with that, but I'm trying to get the wife hanging as well. If her gear fails once I will likely be doomed to a tent for all eternity, so any help is appreciated...

  2. #2
    SilvrSurfr's Avatar
    Join Date
    Jul 2011
    Location
    Jersey Shore, NJ
    Hammock
    Dutch PolyD
    Tarp
    HG Winter Palace
    Insulation
    HG 0, 20, 40
    Suspension
    Dutch Whoopie Hook
    Posts
    14,717
    Images
    3
    Wow, that's elaborate. I just use regular polyester thread and create 4 or 5 lock stitches. Never had a failure.
    "A foolish consistency is the hobgoblin of little minds." Ralph Waldo Emerson

  3. #3
    New Member
    Join Date
    Dec 2014
    Location
    Sioux lookout, on
    Posts
    30
    Quote Originally Posted by SilvrSurfr View Post
    Wow, that's elaborate. I just use regular polyester thread and create 4 or 5 lock stitches. Never had a failure.
    Excellent, just what i wanted to hear. It would make sense since the thread shouldn't be carrying any of the load, just preventing movement. Perhaps I will try regular thread on some of my own loops, I think the wife's gear will continue to be overbuilt out of an abundance of caution.

  4. #4
    New Member
    Join Date
    Sep 2014
    Location
    Mt. Pleasant, SC
    Posts
    8
    Quote Originally Posted by Hogwash View Post
    So I have been whipping up a couple of hammocks lately, and I made some continuous loops to go along with them. I made them according to Opie's excellent tutorial. I noticed that with all of my monkeying around that at least one of them had come apart just a little (about 1/4 inch). I don't think it happened under load, possibly all that loading and unloading, or maybe it was just never totally tight to start.

    Anyway, from what I understand, there are two potential solutions to this. One is creating a lock with a slightly different splice. I actually have a couple of loops like this that have seen some use.


    I'm sure that it is plenty strong, and lots of reputable HF vendors use this method. Personally the feel of that solid little lump of amsteel in the middle of the splice doesn't make me feel warm and fuzzy. In this case the lock is holding everything together and the buries only really serve to hide the ends and keep them from unraveling. I would prefer if the constriction was holding the weight (like in Opie's example), so I decided to lockstitch instead of locksplice.

    I didn't see a tutorial for that here (perhaps those that do it consider it so simple that one would not be needed), so I am going to post a few pictures of what I did, that way those of you with all the experience can tell me if I did something wrong. I'm not trying to reinvent the wheel, I just want to make sure that the wheel I made is okay.

    Samson recommends nylon twine approximately the diameter of one of the strands in the Amsteel you have spliced for the lock stitching. The masons line I had sitting around seemed like it would fit the bill perfectly so that's what I used. I think the needle might have come from Dutchware, or it might be an old darning needle. Either way it is a blunt needle with a large eye.

    I started stitching about 1.5 inches from the middle of the splice, to 1.5 inches on the other side


    Then I reversed direction and offset 90 degrees and stitched back to where I started


    I then tied a single overhand knot, and buried the tails about 1/2 inch though the Amsteel.


    Last I cut off the ends and massaged the amsteel until the ends of the mason's line disappeared. The result seems clean, and like the bury is going to hold all of the weight. I tried to avoid separating the strands on the outer layer of amsteel as I stitched, but I wasn't always totally successful.


    So for those of you that stitch your buries, does this seem about right? I've only done a couple, so if you have a suggestion to make them better, I am all ears! If I hit the dirt during the learning process I'm okay with that, but I'm trying to get the wife hanging as well. If her gear fails once I will likely be doomed to a tent for all eternity, so any help is appreciated...
    This is exactly how I did it when I spliced eyes around thimbles...the only difference is I made sure that both ends of the twine emerged from amsteel from the same hole. I then tied a square not and buried it back in the center of the amsteel. I used 3/16 amsteel and it was for a kayak hoist in the garage.

  5. #5
    Senior Member
    Join Date
    Jun 2015
    Location
    MN
    Posts
    2,460
    I think the recommendation from Samson is important with respect to larger lines and, under those conditions, should not be ignored.

    I believe with small stuff, like the 7/64 that we're using in Cls, etc., just a couple of stitches with thread, between the two buries, is all it takes to keep the buries from creeping. After all, that's all the locked brummel (if you use one) does with a spliced eye.

  6. #6
    New Member
    Join Date
    Sep 2014
    Location
    Mt. Pleasant, SC
    Posts
    8
    Quote Originally Posted by TominMN View Post
    I think the recommendation from Samson is important with respect to larger lines and, under those conditions, should not be ignored.

    I believe with small stuff, like the 7/64 that we're using in Cls, etc., just a couple of stitches with thread, between the two buries, is all it takes to keep the buries from creeping. After all, that's all the locked brummel (if you use one) does with a spliced eye.
    I didn't use the locked Brummel...just spliced the eye according to samson instructions. It does seem like one or two stitches would be fine. After all isn't the stitching just to make sure the bury doesn't work its way out while NOT under load?

  7. #7
    Senior Member
    Join Date
    Jun 2015
    Location
    MN
    Posts
    2,460
    Quote Originally Posted by Klogan View Post
    I didn't use the locked Brummel...just spliced the eye according to samson instructions. It does seem like one or two stitches would be fine. After all isn't the stitching just to make sure the bury doesn't work its way out while NOT under load?
    Yup.

    As convenient as a locked brummel is, using stitching is actually stronger. For the most part, there's enough margin in using 7/64 Amsteel for hammock suspension that a locked brummel is highly unlikely to result in failure of the cord.

  • + New Posts
  • Similar Threads

    1. Continuous loops... What do I do with them now?
      By SCGobbler in forum Suspension Systems, Ridgelines, & Bug Nets
      Replies: 10
      Last Post: 11-11-2015, 19:54
    2. Why Continuous Loops?
      By troyji in forum Suspension Systems, Ridgelines, & Bug Nets
      Replies: 25
      Last Post: 09-29-2015, 18:20
    3. Continuous Loops?
      By Jasonadams1 in forum Suspension Systems, Ridgelines, & Bug Nets
      Replies: 4
      Last Post: 11-10-2014, 17:07
    4. Joining loops, e.g. Continuous loops to whoopies
      By PadreGA in forum Suspension Systems, Ridgelines, & Bug Nets
      Replies: 11
      Last Post: 10-17-2014, 20:34
    5. Stitching for webbing loops
      By sydneywizard in forum Do-It-Yourself (DIY)
      Replies: 5
      Last Post: 11-07-2011, 10:53

    Bookmarks

    Posting Permissions

    • You may not post new threads
    • You may not post replies
    • You may not post attachments
    • You may not edit your posts
    •