Page 36 of 136 FirstFirst ... 2634353637384686 ... LastLast
Results 351 to 360 of 1354

Thread: Bridge Hammock

  1. #351
    Senior Member schrochem's Avatar
    Join Date
    Jun 2007
    Location
    Austin,Tx
    Posts
    796
    Images
    57
    Well I just tried something a little different.
    Another conversion if you will.
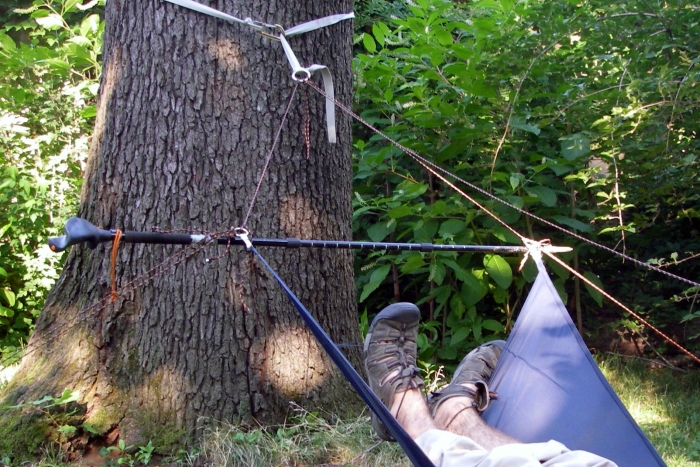
    I was looking at my claytor expedition hammock and how the webbing/rope can feed through the ends. I decided to try it on the Bridge.
    The outer two lines are the original suspension, the inner two are the newly added through a quickly sewn loop.


    What I am trying to accomplish is getting the benefit of a regular hammock for just relaxing. I like having my upper torso curved upward like that to just relax. So this is a wide view of how this might work.


    So here I am in it with it in this 'mode'


    All I did was have some cord go through the loop like the mosquito hammock
    That line just goes to the ring/buckle as well. To 'revert' back to the Bridge just unclip/untie from the buckle and put the spreader bar back in.

    I tried a few different configurations before having to come in (and hearing my temporary stitching start to come out!) and I think there is potential here, but there is noticeable shoulder squeeze. I might be able to loosen those edges by just making the loop in the middle and not all the way to the ends, but it would have to be STRONG.
    Scott

    "Man is a stream whose source is hidden."
    RWE

  2. #352
    slowhike's Avatar
    Join Date
    Oct 2006
    Location
    Winston-Salem, NC
    Hammock
    DIY, gathered end , w/ spreader
    Tarp
    JRB Universal
    Insulation
    DAM/ HG Incubator
    Suspension
    Webbing and rings
    Posts
    11,680
    Images
    319
    scott i had been thinking of something similar to that but i had in mind to be laying in the other direction, w/ the feet at the gathered end.
    how would that work? i know you may need to raise the head end (w/ spreader bar) a little to feel right.
    I too will something make and joy in it's making

  3. #353
    Senior Member GrizzlyAdams's Avatar
    Join Date
    Apr 2007
    Location
    Illinois
    Hammock
    GrizzBridge Ariel
    Tarp
    HG Cuben Winter
    Insulation
    DIY UQ
    Posts
    4,777
    Images
    564
    Quote Originally Posted by schrochem View Post
    What I am trying to accomplish is getting the benefit of a regular hammock for just relaxing. I like having my upper torso curved upward like that to just relax.
    I'm liking this. Flat on my back or stomach is great for bedtime, but not so great for lounging around.

    Grizz

  4. #354
    Senior Member GrizzlyAdams's Avatar
    Join Date
    Apr 2007
    Location
    Illinois
    Hammock
    GrizzBridge Ariel
    Tarp
    HG Cuben Winter
    Insulation
    DIY UQ
    Posts
    4,777
    Images
    564

    Look Ma, no spreader bars!

    Recap--when TeeDee built a bridge hammock and figured out how to use his hiking poles as spreader bars, I was struck by the strength of the compression forces he described, the delicacy of the arrangement for aligning spreader bars, and saw also that my poles could not be used the way he can use his (mine are Pacer Poles, with handles).

    So I wondered if one could make a bridge hammock that did not need spreader bars, but could use guy lines to counter the compression forces induced by the suspension and by the occupant. The fast answer is yes. Read on to find out how.

    Here's the problem. In the vertical plane that contains the guy lines and the compression bar, various forces induce a compression force c along the axis of the spreader bar. To counter that force we have to put c/cos(a) tension on the guy line, where a is the angle at which the guy line ascends. See the figure below.


    There's an evil detail lurking here for us though. If we're hiking solo, at the time we stake out the guy lines there's nobody in the hammock. And when we get into the hammock, the whole level of it will drop. The magnitude of the drop will be much larger than any stretch in the guy line, so its not far off to think of that guy line as the radius of a circle, and the effect of someone climbing into the hammock is to rotate that radius to have a smaller angle of ascension. In the figure below, the guy lines with the occupant in the hammock are in red.


    Here's the evil detail...in order to have tension c/cos(a) after the occupant gets in, we have to put c/cos(a') tension on the guy line before the occupant gets in, where a' is the angle without the occupant in the hammock. How significant is this difference? I did an experiment where I measured the length of a taut guy line (on a configuration with spreader bars), and the height of the ring. This gave me cos(a) = 0.6. I also measured that the ring drops 4" when I get into the hammock, which let me approximate cos(a') = 0.41. In order to have enough tension on the line to counter the compression with the occupant in the hammock, I have to put almost 50% more tension than that on the line before the occupant gets in. (If we have a buddy, life is much simpler if we stake out the hammock while it is occupied.)

    We need to be concerned about the strength of the stakes, and in our ability to pull on the guy lines as hard as is needed to get the separation we want. For the first part I'd hoped to be able to use 6" light weight Titanium stakes. It was clear that one stake could not hold down a corner. I had success though by attaching 2 same-length guy lines to each corner, and staking both out with the lightweight stakes. This splits the load at that corner between the two stakes. Doing this I could get separation of 24" at the head and foot. I was most comfortable using 12" aluminum spikes (for which only one line is needed). Before going on trail I'd experiment to see if 9" spikes would work, or what other stiff, light, and long stake options exist.

    The spreaderbar-less bridge hammock has a very taut center before you get into it.


    That's because there is all this force pulling on the webbing, and the center is where the closest connection between webbing straps exists.

    The spread at the head of the hammock is pretty comfortable, sez the HLH.


    There's a limit to how much tension you can get on the guy line by just pulling on it when staking it out. I could put on enough tension to cause the ring corner to drop by 2" (and this was tricky to do when trying to pull two parallel guy lines and stakes at the same time, rather, securing both at the same time was hard.) To get a wider spread at the head and foot with the occupant in, we need to get more tension on those lines. We can do this using a backtrail block and tackle system. This is comprised simply of a nanowire carbiner hung off the corner ring, with some additional cord fastened on the stake, up to the nanowire, back to the stake, back up to the nanowire. In the image below, you can see two Spyderlines coming off the ring. One goes to the nanowire, the other to the stake (and you can just barely see it behind the sliver cord). The silver cord loops between the carbiner, and 12" stake (not seen in the photo).


    Fasten the guy line, then create slack in it by pulling on the block and tackle line, then tighten up and fasten the guy line. Repeat as desired (and as able).

    I was able to put enough additional tension on a guyline to reduce its height by 4.5 inches from 32.5 inches to 28 inches. I'd run out of daylight, so I don't know yet how great an impact that has on the possible separation at head and foot. There is also an interesting analysis problem here to work on, during my next slow meeting at work.


    But, it turns out that this approach is generally work than is needed, and there remains the issue of suitable lightweight stakes. I like the feel of the hammock with the corners guyed out, at least when I'm flat inside. I can do that without much tension, using my Ti stakes without endangering them, provided I have spreader bars (and provided I can attach the guys while I'm inside the hammock. Otherwise I have to have enough tension on them before I get into the hammock so that I have some tension on them once I'm inside).

    The problem all along has been how to make spreader bars that

    (a) I don't have to carry separately, and
    (b) don't require modification to my Pacer Poles.

    It turns out that I can have spreader bars after all. I'll put that in a separate post.

    Grizz
    Last edited by GrizzlyAdams; 07-16-2007 at 08:51. Reason: cleaning up slop

  5. #355
    Senior Member GrizzlyAdams's Avatar
    Join Date
    Apr 2007
    Location
    Illinois
    Hammock
    GrizzBridge Ariel
    Tarp
    HG Cuben Winter
    Insulation
    DIY UQ
    Posts
    4,777
    Images
    564

    trail spreader bars

    In the course of fooling around with the spreader bar free approach, it occurred to me to try to use a spreader bar that I pick up off the ground. Would solve all kinds of problems if it would work.

    It does.

    What I did was to grab a stick and lash it to the rings at the corner of my hammock. The rings twist easily to lay in the horizontal plane.


    There are two points where the cord grabs the stick. Try to get these tight to the ring, and tight to each other. I'm still experimenting to find easy to tie (and untie) knots that do the job. I use a round-turn with 2 half-hitches just about everywhere else on the hammock, and so tried that here. It's tricky getting the half hitches of the second knot tucked in properly.

    The sticks I used for these experiments are old, and very dry. Still they held up. In the image below they are both tied at 34" - 36".


    In the image below you can see that the stick has deformed some (compared with the image above)


    I'm not especially keen still on putting my Pacer Poles at risk, but I can combine the guy out technique with this one. The guy outs can take some fraction of the compression force off the spreader bar, in this case my poles.


    Having dealt with my idiosyncratic constraints with respect to spreader bars, I'm free now to think about other issues. Later. In slow meetings at work, of which many loom large in my future....

    Grizz
    Last edited by GrizzlyAdams; 07-16-2007 at 06:58. Reason: cleaning up cruft

  6. #356
    Senior Member schrochem's Avatar
    Join Date
    Jun 2007
    Location
    Austin,Tx
    Posts
    796
    Images
    57
    Very interesting Grizz!
    It looks like you used the double stake with the poles.
    Have you tried it with just one?
    Also, is there any slippage on your pole attaching it that way?
    I noticed your ridgeline at the rings, is that where you ended up liking them?
    Scott

    "Man is a stream whose source is hidden."
    RWE

  7. #357
    Senior Member GrizzlyAdams's Avatar
    Join Date
    Apr 2007
    Location
    Illinois
    Hammock
    GrizzBridge Ariel
    Tarp
    HG Cuben Winter
    Insulation
    DIY UQ
    Posts
    4,777
    Images
    564
    Quote Originally Posted by schrochem View Post
    Very interesting Grizz!
    It looks like you used the double stake with the poles.
    Have you tried it with just one?
    No. The issue is that for the guy lines to provide any counter-force when you're in the hammock, you have to get enough tension on them before you get in. At the time I put on the poles I'd had already the hammock tensioned up as best I could without them. So I just haven't worked through many possibilities there. I did however use the poles without guylines at all. I was keenly looking for any "bend" and didn't perceive any.
    Also, is there any slippage on your pole attaching it that way?
    My first go at this had one end of a cord attached to the ring, and the other to the pole/stick. I did get slippage that way. The slips went away when I tied both ends of the cord to the pole/stick.

    I noticed your ridgeline at the rings, is that where you ended up liking them?
    I left it there when fooling around with the spreader-bar free design for obvious reasons.

    A straight line from ring buckle to ring buckle is still higher than I like. I do want to be able to sit orthogonally to the hammock body (as modeled by you in some photo), and keep my ears, so higher than my X or Y versions would be nice. So I'm thinking I can have it both ways by anchoring the ridgeline at the ring buckles, and then force it lower center along the body, by creating an inverted V anchored in the rings at the end of the hammock. The line from the ring buckle descends to the notch of the V, runs down the middle of the hammock, hits the notch in the inverted V at the other end, and ascends to the ring buckle. Moving from 2 dimensional descriptions of the ridgeline into 3 dimensions, I dub this the Tetrahedral ridgeline. The problem now is that there are two degrees of freedom in setting the ridgeline and coordinating those...well, let's just say that I had a driver's licenses for quite a few years before I could parallel park with any confidence.

    Grizz
    Last edited by GrizzlyAdams; 07-16-2007 at 09:28.

  8. #358
    Senior Member GrizzlyAdams's Avatar
    Join Date
    Apr 2007
    Location
    Illinois
    Hammock
    GrizzBridge Ariel
    Tarp
    HG Cuben Winter
    Insulation
    DIY UQ
    Posts
    4,777
    Images
    564
    Quote Originally Posted by TeeDee View Post
    Yes - getting the lines tangled is a definite problem with the Bridge Hammock. But I am pretty sure there is a simple solution. I have one in mind - essentially 2 short snake skins - one on each side that cover from the buckle (CC or ring) to the hammock. Also, when I remove the spreader bars, I pull the suspension lines tight on the ridge line and clip the attachment rings into a micro biner in a prussik loop on the ridge line - one for each side. The biner and prussik keep the lines tight together. That makes the ridge line and suspension lines one unit. Then pull the short snake skins to cover - they can no longer tangle. The short snake skins would be jammed up against the buckles (CC or ring) when the hammock is hung. A short double open ended cinch sack would be there also. Once the lines are covered, the cinch sack would act as a single skin for the hammock.
    Good idea. I should practice sewing more on snake skins before taking on bug netting.


    The best way I have found for sitting up is the same is for a regular hammock, just sit down as when you are going to get into the hammock and stay in that position, don't swing your lags into the hammock. Lean back against the opposire end of the hammock. I find it pretty comfortable. The opposite end of the hammock provides plenty of back support - the webbing crosses my back about at the bottom of my shoulder blades - I just lean way back and relax.
    And could be higher still if you used a shallower cut! (and brought a step-ladder along to get into the hammock )

    Of course, this also needs the ridge line high enough to be out of the way.
    Agreed, actually. Enter the Tetrahedral Ridgeline (tm)


    Interesting, I find that for my implementation of the Bridge Hammock, the sway is about the same as for my HH ULBA and Safari. Not really very much at all. Of course, that shallow arc you used leads to more instability. I don't know how long your spreader bars are, but from the openness of the head side when your son is in the hammock, if the arc was the same, I would have to say your spreader bars are way to long, which leads to instability and hence sway.
    30" at the foot end, 33" at the head end. Wonder what would be a rule of thumb for setting spreader bar width.


    That shallow arc you used makes that hammock lay a lot flatter end to end than mine. It doesn't look like you have much room for error when rolling.
    No, but tie out lines help a lot. Really a big difference. No endorphin inducing sways or waggles though.

    And as I mentioned above, the spreader bars look to be long enough to lead to instability. Mine has a lot more trough to it which gives more coverage in the middle and higher arcs on the head and foot sides. I don't think my arm would be as much out of the hammock when on my stomach. Also, I have more coverage of my shoulder when on my side. I think I'll stick with the deeper cuts.
    I'm thinking this is due more to the narrowness of the hammock than the depth of the cut. Version 0.1 is going to be wider. Probably I'll go with the full width of the roll. Version 0.0 has been a throw-away for learning purposes, in the best tradition of prototypes. v 0.1 will be a prototype also, that's where I'll be trying out stuff that makes it into a camping hammock as opposed to a backyard (or bedroom) hammock.

    Grizz

  9. #359
    Senior Member schrochem's Avatar
    Join Date
    Jun 2007
    Location
    Austin,Tx
    Posts
    796
    Images
    57
    Quote Originally Posted by slowhike View Post
    scott i had been thinking of something similar to that but i had in mind to be laying in the other direction, w/ the feet at the gathered end.
    how would that work? i know you may need to raise the head end (w/ spreader bar) a little to feel right.
    I don't know tim, I was trying to change the system as little as possible to go from sleeping mode to lounging mode. If I put my feet at the gathered end, I need to get my head up some way, so I'd have to do something to the other end. I think there is something to be done from just modifying one end (that will be sufficient for lounging).
    Scott

    "Man is a stream whose source is hidden."
    RWE

  10. #360
    Senior Member schrochem's Avatar
    Join Date
    Jun 2007
    Location
    Austin,Tx
    Posts
    796
    Images
    57
    Quote Originally Posted by GrizzlyAdams View Post
    I'm liking this. Flat on my back or stomach is great for bedtime, but not so great for lounging around.

    Grizz
    That's exactly what I'd like to accomplish. A lot of times when I go on short trips, I spend much of my time just lounging in the hammock
    As a matter of fact, my last overnighter, I got to my destination by 1pm. I literally spent the rest of the day just enjoying the spot I was in. Of course I would dose off now and again

    After sleeping on this, I might be able to just have a small section, say 12", of a tube made out of webbing or whatever. That should pull up the middle (bottom) of the hammock but leave the sides limp. I might need more than 12" or it might just be to taut on the back to be comfortable. I could possibly use several tabs 6" apart and see how that goes.....
    Scott

    "Man is a stream whose source is hidden."
    RWE

  • + New Posts
  • Page 36 of 136 FirstFirst ... 2634353637384686 ... LastLast

    Similar Threads

    1. Bridge Hammock & Hammock Pipe Stand?
      By Trail Runner in forum General Hammock Talk
      Replies: 3
      Last Post: 08-25-2014, 11:34
    2. Bridge Hammock?
      By CB200T in forum General Hammock Talk
      Replies: 24
      Last Post: 11-22-2012, 08:03
    3. My first DIY bridge hammock
      By half-a-jeep in forum Do-It-Yourself (DIY)
      Replies: 17
      Last Post: 07-31-2012, 09:08
    4. Do you sleep warmer in a bridge hammock or a bannana hammock
      By HappyCamper in forum Bottom Insulation
      Replies: 16
      Last Post: 11-27-2011, 00:32
    5. Hammock Bliss Coccon and Bridge Hammock
      By TeeDee in forum General Hammock Talk
      Replies: 3
      Last Post: 10-20-2008, 12:34

    Tags for this Thread

    Bookmarks

    Posting Permissions

    • You may not post new threads
    • You may not post replies
    • You may not post attachments
    • You may not edit your posts
    •