


Ok, so, this is not really a "trip" so much as it was a hike today to get out and try out my new hammock from Grizz!!
The hammock you are about to see is a 100% custom-made hammock - with some things (AFAIK) you've probably not seen anywhere except in a Grizz hammock, though, I could be wrong.
A couple of months back I dropped Grizz an email saying I was looking for something "different" than my WBBB. Not that I hate my WBBB, I was just looking for something, well, different.
So, after a few back-and-forth emails over a few weeks, we started working out the formulas and then it was just time to sit back and wait (for me, at least.)
I don't remember all of my "wants" for the new hammock, but they basically went along the lines of this:
I wanted a bridge hammock.
I wanted something wide - super wide - so I could do fetal position sleeping.
I wanted a bug-net.
I wanted a bug-net that wasn't "in your face" (a probably typical with most bridge hammocks I've seen)
I wanted something to support my 220-pounds.
I wanted something to fit my 6'+ height.
I was not worried about price (custom work deserves a mark-up in price and it's the right thing to expect for those asking for custom work) nor was I worried about weight (I'm shooting for 25-pounds for a three-day trip, so the hammock would have to get really really heavy to effect this base-weight).
One of the first things that Grizz pointed me too was his Dual Mode Bridge Hammock.
While I LOVED the looks of it, I was not interested in a "dual-mode" hammock. I wanted away from the traditional design and wanted a "flat lay" (again, to assist in the fetal-position).
Here is what his DMBH looks like, that he suggested I might consider as a "starting-point" for what I was after:
As soon as I saw that photo I feel in love with the overall design of it.
Only, I wanted a 100-percent-of-the-time bridge hammock.
So, we did some talking, he did some explaining, I did some agreeing, and, now I've got a new hammock!!!
Here are some of the details I can share about the bridge hammock that he has made me!!
The hammock is double-layer (muted green)... the inner he used 1.1oz and the other is 1.9 oz polyester microfiber, which is 1/2" wider than the inner layer (for holding a pad.)
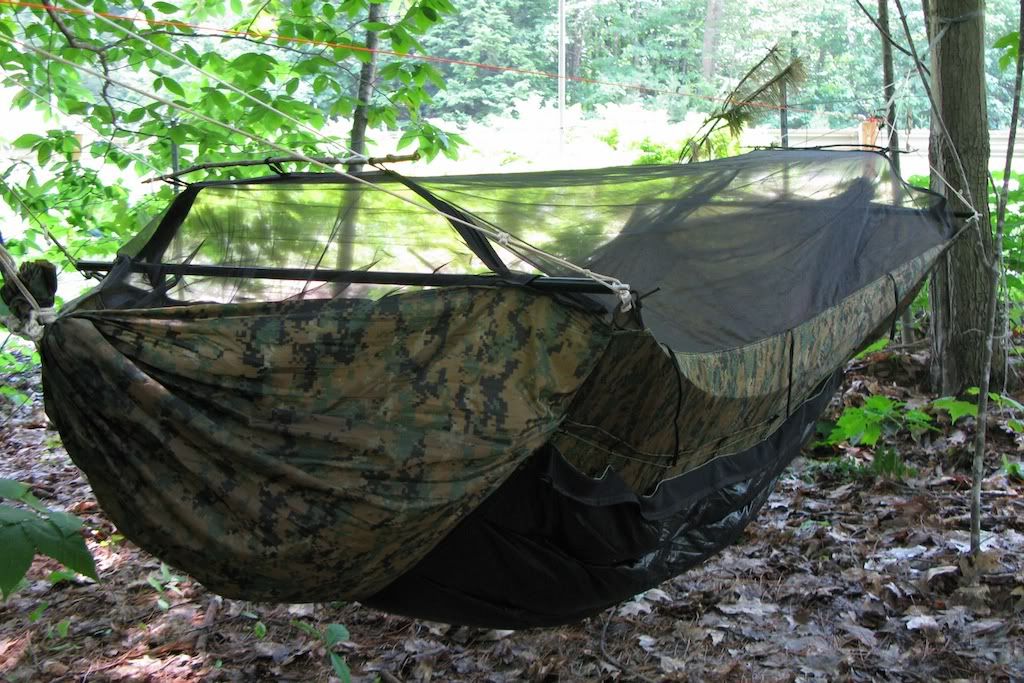
Here is what it looks like all setup and everything:
This has what Grizz has termed (in his communication with me... no idea if he came up with that term or somebody else) a "cathedral ceiling bug-net" and man'oh'man is it sweet!!
This is one very much "out of your face" bug-net -- something I really wanted in my next hammock.
Of course, it comes at a cost... that cost being it requires you to carry two wooden dowels and an ounce or so of extra line - but when you are inside it, the "view out the window" is awesome!
Here are two photos that Grizz emailed me (just after he finished it) showing what it looks like looking out of it, with the ceiling hung up correctly.
wow, look at the head/leg room in this thing!!!
Here is a great shot of how it looks when you are laying it in, in the fetal-position:
Anyway, I got it setup today and was amazed by it!!
Grizz, awesome hammock dude!!
You can see all of the photos I have of it (at this point) here.
On Monday I am heading out for a trip to do a "tripple-lake trip" (which will involve me camping at Whiskeytown Lake, Shasta Lake, and Trinity Lake) and I hope to put some serious time into this hammock. I am also taking my WBBB 2L 1.7 with me, but it will be used by somebody else.
I am sure that Grizz will have all the details on this hammock that I am just not able to provide... as to how it was designed and all that...
In regards to "stability"...
Well, it does take a bit of "trust building". There were a couple of times I thought for sure I was tipping over and ending up on the ground. Each time though, even though I could almost look straight down, it never went "beyond" that point of actually putting me on the ground. Mostly this was my own fault, and mostly because it was the first time I had gotten into it. Once I get use to this (seriously different lay than my WBBB, gotta get to use it) and figure out those few things that cause it to go tippsie on ya, I am confident it won't be an issue.
Finding a way to cook my breakfast in this sucker, without it feeling like I'm gonna end up on the ground is going to be a true mastery.
In regards to "quality"...
Top-notch!! Grizz did an amazing job putting this together. And I am truly grateful to him for putting this together for me!
Having spent some time in this hammock this afternoon, I can honestly say I would take a truly custom-made hammock like this over anything else out there in the marketplace. Nothing I have encountered has given me a more pleasurable hang than this hammock has!
Check out this photo for his stitching work - straight and true!!
I think one of the big things I am going to have to figure out (any other bridge hammockers out there got tips?) is just where the "key spots" are on a bridge hammock, when it comes to sleeping position.
The length of this hammock is 84 inches (7 feet) along the sides. I am really going to have to try out different positions along the length of the hammock for a sweet-spot. While in the fetal position, even being a bit over 6 feet tall, it seems like there is at least two feet at my head and my foot, if I'm dead in the center of it. I could probably get my entire ULA pack inside of this thing with me if I really wanted too - lol. I am sure that there are going to be "sweet spots" where it becomes less tippsie, and more comfortable (if that is even possible, as it's already 10x more comfortable than my WBBB IMFHO), and all that stuff. ie: should I stay in the dead middle, should I be closer to the head of the hammock, or the foot of the hammock, etc.
Okie, next I'm gonna throw some links at you, rather than include them into this thread, so save some of you with dial-up the agony of slow load times
You can see all of the photos I have of it (at this point) here.
First up is the suspension system. I am going to link directly to the flickr page, as I have added "notes" to the photos (mouse-over the photos).
Here is the poll inserted into the hammock:
http://www.flickr.com/photos/abelajo...7624039217343/
Here are the wooden dowels used for the cathedral ceiling bug-net:
http://www.flickr.com/photos/abelajo...7624039217343/
Here is the tree-huggers and spike:
http://www.flickr.com/photos/abelajo...7624039217343/
Here is the spreader bar connection system:
http://www.flickr.com/photos/abelajo...7624039217343/
Here is the ring system:
http://www.flickr.com/photos/abelajo...7624039217343/
Here is one whoopie sling:
http://www.flickr.com/photos/abelajo...7624039217343/
Here is the other whoopie sling:
http://www.flickr.com/photos/abelajo...7624039217343/
(not sure why he used two different methods... perhaps I read over that part of the info he sent me... I do really really love the one with the orange thread... and very very much love the idea of the gray thread on there to slip up against the MSH/spike.)
And, here is a photo of an inner-pocket he made:
http://www.flickr.com/photos/abelajo...7624039217343/
Here is the lovely trail I got to walk through today... at least 60%+ of the trail was this much - sigh:
But, in return nature allowed me to view some of it's beauty!
This above photo shows some of the trouble we have here in the Redwoods in trying to find trees to hang from. There are either not enough trees, or the trees are 30 feet around, or it's just a clustermess like this photo shows. I had never been down this trail before and had to go at least 10 minutes walking beyond what I wanted to before I could find two trees that didn't have 30 other trees between them - sigh.
But, while I was walking, looking, this beautiful area came into view and I just had to snap a photo of it. True Redwood Forest beauty!
Anyway, I would again like to thank Grizz for this custom hammock and all of the work he put into it. I am sure there are probably a couple of things in this post he could correct our explain differently - and hopefully he will.
I really look forward into moving into the "bridge hammock" world after spending some time in my WBBB over the last few months.
John


 Reply With Quote


Bookmarks