


My Bridge Hammock System
The instructions and ruminations I have included here pertain to the Bridge Hammock System I made, but should pertain to any Bridge Hammock. Well at least most.
Table of Contents:
- Introduction
- Hems and Bias Tape
- Why Did I make a Bridge Hammock
- Material list & links
- Making Main body of Bridge Hammock
- dimensions
- laying out arc pattern
- reinforcement patches - or not
- corner rings
- sewing webbing whipping
- Bridge Hammock Suspension
- more rings
- suspension triangle
- to buckle or not to buckle - your choice
- Structural Ridge Line
- ridge line forces & line to use
- setting up ridge line
- more rings or Quick Links
- Spreader bars
- for testing & car camping
- length and stability
- compression forces
- hiking poles as spreader bars
- pole tip and top
- limiting hiking pole collapse
- hanging the Bridge Hammock - refer to last section in Table of Contents
- getting into the Bridge Hammock
- determine desired ridge line length
- determine desired spreader bar length
- Taking down the Bridge Hammock - refer to last section in Table of Contents
- Bridge Hammock Accessories
- Tie Off Cords
- Tie Off Bars
- Gear Loft/Hammock
- Bridge Hammock Pillow
- Overcover
- Draft Stoppers
- Mating Overcover and draft stoppers
- Bug Netting
- Making an Octagon patch pattern
- Poncho Liner as under quilt
- Sleeping bag as under quilt
- Overcover with sleeping bag or poncho Liner
- My Bridge Hammock Specifications
- Terminology Rant
- Spreader Bar Compression Forces
- Force and Draft stopper parabola computation
- Sample output
- New method for hanging and Storing My Bridge Hammock system
Introduction
To start, you might think that the Bridge Hammock is more difficult to make than other hammocks, say the Speer type hammock or a Hennessy hammock, which I will refer to as "regular hammocks" in this article. There is some truth to this and some falsity. Cutting and sewing the side arcs for the Bridge Hammock is more work than regular hammocks which are simple rectangles of fabric.
However, once the arc cuts have been made and sewn with the webbing, the Bridge Hammock is much easier to finish and work with than a regular hammock. For starters, rigging the suspension on the Bridge Hammock is far easier than whipping either a Speer or Hennessy type hammock. Just look at all of the various methods for whipping a regular hammock and all of the questions doing so has generated by new hammock makers. You can get very complicated with the suspension, but that is not really necessary and may not be desirable for some people like myself.
Also, hammock accessories such as under quilts, under pads, overcovers, under covers, gear lofts/hammocks and bug netting are far easier to make and fit for the Bridge Hammock. For the most part a simple rectangle fits perfectly. Also, as I will detail in this article, making and fitting bug netting to the Bridge Hammock can easily be accomplished only with noseeum mesh and shock cord. Some plastic fittings from ITWNexus can be used and are highly recommended, but are optional. No zipper or Velcro is needed for either the bug netting or the overcover.
The overcover is a simple rectangle and fits tight as does the bug netting.
One thing I have learned about the Bridge Hammock after many months of making Bridge Hammocks and designing, fitting and making bug netting, under quilts, under pads, overcovers and other accessories, is that the Bridge Hammock front loads the design process. By that I mean that cutting and sewing the arc cuts at the beginning is more difficult than simply hemming the ends of a regular hammock, but after that everything is far simpler than for a regular hammock. A little more effort up front yields great benefits later.
Anybody that has taken a piece of fresh, uncut noseeum mesh and fitted bug netting to a regular hammock from scratch, no pattern or instructions, as I have done, can attest to the fact that it can take many hours of frustrating measuring, fitting, remeasuring and refitting to make the bug netting fit.
In contrast, once I had the design principles firmly in mind for the Bridge Hammock, cutting a simple rectangle and fitting it to the Bridge Hammock took less than an hour. Cutting and fitting the end pieces took another 2 hours each and the bug netting fits perfectly - no zipper no Velcro.
I had one primary design principle in mind in all of my work on and with the Bridge Hammock:
K.I.S.S. == Keep It Simple Stupid
When I occasionally momentarily forgot this principle and things started getting complicated, I found that it just didn't work. I had to restart and follow this principle and things worked beautifully.
This is not to say that you cannot get very complex in designing and making the Bridge Hammock, the suspension, or the accessories. Complexity is always there in anything for those who want complex. I like it simple. It is easier to design, easier to make and much easier to fix in the field when the inevitable failure occurs. Either in the equipment or in me.
This also not saying that those who like complex are wrong, it's just not what I like.
Off topic - those so inclined can skip the next paragraph.
I feel there are just too many people trying hard to make things too complex. Take String Theory for example. It is so complex that even Nature cannot understand it well enough to follow any single String Theory and no wonder - the last I read there are on the order of 10^500 possible String Theories and nobody can write down even one of them. Contemplating String Theory was all the complexity I needed and now I know that it is a failure. It's more fun now contemplating why Newton's Law of Gravitation fails at accelerations commensurate with the Cosmological Scale and wondering why the MOND theory works and may replace Newton at that scale and obviate the need for dark matter. No theories, but the calculations are much, much simpler. What could better suit a hammock than slowly swinging and meditating on space/time and how some more daring modern theoretical physicists, in trying to understand quantum gravity and the nature of space-time, are now starting to merge or agree with Buddhist philosophy thousands of years old about space/time being an illusion and how maybe time doesn't exist as a separate dimension, but is something the mind invents to separate events. What is old is new again. With Einstein, modern physics has gotten a better approximation after Newton, but Minkowski, and hence Einstein, still thought of time as simply another dimension, the fourth dimension, albeit with a different metric than the conventional 3, but still just another dimension. Modern physics has still to realize that time is not a dimension at all and so has not gotten to the next approximation after special and general relativity although some of the people probing the foundations of Quantum Mechanics and making it background-independent are getting closer. Ahh, the fun of being a mathematical physicist. An Army of One is Fun. And so much more librating than following the herd for either money or recognition.
Back on topic
Also, after much testing, I decided that I did not want to include any Velcro or zippers in my Bridge Hammock System. Where-ever a zipper or Velcro was called for, I decided to use shock cord and/or guy line cord. I finally decided on this for several reasons:
- weight. zippers are heavy - well, heavy in relation to shock cord
and guy line cord. Really, really heavy. The same is true for Velcro, even the Velcro Free Magic, which is pretty light for Velcro.- ease of construction. Sewing zippers is lots harder than
sewing Velcro and sewing either is lots harder than tying a simple bowline or overhand knot in shock cord. Also, cable ties, A.K.A zip ties, can be used with shock cord to form loops, eyes, join lengths, etc. The 4" cable ties are extremely light, especially after removing the excess tie and extremely easy to use. And the cable ties are available at all Lowes, Home Depots, hardware stores, K-Marts, etc and in black for low visibility.- ease of use. shock cording is lots easier to use than either
zippers or Velcro. Especially Velcro. Sealing long runs of Velcro can be very frustrating, especially if you want to get it lined up properly. Irregardless of how much I try I always end up with a little extra on one side. Zippers are much easier to use than Velcro Free Magic, much easier, but they are also heavier. Even the lightest plastic coil zippers. Designed properly, shock cords are even easier to use than zippers. Pull aside and let it snap back into place. Simple.- set-up. With shock cord, I have the initial set-up once or twice
a year when the accessory is needed. After that, whatever the shock cord is used on snaps back into place when displaced, e.g., when pulled aside on entry/exit. With Velcro I have to essentially set it up each time it is used. The same with zippers. With zippers the set up is quick and simple, but still not as simple or as quick as with shock cords.- When not in use. With Velcro or zippers, when the accessory the
Velcro or zipper is used with is not being used, e.g., bug netting in the winter, I still have half of the Velcro or zipper hanging around getting in the way and adding it's contribution to the weight. With shock cords, when the accessory is removed, it's all gone.- potential problem area. Both zippers and Velcro can get dirt in
them and clog. Also, both can catch noseeum and possibly damage the mesh. Both problems are eliminated with shock cords.- field repair. Fixing zippers in the field is near impossible, and
depending on the breakage, really impossible. This isn't a real problem with Velcro, but it does get clogged with dirt and other debris. The need for fixing either in the field can be frustrating and sometimes downright dangerous depending on where the damage occurs. Fixing shock cord in the field is extremely easy. Re-tie a knot or tie two lengths together if a section is accidentally cut. Not much else can happen to shock cord. This assumes, of course, that all equipment has been inspected prior to field use and frayed shock cord replaced. Even replacing shock cord in the field is easy. Carrying a length of 3/32" shock cord is easy since it is extremely light and very small in bulk. Carrying extra zippers or Velcro would be useless.
In view of my past experience with Velcro, zippers and shock cording, I decided that no zippers and Velcro would be used. At first I thought this would be hard or impossible in some cases or for some accessories, e.g., bug netting. I was wrong. The shape of the Bridge Hammock made the task fairly easy.
The instructions I have included for using my hiking poles for spreader bars are peculiar to my particular hiking poles, Stoney Point, and those which also have a 1/4" x 20 camera mount stud on the top of the pole, under the top handle. The top camera mounting stud is necessary to use my method of hiking poles as spreader bars. Perhaps the method may be modified to suit other hiking poles, but since mine work, I have not persued the use of others. I understand that Grizz has been doing a lot of work in this area.
At the end of this article I have a short rant on terminology. I have put it at the end so that the reader doesn't have to bother with it unless you desire to.
Also, at the end of this article is a derivation of the compression force on the spreader bars. I have put it at the end so that the reader need not be bothered by such details unless you are inclined to do so.
Hems and Bias Tape
One last thing I should mention here. I use bias tape to bind exposed edges instead of hems. This has two advantages for me:
- I do not need to allow for hems in cutting the fabric, and
- I find binding the edges with bias tape easier than hemming and I'm lazy.
Thus, all dimensions I give do not allow for hems on the edges. If you hem the edges, then you will have to add an allowance for your hems where necessary.
Why Did I make a Bridge Hammock
I was initially looking simply to eliminate the reverse bending of my knees. For me, this is pure torture in a regular hammock. I have to really work to lay just right in a Hennessy UltraLight Backpacker Asym hammock to eliminate the reverse bending.
In my Safari clone, this isn't a problem. In fact my Safari clone is extremely comfortable and at 26.80 oz, it isn't too heavy. The real problem with my Safari clone is that it is really only a summer hammock. After making my Safari, I understand why Tom Hennessy doesn't offer the SuperShelter for the Safari. The Safari is just too big and you are laying too much on the diagonal for under quilts or underpads to really work and be practical.
Okay, so I needed a hammock that eliminated the reverse bend of my knees like the Safari, was much smaller than the Safari and which would make it possible to design, fit and actually make, practical under quilts, undercovers, underpads, overcovers and bug netting.
The hammock had to be a four season hammock. I definitely did not want four separate hammocks or even 3 or 2. I wanted a single hammock that could be adapted for any season and be comfortable.
In looking at the Australian design, I thought that the straight line bottom could accomplish all of the above. I have found that, for me, it does all of the above.
Is the Bridge Hammock the perfect hammock?
Very definitely NO !
It does have it's problems.
Tangling of the suspension lines and ridge line spring immediately to mind.
Spreader bars can be a definite problem if a person doesn't use hiking poles or doesn't want to risk their hiking poles as spreader bars.
Interference of the spreader bars with a tarp can also be an issue.
Another issue would exist for those who do not like or use a structural ridge line. Using a Bridge Hammock without a ridge line could be problematic in that getting the correct hang may necessitate hanging very high or finding trees of exactly the correct separation. I always use a ridge line, so this isn't a problem for me.
I have found a solution to all of the above problems for my use. I solved the line tangling problem by developing a method for taking the hammock down and storing it.
I solved the hiking pole as spreader bar problem by using the design of my hiking poles and stainless steel rings in the suspension.
I solved the tarp problem, by simply not inserting the spreader bars until I am fully ready to get into the hammock when using a tarp.
Not everybody would be willing or able to use my solutions. To use my solution for the use of hiking pole as spreader bar requires a very specific design for the hiking pole. Some hiking pole brands incorporate this design, but a lot don't.
Some people would be unwilling to modify their behavior in regards to tarp and hammock use. This was not a problem for me. The draw of the Bridge Hammock was just too great once I fully realized the potential of the design for my use.
I encountered other problems along the way, that I have solved. The problem of a draft blowing down the length of the hammock is not a real problem for a regular hammock. It can be for a Bridge Hammock. I developed draft stoppers to block such drafts.
Also, I found delightful surprises along the way in which the Bridge Hammock design makes doing some things very easy and which would be impossible in a regular hammock.
The Gear Loft/Hammock is one of these. The Gear Loft/Hammock is simply a storage hammock which can be used inside the hammock or flipped and used outside of the hammock. It is possible to have 3 separate Gear Lofts/Hammocks at the same time:
- one inside the foot end of the Bridge Hammock,
- one outside the foot end of the Bridge Hammock, and
- one outside the head end of the Bridge Hammock.
A fourth is technically possible inside the head end, but most people, myself included, would find it cumbersome and in the way. But in a dire situation it would be possible to use one and sleep quite comfortably in the hammock.
The Gear Loft/Hammock is extremely easy to make and use and is not possible with a regular hammock. At least not in the configuration used in the Bridge Hammock. There is gear hammock that can be used with a regular hammock (but not inside a regular hammock), but I found it's use not nearly as easy or convenient as my Bridge Hammock Gear Loft.
I developed a "Bridge Hammock pillow" that weighs less than an ounce, is always with the hammock ready for use, is adjustable and very easy to make. Such a pillow would not be possible with a regular hammock.
Also, I found that the design and structure of the Bridge Hammock made it fairly easy to design and make bug netting that is zipper and Velcro free and for which the tension in the netting can be adjusted to very loose to very tight and up out of your face. The same is true of an overcover. With the overcover and draft stoppers, the Bridge Hammock can be totally enclosed when needed.
So I have found that I have been able to adapt my Bridge Hammock quite easily into a four season hammock that meets all of my requirements and is easily, for me, the most comfortable hammock I have ever used.
Now some people will undoubtedly try a Bridge Hammock, either a DIY or a commercial version and find that they do not like it or it doesn't suit their style of hammocking. Each person is different in their goals, tastes and styles. Thus the Bridge Hammock is probably not the "everyman hammock".
Material list
The following list is as complete as I can remember. I may have forgotten some minor odds and ends, but I think I finally remembered most things as I was writing this article. Any omissions are the sole fault of my faulty memory.
- Fabric.
- hammock body. 2 1/2 yards, 60" wide
I used 1.9 oz/square yard DWR nylon ripstop. No special reason other than the fact that 1.9 oz ripstop works very well, is strong enough for my weight, feels good next to my skin and was in stock at the local Hancock Fabrics store. I used DWR ripstop because that is what they had.
You will need fabric with at least a 60" width. The fabric I obtained was 63" wide. You will need 82" to 83", so figure 2 1/2 yards.- Draft stoppers. 2.5 yards 1.1 oz nylon ripstop for 2. DWR coated
would be best.- gear loft/hammock. 1 yard 1.1 oz nylon ripstop each. DWR is not
necessary here, but can be used if you have it available. The weight savings using uncoated ripstop is negligible.- overcover. 2 3/4 yard 1.1 oz DWR nylon ripstop. A minimum width of
60" is needed. The more width, the better. If you can get 63" or 64" wide with selvage, that works the best.- bug netting. 5 3/4 yard nanoseeum mesh. You will need a
minimum width of 60", so I would suggest the 60" wide nanoseeum since it is lighter. You can use plain noseeum, but since it isn't available in 60" widths you would have to add to the width to get to 60". That may end up costing more and producing more waste and be heavier.- pillow. 1/2 yard 1.1 oz nylon ripstop. You can use uncoated or
DWR. This can be made from scraps of what ever you have.- cordage.
- suspension triangle - 14'. I use 2.8 mm Spyderline. It can be
obtained from Annapolis Performance Sailing or from West Marine. West Marine had the best price when I purchased mine and is local for me.- suspension - I use the same 2.8 mm Spyderline. If you use the
clinch buckle or the ring buckle, then you will substitute webbing here. Whatever length you deem appropriate.- ridge line - approximately 16'. I use 2 mm Yale Crystalyne. The
rated strength is way more than is necessary, but the line is easy to use. Also, I use Prussic loops on my ridge line and guy line cord works good for this with the Crystalyne with it's braided polyester cover. Available from Annapolis Performance Sailing at the above web page. The BPL spectra/dyneema guy line cord is also a good choice. However, I find small diameter and plastic coating of the BPL guy line cord harder to work with.- light guy line cord - approximately 30' to 40'
I use the Mountain Laurel Designs dacron guy line cord. Strong and very light. Any small diameter, light and flexible cord will work. The diameter must be small enough to fit the Line Loks (BPL micro tensioners). I have found small diameter braided nylon cord at Hancock Fabrics drapery department which could be used and is only $0.29/ft. I assume all Hancock Fabrics stores would carry the cord. It is white though and that may be a problem for some.- shock cord. The shock cord is readily available from
Quest Outfitters. You may also find it locally. I couldn't.
- 3/32" diameter shock cord approximately 32' - the smallest
diameter shock cord Quest Outfitters sells.- 1/8" diameter shock cord - approximately 6' - next to the
smallest Quest Outfitters sells.- webbing - approximately 17' of 1/2" tubular polyester
webbing. The only source I could find is Sailrite. This is used for the arc cuts.- misc. hardware
- plastic fittings.
- ITWNexus pack clips - 10
ITWNexus- ITWNexus end clips - 8
Note, both the pack clips and the end clips are part of their "Shock Cord Management System".
- Line Loks - 7
Clam Cleats
The line Loks are available from Fisheries Supply in Seattle. They sell either carded as 2 or in bulk. Carded is expensive, so buy bulk.
Fisheries Supply
Note: instruct them to ship only when order is complete. If they ship from stock and backorder part, they charge double shipping - I learned the hard way. But their price was the best - especially from bulk.
Also available from BackPackingLight as Micro Tensioners in their guy line kit:
BackPackingLight
The lady at BPL informed me that they have had numerous requests for the micro tensioners as a separate item and are considering such. The BPL micro tensioners are Line Loks. I think they use their own name so that people will think they have to buy from BPL.
Update: They are now available directly. Note that you want the mini Line-Lok for 1 to 2 mm line.
- mini-carabiners - 4, more would be handy
Available at Bison Designs. Best price and same as the BPL URSA Light Micro carabiners without the BPL logo and in different colors. I like black.
Also available at Backpacking Light- rated stainless steel rings - 8 3/4" ID or 10 depending on
suspension. 2 1.25" ID rings are optional and are used for testing spreader bar length. I recommend the Sea Dog Stainless Steel Round Rings.
Annapolis Performance Sailing- nickel-plated steel rings - 4 1/2" ID
available from McMaster-Carr
Search for D-rings. The round steel rings are on the same page. Sold in boxes of 10. Very reasonable prices.- SMC descending rings - optional - 2 or 4 depending on suspension
system
Available from various sources, REI being one.- clinch buckles - optional - 2 depending on your suspension choice
Available from OnRope1- CAMP Nano wire carabiners - 2 or 4 depending on suspension system
Available from various sources, REI being one.- CPVC fittings - 2 3/4" "T" fittings - optional, used to test
various spreader bar lengths. Available at LOWES or Home Depot or any plumbing supply.- Poplar dowel - 1 48" x 1/2" - optional used with Stony Point
hiking poles - available at Lowes- Poplar dowel - 1 48" x 5/8" - optional used with Stony Point
hiking poles - available at Lowes- Poplar dowel - 2 48" x 7/8" - optional, used with CPVC "T"
fittings to test various spreader bar lengths. Available at Lowes- Electrical Wire Nuts - 2. Available at Lowes, Home Depot or any
electrical supply store. Find a size that fits over the carbide tip of your hiking pole. Also, you want ones that have little "wings" that are used for grasping and tightening the nuts.- 1/2" diameter Aluminum cylinder, solid. 2 4 cm, approximately
1.5", lengths will be needed.- 2 1/2" fender washers. Available at Lowes or most hardware
stores. Used with the Electrical wire nuts above.
Making Main body of Bridge Hammock
I used the dimensions as set out on the Australian web page. I extended the pattern there to 80", 2032 mm, by adding 66 mm to each end of the pattern given. I choose the 80" length for the simple reason that that is the length of a Queen size mattress which is long enough for me.
The following diagram
lays out the dimensions I used. I used two fixed points, the two points 66 mm from each end. I set weights on those points, placed a flexible rod on the pattern paper or fabric and flexed the rod using cord. You will have to adjust the point where the cord is attached to the flexible rod to obtain the closest match with the remaining three measured points.
Once the rod is the closest to the three points, tie the cord and trace the line of the rod on the fabric or pattern paper. It is more important to match the head end point closer than the foot end point. You will find that you can probably flex the rod through the head end and mid points and that the rod will then be closer to the Center Line than the foot end point. This is fine and works. Getting the exact shape of the arc the same as the Australian design is not real important, close enough works fine
You may obtain the arc directly on the fabric or on pattern paper. For pattern paper, use simple poster board. If using poster board, simply obtain a pattern for 1/2 of the hammock body. The pattern may be placed with the center line of the pattern laid on the center line of the fabric, the arc is then traced on 1/2 of the fabric and then the pattern flipped and traced on the other half. I understand that some people fold the fabric in half and cut both arcs simultaneously. I tried this, but I find that the ripstop is very slippery and I could not get the two halves to stay aligned while I cut the arc. It may work for you. If so, then you will half the work in cutting the arcs.
NOTE: I used fiberglass chimney sweep brush handles for the flexible rod. I used them simply because they are flexible and I already had them. Flexible AL or carbon fiber tent poles would work equally well. Also, a square cross section wooden or plastic molding should work equally well.
Once the arc is traced on the fabric, cut the fabric.
reinforcement patches - or not
The next thing you must decide is whether or not to put reinforcement patches on the four corner of the fabric. If you do not, then simply skip this small section. If you decide to put the reinforcement patches on, then simply cut four pieces of fabric from the scrap you just cut. The pieces are slightly triangular. Simply lay a scrap under the hammock corner and trace the arc. You may hem or bind with bias tape the single exposed edge and then sew the patch to the corner. Repeat on the other 3 corners.
Next bind the ends with bias tape (or hem if that is your preference - remember to allow for the hems).
corner rings
First prepare the webbing by sewing a 3/4" ID ring on one end of the webbing. Fold the webbing through the ring and sew three or four bar tacks across the folded webbing. The bar tacks should be spaced approximately 1/4" to 1/2" apart.
sewing webbing whipping
You will have three stitch lines for the webbing. Refer to the stitching diagram below.
First lay the fabric edge on the webbing with the ring on one end lined with the end of the fabric.
Stitch down the middle of the webbing.
Thread the webbing through a 3/4" ID ring and back onto itself an amount equal to the amount folded back on the first ring. Cut the webbing, heat seal the end, and bar tack the webbing the same as before.
Now fold the fabric twice over the webbing, pulling the folded fabric tight on the webbing. Holding the fabric tight with the webbing inside, sew another stitch line down one edge of the webbing. Then a second stitch line down the opposite edge of the webbing.
When viewed from the end, the fabric, webbing and stitches will look like the following diagram:
Repeat on the opposite arc.
Congratulations, you now have the body of the hammock completed.
You have completed the hardest part of making a Bridge Hammock.
REALLY !!!
Bridge Hammock Suspension
more rings
The next step is to add another set of rings to the rings you have sewn to the webbing on the four corners of the hammock.
The rings you sewed before will be used for attaching accessories, such as draft stoppers, under quilts, etc. To the hammock.
I will refer to these rings as accessory rings.
The second set of rings are used for the spreader bars. I will refer to these rings as bar rings.
These names are arbitrary, but give me a means of defining which set of rings I am referring to below.
It is possible to use the one set of rings already attached for both the accessories and the spreader bars, but it is very inconvenient to do so. If you desire to use a single set of rings to conserve weight, approximately 1.6 oz for the four rings, you may skip this section.
If you are going to experiment with spreader bar lengths, then use one 1.25" ID ring for one corner on each end. The 1.25" ID ring will be replaced with a 3/4" ID ring once you have determined the spreader bar lengths suitable for you.
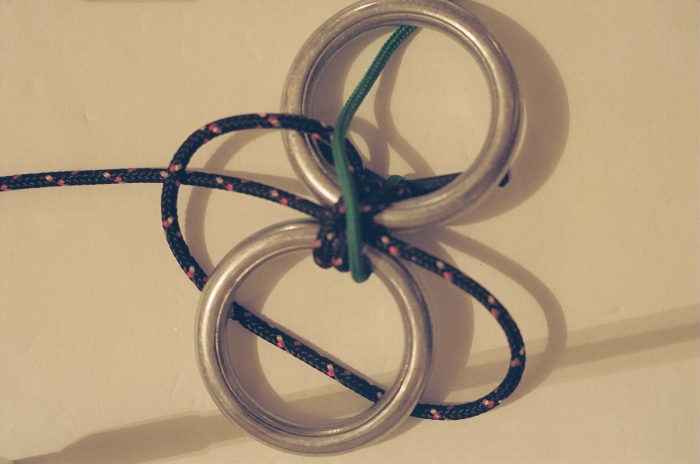
The second set of rings is attached to the first set by a lashing I developed for this purpose. This lashing is tied as shown in the following illustrations.
First wrap the line around both rings 3 times with the ends exiting the same ring on opposite sides of the ring. Keep the wraps fairly loose for now.
Bring the end exiting the front down around and behind the other ring:
Then thread the end through the lashing between the rings and under the bight:
Now bring the other end behind the top ring down and up through the bight formed by the first end:
then across the top of the lashing:
Then thread through the lashing bewteen the rings and out and through the bight formed when brought down.
Now dress and tighten the lashing.
Once properly dressed and tightened, pull the ends to pull very tight. Then tie overhand knots in both ends and work the knots down tight against the lashing and pull tight. Trim excess and seal the rope ends.
The lashing is finished.
suspension triangle
You are now ready to tie the lines for the suspension triangles on the ends of the hammock. For this you will need 2 9' 3" sections of the line you have decided to use for the suspension. Tie one end to a corner ring using a round turn and two half hitches knot. This knot is illustrated on Grogs
Animated Knot Site.
We'll start with a suspension triangle 700 mm, 27.5", on a side. You can experiment with differing suspension side lengths if the 700 mm length doesn't suit you.
Measure down the secured line 50". This allows 1" for the larks head knot attaching the suspension triangle to the suspension ring. At the measured length secure the line to the ring at the other corner for this end of the hammock. Again use a round turn and two half hitches knot. You will have a length of line approximately 1.75 times the length of one side of the suspension triangle. Do not cut this length off. This length of line will be used for 2 purposes:
- It will be used to experiment with various spreader bar lengths if
you decide to do so.- More importantly, the "extra" length of line is used to secure
the suspension lines when taking the hammock down and help in keeping them from getting tangled.
If you have decided to use the 1.25" ID rings for experimenting with spreader bar lengths, then that ring should be the second ring to which the suspension line is tied.
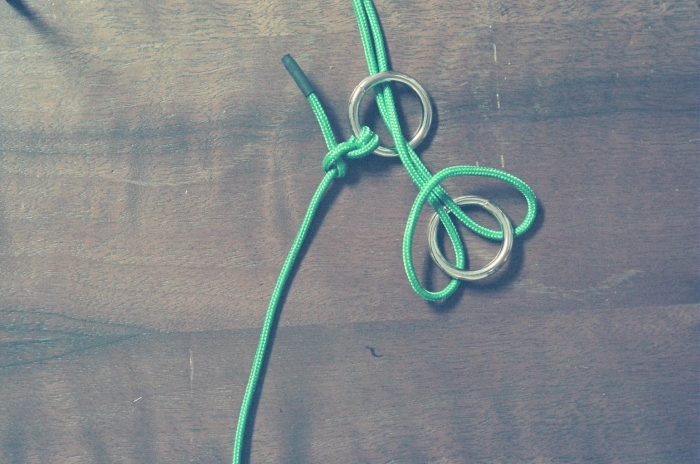
At the mid-point of the line tie the line to the suspension ring. The following pictures illustrate, tying the larks head to a ring. The pictures illustrate tying the larks head for the ridge line ring, but the technique is identical.
After tying the larks head, keep the knot loose and ensure that the corner rings are equi-distant from the suspension ring. Tighten the larks head knot.
I have used a Sea Dog 3/4" ID stainless steel ring for my suspension ring. I would suggest using either the SMC descending or a rated stainless steel ring such as the Seadog. I used the 3/4" ID Sea Dog ring because it is light, I had plenty on hand, it is smaller and less bulk and the small diameter lets the modified skins slip easily over the ring so that the skins rest on the suspension line when hung and then slide down to enclose the hammock for take down.
Repeat the above on the other end of the hammock.
The next step is to connect the suspension system of your choice to the ring at the apex of the suspension triangle and you are almost ready to hang your Bridge Hammock.
to buckle or not to buckle - your choice
The suspension system you choose can be any of the systems used. The clinch buckle and the double ring buckle both use webbing for the suspension from the apex of the suspension triangle to the tree. If using the clinch buckle, then use that buckle instead of the ring at the apex of the suspension triangle.
If using the double ring buckle, then use 2 rings at the apex of the suspension triangle.
You may want to make the larks head a double wrap larks head instead of the single wrap illustrated if using the clinch buckle or the double ring buckle.
I have personally abandoned the webbing for my hammock suspension and use webbing only for the tree huggers. I have gone back to rope for my suspension, namely the Spyderline 2.8 mm line. I find that for a given strength, the line is more than 3 times lighter than the webbing. Instead, I have developed a Carabiner Hitch patterned after the Trucker's Hitch. The rope with Carabiner Hitch is lighter than webbing, is as easy and fast to use and as convenient for adjusting the hang of the hammock as the webbing with either the clinch or double ring buckle. Just my personal preference, but YMMV as they say.
Structural Ridge Line
Before hanging your Bridge Hammock for the first time you may want to add a structural ridge line. Doing so will insure that you obtain the same flatness every time you hang your Bridge Hammock. The spreader bars, which will be discussed later, control the sag of the Bridge Hammock.
Also, the structural ridge line will be essential for the bug netting and the overcover as detailed below. The ridge line is helpful in making the overcover and draft stoppers into a cold weather system, but the ridge line is not essential for the draft stoppers alone.
ridge line forces & line to use
Before detailing my method of setting up the Bridge Hammock ridge line, I have included below a diagram giving the force on the ridge line.
The short answer is that I would recommend using a line with a rated strength of a minimum of 1.5 times your weight if you use a round turn and 2 half hitches to secure the line at the ends and a rated strength of three times your weight otherwise. Remember the rating on line is the breaking strength.
I personally use the 2 mm Yale Crystalyne line. It is a braided polyester cover over a vectran core. It is rate at approximately 1,000 lbs. For the strength, it is way overkill for the ridge line. I use it because I can use small diameter guy line cord like the BPL dyneema or the MLD dacron cord for Prussic loops on the Crystalyne and the Prussic loop holds extremely well and I use Prussic loops on my ridge line a lot. They are necessary for the overcover and the bug netting and for my method of storing the hammock.
One trouble with the line is that vectran does not seal with heat, it just burns. To seal the ends I developed a method using heat shrink tubing and crazy glue. You can get the heat shrink tubing at Lowes, Home Depot, K-Mart, Harbor Freight Tools or any electrical supply store. Slide a small section, say 1/2", of a size slightly larger than the cord over the end of the cord, apply a small drop of crazy glue 1/4" from the end, slide the tubing back flush with the end and apply heat to shrink the tubing down tight. The Crazy Glue is squeezed into the cover and vectran and adheres to the tubing and holds the end sealed. Completed in a minute or so. Resembles the end of a shoe lace when completed.
The smallest diameter Spyderline would work well also. It is the same diameter as the Crystalyne and it is lighter.
setting up ridge line
To set-up the ridge line by my method, start with 2 lengths of the line you have decided to use 14" long. Tie each length into a loop using your favorite knot. A tucked, i.e., double, sheet bend is a good knot for this. Once the loops have been tied, attach each to the ring at the apex of the suspension triangle using a larks head. The ridge line proper will be attached to these loops.
more rings or Quick Links
Obtain another length of the desired line at least 120" long. This length is more than needed for the ridge line, but will provide excess for testing longer and shorter ridge lines if you desire to do so. If you do not want to test various ridge line lengths then 110" will suffice.
Now get 4 1/2" ID steel rings as detailed in the materials list. Tie one end of the long length of line to one ring using a round turn and 2 half hitches and attach to one of loops tied to a suspension ring using a larks head as illustrated below:
Part 2


 Reply With Quote
Bookmarks