


Bridge Hammock Thoughts
Just returned - well about a week ago - and thought I would share how my corded Bridge Hammock and suspension triangle worked and how the latest modular suspension works.
Just to refresh, I use only Samson Ropes AS-78 (dyneema 78 - the next step after Amsteel which uses dyneema 75 I believe) on the arc - corded arcs - and for the suspension triangle. I've been using corded arcs on the Bridge Hammock exclusively now for a long time and have learned how to live with it. The biggest problem with the corded arcs is that the cord isn't as wide as webbing and tends to irritate the underside of the thighs on entry and exit or while sitting crosswise and lounging. There is a very simple solution - use a sit pad or any extra clothes draped over the cord and the problem disappears. Also, the problem tends to disappear during cold weather because most people wear heavier pants which also cushion the cord.
One other problem with corded arc that has been mentioned is the cord against the back when lounging. I had this problem initally when I used Spyderline on my first corded Bridge Hammock and the second when I used Amsteel. The problem largely disappeared when I switched to AS-78. Spyderline and Amsteel become very stiff when loaded. AS-78 is much softer than either Spyderline or Amsteel and remains soft and flexible when loaded - well a whole lot more so than either Spyderline or Amsteel.
The advantages of cord over webbing on the arcs is twofold:
- weight and bulk - webbing of equal strength is 3 times as heavy in all of the measurements I have made. Also, webbing is much bulkier than cord, so the corded arc Bridge takes up less volume when stored.
- selection - there is a much wider selection of cord with various weights and strength ratings than you will ever find for webbing. Also, a much wider selection of vender's and prices.
Before my hike I had completed my current process for connecting the suspension triangle to the corded arc ends and securing the spreader bars to the suspension triangle. One of my goals in this design of the suspension and suspension triangle was to eliminate all hardware from both. I stated by eliminating all webbing from both a long time past and then started on eliminating the hardware. I have succeeded in eliminating both webbing and hardware. It seems that I have come full circle. I started with knots - no webbing except for tree huggers and no hardware, but I don't particularly like tying and untying knots just to adjust the suspension and prefer splices as being easier for me to use. The design I currently have is the lightest and easiest to use suspension I have ever used and I have used every single one devised.
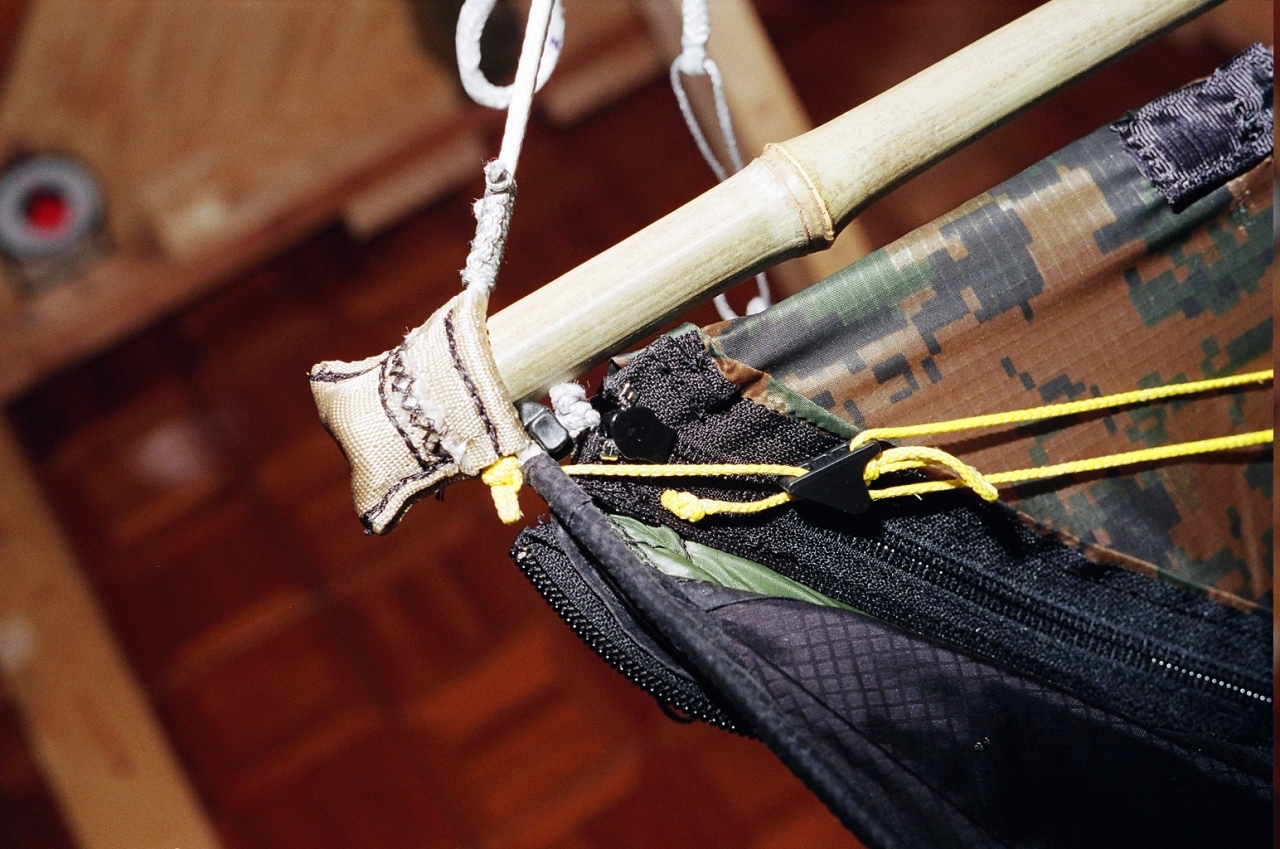
First, I'll describe the method of ending the arc cords and connecting the suspension triangle. On both ends of the arc cord I splice fixed eyes using a locked Brummel and bury. I make the fixed eye 6" long when pulled out flat. I then sew a pouch on each eye using 1.5" wide seat belt webbing from strapworks. I make the pouch double layer since that gives me more peace of mind and only increases the weight a small fraction of an ounce. I use the 1.5" seat belt webbing since that gives me a pouch big enough to be able to squeeze in a spreader bar up to 3/4" diameter. Also, the strapworks 1.5" seatbelt webbing is very flexible which makes inserting the end of the spreader bar a whole lot easier.
I then tie two Solomon Bar scarabs on each eye using 1.75" Lash-it dyneema cord. The dyneema is overkill for this application, but I have a lot of it and it is easy to work with and very light. One of the scarabs is used to "lock" the pouch in place and the other scarab is used to "lock" the suspension triangle to the eye.
Various pictures from various angles of the eye with 2 scarabs, pouch and suspension triangle attached:
In this picture you can see the black micro-cord lock on the under quilt attachment cord - it is pulled tight against the right side of the webbing pouch:
Here is another picture of the same thing with the web pouch slid back so that the black micro-cord lock is more visible:
In the pictures you can see the webbing pouch with my bamboo spreader bar inserted and the lanyard knot from the suspension triangle inserted in the end of the eye. The scarabs are slid against the pouch and the lanyard knot to lock both in the eye. Not too sure if the scarab used to lock the pouch in place is really necessary, but it gives me peace of mind knowing that with it the pouch simply cannot move. Also, I'm not too sure that the scarab locking the suspension triangle lanyard knot is place is really needed since I have forgotten to slide it tight on a few occasions and had no problem. But again the peace of mind it affords me is worth the few grams it weighs.
Here is a picture of the suspension triangle. I tie 3 lanyards knots as shown. The 2 on the ends of the cord are inserted and locked into the eyes on one end of the Bridge. The lanyard knot in the middle is inserted into the fixed eye of the Whoopie Sling in the Modular suspension and also locked with a scarab.
Here is a picture of the suspension triangle attached to one end of the Bridge Hammock:
My suspension itself, which I call the Modular Suspension System, is simplicity itself. It consists of 3 parts: 2 Whoopie Slings which are connected with a ridge line. The ridge line itself is a length of 1.75 mm Lash-It with a fixed eye spliced on each end. The fixed eyes on the ridge line are then connected to the fixed eyes of the Whoopie Slings with larks head knots. The Whoopie Sling fixed eyes have Solomon Bar scarab locks tied on them. The scarabs "lock" the lanyard knots of the triangle suspension in the fixed eyes.
Here's the lanyard knot at the apex of the suspension triangle inserted and locked into the fixed eye of the suspension Whoopie Sling:
For the spreader bars themselves I have become rather partial to bamboo. It is very light and very strong and flexible. For the head end spreader bar I use a bamboo piece 34 3/8" long. It is 11/16" diameter on one end, tapering to 1/2". It weights 97 grams (3.40 oz). For the foot end spreader bar I use a bamboo piece 24 3/8" long, 1/2" diameter on one end and tapering to 7/16" diameter. The foot end spreader bar weighs 41 grams (1.40 oz). The only problem I have encountered with the bamboo is that, since it is hollow and since the eye splice forces are compressing a spreader bar across the diameter, the bamboo ends tend to get crushed. This is easily fixed however by simply plugging the end of the bamboo spreader bar with a short oak or poplar dowel. 1" to 1.5" is plenty. The weights I list above are for the bamboo spreader bars fixed in this manner with oak plugs glued in place. The crushing is especially noticeable on the head end, since the forces there are greater than on the foot end. Here is a picture of the 2 bamboo spreader bars:
I have had quite a few people remark on the bamboo spreader bars, wondering whether they are really capable of the compression forces. I have had no problems with them at all and I have calculated the compression forces, end-to-end, on the head end spreader bar at a little over 200 lbs.
The eyes spliced on the arc cord ends have had another very beneficial feature. They make securing under quilts, over covers and bug netting extremely easy. For an under quilt, the cord on the end of the under quilt top shell arc has a micro-cord lock threaded on it. The webbing pouch and locking scarab are slid back away from the hammock and the under quilt micro-cord lock and cord is then inserted into the eye between the pouch and the hammock, i.e., into the crotch of the eye splice. The webbing pouch is then slid tight against the hammock and the locking scarab slid into place. When the under quilt is first fitted to the hammock the micro-cord lock is then slid on the under quilt cord pulling the end of the under quilt even with the end of the hammock. The micro-cord lock is then secured in place with a slipped overhand knot. That is the full extent of any adjustments needed for the under quilt suspension. It need never be re-adjusted again. The webbing pouch keeps the suspension trapped in the eye splice crotch, which in turn prevents the micro-cord lock from slipping out. Simple, extremely effective and needs no adjustment whatsoever.


 Reply With Quote


Bookmarks