


Extend the length used for the overcover by 2". NOTE: this may not really be necessary. That alllows a 1" seam allowance on both ends. I made my bug netting before making the overcover and so the length is the same as for the overcover. The nanoseeum is too expensive to throw it away and it works anyway. Experience is a good teacher.
We'll make the patches first. The patches are made out of ripstop cut into an octagonal shape.
The exact size of the patches is determined by you. I just eyeballed the size as I was drawing the pattern and never really measured anything. Just make it to a size that looks right for you.
Making an Octagon patch pattern
The reinforcement patches on the bug netting use octagons instead of circles. I originally attempted to use circles, but hemming a circle is an exercise in frustration.
I will show you how to make a perfect octagon using only a straight edge, a pair of compass dividers and a pencil.
I advise using heavy paper, such as poster paper for making the octagon pattern.
The steps are as follows
- First draw a straight line. The line will bisect the octagon, so
place the line on the paper accordingly. I will call this line "line1".
- place a small tick mark on the line. The place marked will be the
center of the octagon, so again, place accordingly. I will reference this mark as the "center mark".
- Using the compass dividers, place the pivot point of the dividers
on the center mark and draw three small arcs: one on the line on each side of the center mark and one above the center mark so that it will intersect with a line perpendicular to line1. Call these arcs "arc1", "arc2" and "arc3".
- Using the compass dividers set wider than in the last step, place
the pivot point of the dividers on the intersection of line1 and arc1 and draw arc4 and arc5 as depicted.
- Repeat the last using the intersection of line1 and arc3, drawing
arc6 and arc7.
- draw a straight line connecting the intersections of arc4, arc6
and arc5, arc7. This is line2. Line2 will be drawn through the center mark and will be perpendicular to line1. Line1 and line2 divide the paper into 4 equal quadrants.
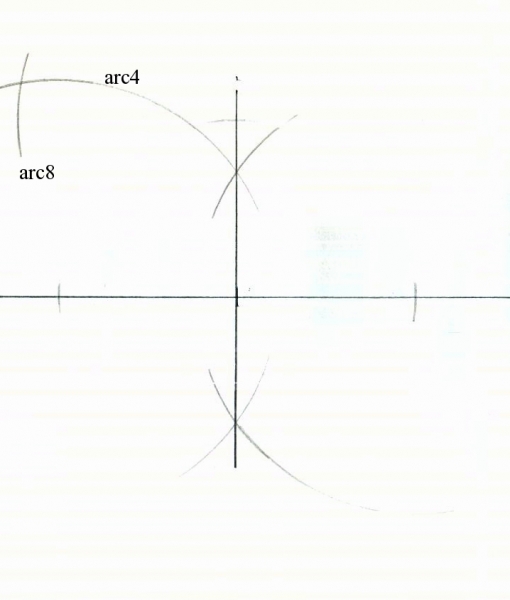
- Using the compass dividers continue arc4 as depicted.
- Using the compass dividers set to the same width as in the last
step, place the pivot point of the dividers on the intersection of line2 and arc2 and draw arc8 as depicted.
- Draw a straight line through the intersection of arc4 and
arc8 and the center mark. Continue the line through the center mark and into the next quadrant. This line bisects the right angles and equally divides the two quadrants.
- Repeat the above two steps in the next quadrant clockwise.
- The paper is now divided into 8 equal segments.
- Set the width of the compass dividers to the desired length from
the center of the octagon and a point of the octagon. Place the pivot point of the dividers on the center mark and draw a complete circle.
- Now draw straight lines connecting adjacent intersections of the
above circle with the lines previously drawn.
- You have a perfect octagon - well depending on how careful you
were in drawing the lines, arcs and circles.
Trace the pattern on the fabric and cut out the rough patches. You will need 12.
Fold the edges over and sew flat. The patches will be sewn with this side against the mesh. The patches will be sewn in the same positions as the tie off bars and pack clips were for the overcover.
Cut a patch in half, hem the new edges and sew half a patch on both sides of the netting at the middle of each end of the main body, sandwich the netting for the inside and outside attachment loops. The newly cut and hemmed edge of the patch should be 1" away from the edge of the mesh.
Now sew the loops for attaching the main body to the ridge line and for the clothes line inside the bug netting.
This is done the same as was done for the overcover. Treat the seam allowance line the same as the fabric edge of the overcover.
Do this on both ends of the main body of the bug netting.
Install the clothes line in the same manner as for the overcover. See the directions there if needed.
Next the pack clips and the edge tie off bars need to be positioned and sewn to the bug netting main body.
The pack clips and tie off bars are positioned in the exact same manner as for the overcover. Refer to those directions to do this. You can probably use the same position measurements as used for the overcover or very close to those.
Once the positions for the pack clips and tie off bars have been determined, sew the octagon patches in place centered on the positions marked.
For the tie off bars on the edge of the bug netting, fold a patch in half, sandwich the netting between the two halves and sew in place. Sew the tie off bars to the center of the patch on the inside of the bug netting and approximately 1/2" from the edge.
For the pack clips center the patch on the pack clip position and sew in place. Then sew the pack clips onto the patches. The pack clips are sewn in the same manner as for the overcover.
Getting pictures of the patches with tie off bars and pack clips sewn in place was difficult since I used a very dark purple ripstop and dark green grosgrain. Against the black mesh, neither shows well in photos. I as able to get the following photo and doctor it with photo software (GIMP) enough to get somethings somewhat visible:
The pack clips are sewn on the inside of the bug netting.
The following picture shows the bug netting main body installed without the end panels:
If you look very closely in the above 3 photos, you can see, on the left, the shadow of the bug netting through the hammock fabric. The line of the shadow comes down from the foot end accessory ring to a dark patch, and then back under the arc. The dark patch is the octagon reinforcement patch. The first photo clearly shows the bottom edge of the netting is approximately 2" below the low point of the arc.
With the poncho liner as an under quilt:
As you can see, with the clothes line pulled tight, the bug netting is pulled tight down to the hammock webbing and around the arc of the webbing. I like it this way since I have plenty of room inside the netting to sit up and move around and the netting is up out of my face and out of the way.
Once the main body has been made, the end panels are needed.
The end panel ends are made the same as the draft stoppers described above with 1 exception:
a constant 1" seam allowance is made on the sides of the triangular upper part.
The bug netting end panels are illustrated below: (Unfortunately the markings are difficult to see and I could not make them any clearer with photo manipulation software)
The belly bands are made and attached to the end panels in the same manner as for the draft stoppers.
Part 6


 Reply With Quote
Bookmarks