Page 1 of 2 12 LastLast
Results 1 to 10 of 12
  1. #1
    Senior Member TeeDee's Avatar
    Join Date
    Jan 2007
    Location
    Maryland
    Hammock
    DIY Bridge
    Tarp
    DIY 10'x11'
    Suspension
    Whoopie Slings
    Posts
    1,628
    Images
    300

    My new Bridge Hammock hanging system

    I have submitted the following as part 8 of my Bridge Hammock system Article. I am posting here so that you can read it now. I submitted as a new part of the article so that people will be able to find it easily in the future if they are interested in it.

    Recently in hanging the Bridge Hammock, I was looking at the suspension ring at the apex of the suspension triangle and wondering why should the suspension triangle be permanently tied to the ring. What would happen if it wasn't. Then I remembered past experiments with using a tree to tree line and hanging a hammock from the line with Prussic loops. The Prussic knots didn't work well unless the tree to tree line was at least 0.25" diameter and preferably 0.5" diameter in order for the Prussic loops to work well.

    Then it occurred to me to replace the Prussic knots with the suspension ring and I had the same thing. The rings don't slide on the tree to tree line like the Prussic knots did, but they hold a lot better. The Prussic knots had the advantage that I could slide them to center the hang.

    A big advantage of the tree to tree line was the fact that I could hang the line and then hang the hammock from the line. That simplified things considerably.

    Well I would still have that advantage with the rings, I would just have to shift the line to center the rings.

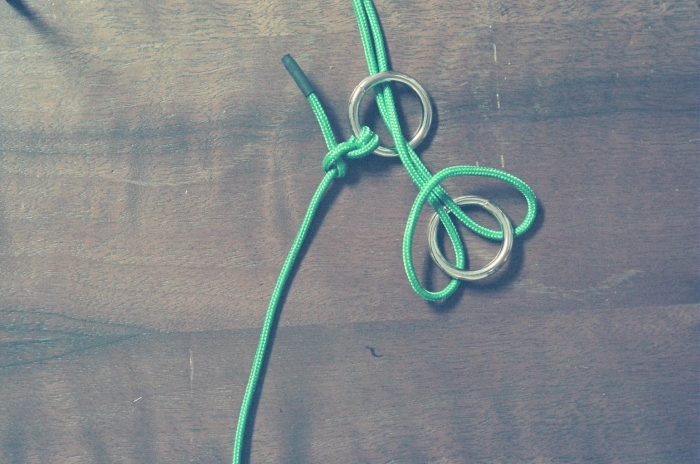
    So I immediately untied the suspension triangles from the suspension rings. I then hung the line, tree to tree and centered the rings. Then I simply passed the suspension triangle line through the suspension ring now hung on the line and used a larks head to secure the suspension triangle line to a stake. Repeated on the other end of the Bridge Hammock.

    Bridge Hammock hung.

    This simplifies the process of hanging the hammock considerably. Instead of hassling with the hammock, the tree huggers (or webbing), getting everything hung from the trees and then centering everything and then tightening, I now just hang the line and center. Less weight to hassle which makes the hanging and centering process much easier and less hassle. Then hanging from the line using the rings and larks heads is extremely simple and easy.

    So I have now modified the hanging, take down and storage process accordingly.

    I have 2 sections of the 2.8 mm Spyderline suspension line tied to 3/4" ID Stainless steel rings with the Crystalyne ridge line in the middle, i.e., from left to right I have 15' Spyderline, SS ring, ridge line, SS ring, 15' Spyderline.

    Hang the Spyderline and ridge line tree to tree.

    Grasp the suspension triangle line at one end of the Bridge Hammock, find the middle and thread the middle through one of the rings on the tree to tree line. Double the loop back on itself and pass a stake through the loop formed, making a lark's head knot on the stake. Make sure that the corners of the hammock are even and tighten the lark's head knot on the stake and let the stake fall back on the ring. That end of the hammock is now hung.

    Repeat on the other end of the Hammock.

    Done.

    I can use various methods of attaching the suspension triangle to the ring:
    1. separate knots - instead of a single line from bar ring to bar ring, I can use 2 lines and tie each separately to the suspension ring on the tree to tree line. I eliminated this method quickly as cumbersome. It is much more difficult to ensure that both sides of the triangle are equal. I have to tie 2 knots and then untie 2 knots. More work and more knots and more error prone.

      Thus, I use a single line from bar ring to bar ring. Then simply thread the middle of the line through the suspension ring and tie with a lark's head to a "toggle" which holds the line to the ring. Getting equal lengths on the suspension triangle is a trivial matter taking a second or two, before tightening the lark's head.
    2. stake - use a tarp stake as the toggle holding the suspension triangle to the suspension ring. Here it is with a Titanium nail used as the toggle:


      Since I carry 2 of these anyway, it is no added weight. I use the nails to pound holes in frozen or hard ground for regular Titanium stakes. Save bending the regular stakes. Weight per stake: 12 grams each, total 24 grams
    3. ring - I can use 3/4" ID nickel plated steel rings for the toggle:


      Weight 5 grams each, total 10 grams.
    4. scrounged toggle - or I can scrounge a section of branch, say 6" long, trim and use this as a toggle:


      I have to ensure that the wood is sound, not rotten or brittle. Also, I have to use a small suspension ring, like the 3/4" ID Stainless Steel ring. Using an SMC descending ring with a 1.5" ID would increase the bending force on the wood toggle and maybe cause failure. Since the SMC descending ring and the Stainless Steel ring are the same weight, there is no weight penalty using the stainless steel. Actually, the Stainless Steel ring is 1 gram lighter than the SMC descending ring.

      Also, I personally would not trust any branch less than at least 1/2" in diameter.

      Carry weight: zero grams - can't get any lighter unless you can find an null-gravity device at Lowes or Home Depot.


    So I have several options for securing the suspension triangle to the suspension ring. The heaviest option is the Titanium nail, but I carry those anyway. If you don't and don't care to spend the money to buy them, then the nickel plated steel rings are a good option and very light. Available from McMaster-Carr in boxes of 10. The lightest option of all is the last, actually zero carry weight - scrounge a wooden toggle from the ground. This is the riskiest option: you may not be able to find suitable wood for toggles, and the wood you do find may have hidden defects leading to failure.

    So here is the Bridge Hammock hung with the new method and using a wood toggle:


    I have used all three of the options and will in the future. All three work very well.

    Since the ridge line and suspension triangle lines are now stored separately, the problem of line tangling has been eliminated. Thus, the two section snake skins I used before are no longer necessary. Also, the curly laces are no longer necessary either.

    I have switched to a single "snake skin". It really isn't a snake skin, but what you would get by mating a double ended stuff sack with a snake skin. A constant diameter tube with draw cords on both ends: a "double ended stuff skin". Instead of 2 skins as for regular snake skins, only 1 stuff skin is used and for the Bridge Hammock it doesn't taper like a normal snake skin, but has a constant diameter. Very easy to make and use.

    When taking the Bridge Hammock down, I simply remove the spreader bars/hiking poles, and drop the bug netting or overcover into the hammock. Then I pull the suspension line in the suspension ring to pull the hammock out more straight and use a half hitch to hold. Do the same on the other end. Then pull the single "stuff skin" the full length of the hammock leaving the triangle suspension llines exposed. Cinch the draw cords on both ends. Untie the suspension triangle from a ring, walk to the other end and untie that suspension triangle line from that ring. Hammock is down. Take down suspension and ridge lines and I'm done except for putting the hammock and line away.

    Bridge Hammock in the single "stuff skin":


    This image shows the end of the stuff skin with the draw cord securing the end:


    This image illustrates how I pull the suspension triangle line and secure with a half hitch before pulling the skin to enclose:


    This image shows the skin stored on the suspension triangle:


    Note that with the new method of hanging and storage, using a Black Bishop bag is now the same as using the skin for hammock storage.

    Either work equally well.

  2. #2
    Senior Member GrizzlyAdams's Avatar
    Join Date
    Apr 2007
    Location
    Illinois
    Hammock
    GrizzBridge Ariel
    Tarp
    HG Cuben Winter
    Insulation
    DIY UQ
    Posts
    4,777
    Images
    564
    Hi TeeDee--
    funny you should bring that up. About a month ago, with Dutch's help, I cooked up a way of doing the same thing, see this post.

    I've really like being able to clip and unclip the hammock from the suspension. In fact I depend on that for sliding my hammock sock over the hammock easily.

    But what is needed is a way that will do the same thing with a trip to Lowes. I was going to toy around with this the next chance I got, but you've gone and done it. good stuff.

    Grizz

  3. #3
    Senior Member TeeDee's Avatar
    Join Date
    Jan 2007
    Location
    Maryland
    Hammock
    DIY Bridge
    Tarp
    DIY 10'x11'
    Suspension
    Whoopie Slings
    Posts
    1,628
    Images
    300

    Second reason for posting here

    Actually there is another reason I posted here also.

    It occurred to me that this method could be used to hang any top loading hammock, simplifying the hanging of any top loader.

    All that would be needed for a top loader, would be a simple loop, say 6" to 9" long on each end of the hammock. Secure the loop to the suspension ring on the tree to tree line using a toggle and lark's head as above.

    People were trying to use Prussic loops on line months back. The Prussics had the disadvantage of requiring large diameter rope which increased the weight considerably. By doubling the diameter of the rope, you get 4 times the weight.

    The SS rings I suggest here are 0.4 oz each, so they add less than 1 oz to the weight.
    Last edited by TeeDee; 12-19-2007 at 18:04.

  4. #4
    Senior Member TeeDee's Avatar
    Join Date
    Jan 2007
    Location
    Maryland
    Hammock
    DIY Bridge
    Tarp
    DIY 10'x11'
    Suspension
    Whoopie Slings
    Posts
    1,628
    Images
    300
    What's that they say about great minds??

    I just got back from a lot of quality time in the woods and will be heading back out for several more months very shortly.

    Having fun.

    Quote Originally Posted by GrizzlyAdams View Post
    Hi TeeDee--
    funny you should bring that up. About a month ago, with Dutch's help, I cooked up a way of doing the same thing, see this post.

    I've really like being able to clip and unclip the hammock from the suspension. In fact I depend on that for sliding my hammock sock over the hammock easily.

    But what is needed is a way that will do the same thing with a trip to Lowes. I was going to toy around with this the next chance I got, but you've gone and done it. good stuff.

    Grizz

  5. #5
    Senior Member TeeDee's Avatar
    Join Date
    Jan 2007
    Location
    Maryland
    Hammock
    DIY Bridge
    Tarp
    DIY 10'x11'
    Suspension
    Whoopie Slings
    Posts
    1,628
    Images
    300
    Quote Originally Posted by GrizzlyAdams View Post
    Hi TeeDee--
    funny you should bring that up. About a month ago, with Dutch's help, I cooked up a way of doing the same thing, see this post.

    I've really like being able to clip and unclip the hammock from the suspension. In fact I depend on that for sliding my hammock sock over the hammock easily.

    But what is needed is a way that will do the same thing with a trip to Lowes. I was going to toy around with this the next chance I got, but you've gone and done it. good stuff.

    Grizz
    I like that very much - multi-use suspension. If you find yourself short of the readies when you hit town, just use your suspension for a cup of tea.

  6. #6
    Dutch's Avatar
    Join Date
    Apr 2007
    Location
    Reinholds, PA
    Hammock
    Bridgeskin
    Tarp
    DIY Blackcat
    Insulation
    DIY Quilts
    Suspension
    Whoopie sling
    Posts
    9,559
    Images
    201
    TeeDee I'm digging this idea, help me understand the use of the second ring.

    It seem like you have to unfasten the suspension triangle from the hammock to get it through the larger ring.
    Peace Dutch
    GA>ME 2003

    www.MakeYourGear.com
    http://dutchwaregear.com[/URL]
    Visit Dutchwaregear on facebook (and like it)
    Check us out on Twitter @dutchwaregear

  7. #7
    Senior Member BillyBob58's Avatar
    Join Date
    Jan 2007
    Location
    Tupelo, MS
    Posts
    11,108
    Images
    489
    Great idea. I need to get a set up like this going for use with my top loader, which I am going to be spending more time in while I continue testing the PeaPod.

    I wonder if a separate single tree to tree line approach would also be more convenient for hanging the tarp, and if that would be weight efficient?
    Bill

  8. #8
    Senior Member GrizzlyAdams's Avatar
    Join Date
    Apr 2007
    Location
    Illinois
    Hammock
    GrizzBridge Ariel
    Tarp
    HG Cuben Winter
    Insulation
    DIY UQ
    Posts
    4,777
    Images
    564
    Quote Originally Posted by Dutch View Post
    TeeDee I'm digging this idea, help me understand the use of the second ring.

    It seem like you have to unfasten the suspension triangle from the hammock to get it through the larger ring.
    I don't think so. Take the suspension rope (two ends attached to the hammock), find the center, and push a loop whose center is the center up through the suspension ring. Now take the 2nd ring and attach to the loop with a lark's head. Nice.

    Grizz

  9. #9
    Senior Member TeeDee's Avatar
    Join Date
    Jan 2007
    Location
    Maryland
    Hammock
    DIY Bridge
    Tarp
    DIY 10'x11'
    Suspension
    Whoopie Slings
    Posts
    1,628
    Images
    300
    Quote Originally Posted by Dutch View Post
    TeeDee I'm digging this idea, help me understand the use of the second ring.

    It seem like you have to unfasten the suspension triangle from the hammock to get it through the larger ring.

    Dutch - it's the same method I use for my ridge line. This series of images show how the two rings work together. The loose ring acts as a toggle, capturing the line and keeping it from slipping back through the first ring:


    Think of the line coming up from the bottom as the ridge line. The suspension line would also be tied to the same ring and lead off the top of the images. You end up with the loose ring lark's headed to the suspension triangle line which would correspond to the doubled line coming down from the top.

    When the rings are the same size or the toggle ring is the larger of the two, the toggle ring can withstand a large force.

  10. #10
    Senior Member TeeDee's Avatar
    Join Date
    Jan 2007
    Location
    Maryland
    Hammock
    DIY Bridge
    Tarp
    DIY 10'x11'
    Suspension
    Whoopie Slings
    Posts
    1,628
    Images
    300
    Quote Originally Posted by BillyBob58 View Post
    Great idea. I need to get a set up like this going for use with my top loader, which I am going to be spending more time in while I continue testing the PeaPod.

    I wonder if a separate single tree to tree line approach would also be more convenient for hanging the tarp, and if that would be weight efficient?
    Bill
    I use a separate ridge line rope for my tarps all the time. Only way I hang my tarps anymore. I use the same 2.8 mm Spyderline. The Spyderline can be either over the tarp or under the tarp. Either way works great. If under the tarp, be sure you put drip strings on the Spyderline on both sides of the tarp otherwise, as Slowhike wisely mentioned once, you may get water running down to the low point in the middle and dripping on you.

    I started doing this for 2 reasons:

    1. safety - I always carry at least 50' of something like the 2.8 mm Spyderline for use as needed. 99% of the time it isn't needed, but when you need a long, strong line for emergency use, you need it. Period. Thus, I use a minimum of 50' of Spyderline for my tarp ridge line. At 3.2 oz for 50' it is cheap insurance.
    2. ease of use. I use a single snake skin on my tarp. It is nothing but a constant diameter tube long enough for the whole tarp. I started with 2 like Hennessy uses, but always ended up with a big air bubble in the middle. Well since my tarp is in the skin, it is just easier to hang everything using that single line. I have a small bowline loop on one end. I clip a micro-carabiner in that, wrap one tree and clip back on line. Walk to opposite tree, wrap and use Figure 9 to tension. I pull as tight as I can. Then pull the skin and unfurl tarp. The tarp itself is connected to the ridge line Spyderline with 2 Prussic loops. Slide Prussic loops to center tarp as desired and pull as tight as desired. Then stake sides. 1 mm Guy line cord works really great for Prussic loops on that 2.8 mm Spyderline. Holds my weight easily.


    So is it weight efficient. Not as efficient as carrying 2 10' sections of Spyderline, but with the 50' I have a big advantage in an emergency. The 2 10' sections will save you about 1.9 oz and cost you big time if you need that 50'.

    Also, if you run across really big trees, the 2 10' sections may not be nearly enough. I've not had any trouble with that 50' not making around trees yet.

    Bulk - the 50' is wrapped around the tarp in the skin. Adds 2.8 mm to the radius of the wrapped bundle. Not noticeable to me.

    Is it easier to hang with the single 50' length than 2 10' sections of Spyderline. It is far easier for me. YMMV

  • + New Posts
  • Page 1 of 2 12 LastLast

    Similar Threads

    1. My Bridge Hammock System - Part 4
      By TeeDee in forum Do-It-Yourself (DIY)
      Replies: 3
      Last Post: 01-22-2012, 17:22
    2. My Bridge Hammock System
      By TeeDee in forum General Hammock Talk
      Replies: 80
      Last Post: 12-13-2007, 08:46
    3. My Bridge Hammock System - Part 6
      By TeeDee in forum Do-It-Yourself (DIY)
      Replies: 0
      Last Post: 12-08-2007, 15:41
    4. My Bridge Hammock System - Part 5
      By TeeDee in forum Do-It-Yourself (DIY)
      Replies: 0
      Last Post: 12-08-2007, 15:36
    5. My Bridge Hammock System
      By TeeDee in forum Do-It-Yourself (DIY)
      Replies: 0
      Last Post: 12-03-2007, 20:53

    Bookmarks

    Posting Permissions

    • You may not post new threads
    • You may not post replies
    • You may not post attachments
    • You may not edit your posts
    •