

...This is good to know...I hadn't noticed it has a thinner end..Originally Posted by stormcrow


...This is good to know...I hadn't noticed it has a thinner end..
Great video, nice tips/mods...looks like a well thought-out rig...I might be incorporating some of your tweaks...
I to enjoyed your video HobieCat. Thank you for posting it.
I've watched this video several times before purchasing my inc, didn't know this was you. Thanks for the vid buddy.
A lot of the tweaks you did to yours aren't required with the new design due to the new differential between head and foot and the addition of the GG loops on the corners to keep the quilt taught without having to tighten suspension. This new quilt should be set it and forget it.
In my case adding a SC would not have helped.
I'm not doing a very good job of explaining this, sorry folks.
The primary SC has been stretched and knotted to where there is only about 4" of stretch left before the SC is fully stretched.
The end SC have been adjusted and I get a seal at both ends. No air is leaking in.
The bottom of my UQ is not equally concaved (hope that's a word).
It is shallower at the foot end for about the length of your legs and deeper where your butt and back goes.
I had the UQ adjusts to far towards my head so my butt was touching the shallow part this left a gap in the UQ to hammock. The ends were still sealed.
When I moved the UQ down towards my feet my butt went into the deeper part of the UQ and the gap went away.
Clear as mud, right, haha
Last edited by OutandBack; 03-12-2011 at 01:02.
haha, the way Adam explained it to me was this:
Your legs don't bend backwards, so if your whole underquilt maintains the same curve throughout to comform to the hammock (the pleating that gathers the ends of the quilt form the curve, depending on how extreme the pleat is) then your least efficient area is around your legs since there will naturally be a dip or sag under them, hence why people started adding the extra SC in the middle of the end of the quilt on the foot ends.
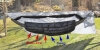
Now that there is a head and foot end differential, he's pulled in the pleats more (shortening the baffle WIDTH, not height... even this isn't exactly accurate but the best I can explain) for the foot area, creating a "platform" (that you can see in the first pic in this thread, you can tell the flat side of the UQ) for your legs and then a "pocket" for the rest of you. Creates a snug hassle free fit.
Picked mine up last night and he dialed it in for me and I can tell you, once it's dialed in (took 2, 3 minutes for the FIRST time dial in?) it's completely hassle free and you can feel the UQ conform to your body, we even tried it at an extreme diagonal to see if you'd move off the quilt or stretch the sides, worked perfectly, regardless of lay.
Last edited by Red Wing; 03-11-2011 at 14:21.
Thank you slo, exactly. If you screw up like I did and your butt is on the leg shelf no adjustment to the suspension will close the gap.
Now that I understand it, it's a sweet design, way to go Adam!
Last edited by OutandBack; 03-11-2011 at 16:52.
 Posting Permissions

 Reply With Quote
Bookmarks