


I think this is the right area for this. Check out my introduction backstory at http://www.hammockforums.net/forum/s...003#post501003. Jump forward a little to a new marriage and a wife who did not want me to put holes in the walls, sheesh.
After all I went through for this stand, it deserves for others to know about the tale, even as a precaution. I set out to build an INDOOR heavy duty hammock stand that could hold more than one person. So naturally most of the store stands are meant for only a single person. I am here to tell ya that they are more fun with more people in them!
So I end up buying the metal brackets to make my own. I coulda sworn I got them from hammocks.com a few years ago but they no longer list them on their site. I get the "4x4" wood from a nearby home improvement store. Needless to say, I NOW know that 4x4 wood is not really 4x4. Anyhow, shims are ALSO needed because the uprights will sway because they are not snug in the metal brackets. Fast forward to a month of indoor use......
'Rethinking What I Had Done'
I begin thinking this was not a good idea. I did not know at the time I bought the wood that it was "treated" and had deadly chemicals in it. For the entire month, my allergies were going haywire. I didn't put two and two together for a few weeks. I went ahead and disassembled it and moved the wood outside. Low and behold, my allergies eased up. To this day, my allergies act up easier than they use to for the past 20+ years. My quality of life has permanently been altered by those chemicals emanating in the air for that month.
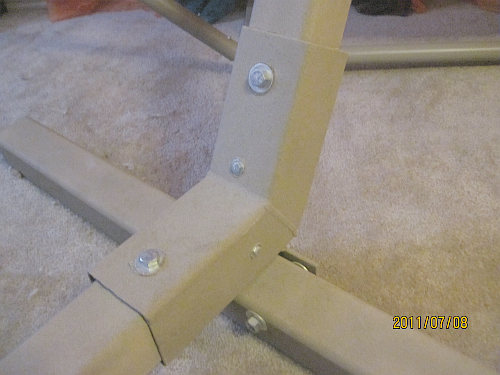
After no longer using the wood, I went to a local iron works company. I got me some 4x4 square tubing cut to the same specs. I can not remember if I drilled holes first or sized them up in the brackets but wouldn't you know it, the square tubing was the exact same size as the brackets! So I go back to the iron works and order the next size smaller of pipe. All together a hundred or so bucks for the first set of tubing and another 200 or so for the second set of tubing. They give me 3.5 inch square tubing.....uhm...and 1/4 inch thick! Oh my, these pipes weigh a ton. The 8 foot length bar at the bottom can not be lifted by one person. The two four foot legs can be carried by one person, carefully. The six foot risers can be dragged by one person.
'Drilling of the Holes'
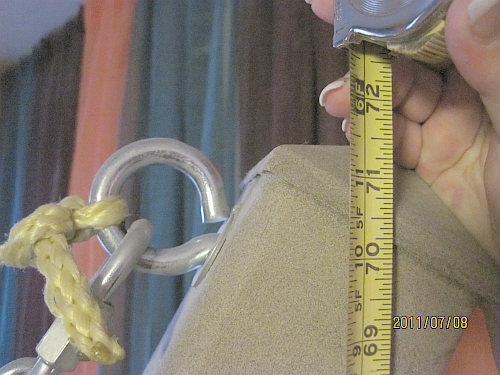
This was an adventure to say the least. I used 1/2 inch bolts to secure everything together. Might as well overkill any project to ensure it is durable, right? So I ended up going through 3 1/2 inch drill bits and a can and a half of oil. Drilling through the 1/4 inch steel with a hand drill is not something I ever want to do again. Yes, you heard me right. A hand drill, and many, many hours of time, over days, maybe two weeks. Each hole (note that a bolt needs a hole on two sides to go through), each hole must have taken over an hour. A brand new drill bit may have taken under an hour, but the steel makes quick dullness of the bits. Did I mention the aroma of the burning machine oil? Takes a little to get use to that. After getting it together and using it a few days, it was obvious that more bolts would be needed to limit the sway of the risers. So smaller holes were drilled in place, while the unit was already together and painted for smaller bolts. I used heavy duty eye bolts at the top for where the hammock would attach to, I did not use the included ones that I had left in the wood.
'Sealing of the Pipes'
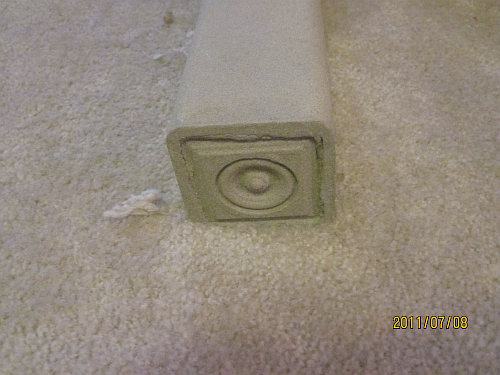
Cutting steel iron requires a lot of oil to keep metals cool. Since this stand was going indoors, I did not want to get machine oil all over the carpet or anything else so I had to seal up the pipes. I mostly used spray foam that is used around windows in new homes. Using spray foam and 100% silicone as glue, I stuck on two wood 4x4 metal caps onto the tops of the riser pipes. I found a decorative 3 inch wooden square that I stuck into the ends of the feet supports.
'Painting of the Pipes'
Preparation involved wiping all the pipes down with paper towels to remove loose oil. I used a nice textured sand color spray paint since it was less likely to show streaks like spray paint normally does. I do not recall how many cans of paint I went through. I stood up the pipes to reduce garage floor space needed to lay cardboard or paper down to protect it from the paint. The painting process must have taken a week to two weeks by itself. I may have started the painting while other pipes were drying the foam inside.
Summary: I had help carrying the pipes inside. This hammock stand currently sports a Mayan jumbo hammock. An unlimited number of people could be supported by this hammock, but the subflooring may not. I have put the stand at an angle in hopes that the two four foot beams go across many boards in the floor for support. It has held up for 4 years, so far so good. The stand can be push tilted up on one end and push/pulled to one side or the other to move it around very slowly. I now have a hammock that is built like a tank, and as heavy as one too. (The one on the left in the picture. Check my gallery for more info on both.)
PS: I have just started getting piping to build another hammock stand that will be lighter than the stand of gods and the jr stand you see in the pics above. I'm trying to eliminate the inherent problems of both (weight, size, bottom crossbar).
")


 Reply With Quote
Bookmarks