Page 1 of 2 12 LastLast
Results 1 to 10 of 19
  1. #1
    Senior Member Ramblinrev's Avatar
    Join Date
    Apr 2008
    Location
    Milton, PA
    Hammock
    Hennessey Explorer Ultralight
    Tarp
    Hennessey Hex
    Insulation
    HH Super Shelter
    Suspension
    ring buckle
    Posts
    7,945
    Images
    101

    Self-End cap Bridge... with B A I T

    A work still very much in progress although I have all the materials except the 15' #5 zipper. I ordered that the other night so it will take a while to get here.


    This is the DIY Bridge that I based on Grizz's Guide with Turkeyboys self-end-caps added along with my own special touches. It is a double layer body so pads can be placed easily. The ends of the hammock are not the same

    Head End:


    Storage Pocket in the head end:


    Storage Pocket Closed
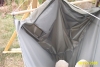


    Foot End:


    The mesh you see in the foot end is my B A I T (Bear Aroma Intensification Trap)

    It is essentially a mesh window, but this way the bears can get a clear odor of what is inside without having to resort to any claws or destructive techniques. Trust me... a good sniff of me and it will be gone.

    It also closes


    Finally... I present for your viewing enjoyment my zipper test jig....


    It would appear the zipper will be fine when installed.

    Thanks for viewing this project. I'll post some more shots when the project is done.
    I may be slow... But I sure am gimpy.

    "Bless you child, when you set out to thread a needle don't hold the thread still and fetch the needle up to it; hold the needle still and poke the thread at it; that's the way a woman most always does, but a man always does t'other way."
    Mrs. Loftus to Huck Finn

    We Don't Sew... We Make Gear! video series

    Important thread injector guidelines especially for Newbies

    Bobbin Tension - A Personal Viewpoint

  2. #2
    Senior Member GrizzlyAdams's Avatar
    Join Date
    Apr 2007
    Location
    Illinois
    Hammock
    GrizzBridge Ariel
    Tarp
    HG Cuben Winter
    Insulation
    DIY UQ
    Posts
    4,777
    Images
    564

    so that's where...

    I was wondering where Dutch's bear got off to, after Mr. T ran him off.

    seriously though, (1) what's the distance between the two spreader bars, and (2) how long did you cut the fabric so that you could pull up the ends to make an end-cap?

    Grizz

  3. #3
    Senior Member Ramblinrev's Avatar
    Join Date
    Apr 2008
    Location
    Milton, PA
    Hammock
    Hennessey Explorer Ultralight
    Tarp
    Hennessey Hex
    Insulation
    HH Super Shelter
    Suspension
    ring buckle
    Posts
    7,945
    Images
    101
    Spreader bars are roughly 7'. If you want a more precise distance I'll measure it the next time it is set up.

    The fabric was 11' unhemmed length.

    A ________________
    |
    |
    |
    B|________________

    Corners A/B are lifted to the ridgeline.

    The fabric had an unhemmed width of 59"

    The suspension arc was cut into the fabric to 80" centered in the length.


    The suspension triangle is like 27" or there abouts.

    Any further measurements you might want I probably don't have in memory.
    I may be slow... But I sure am gimpy.

    "Bless you child, when you set out to thread a needle don't hold the thread still and fetch the needle up to it; hold the needle still and poke the thread at it; that's the way a woman most always does, but a man always does t'other way."
    Mrs. Loftus to Huck Finn

    We Don't Sew... We Make Gear! video series

    Important thread injector guidelines especially for Newbies

    Bobbin Tension - A Personal Viewpoint

  4. #4
    Senior Member GrizzlyAdams's Avatar
    Join Date
    Apr 2007
    Location
    Illinois
    Hammock
    GrizzBridge Ariel
    Tarp
    HG Cuben Winter
    Insulation
    DIY UQ
    Posts
    4,777
    Images
    564
    thanks, I was just looking for a general idea.

    Grizz

  5. #5
    Senior Member
    Join Date
    Aug 2007
    Location
    Chapel Hill, NC
    Posts
    139
    Images
    6
    Ramblinrev --

    This looks really good. How deep is the suspension curve? I've been thinking that I'd make my next one a slightly deeper cut (7") and a slightly shorter length (6'). I"ve been using 5" and 7'. The reason is that I want to make sure the ridgeline is higher so that I have plenty of room, but can still get a flat lay. In my yellow hammock from a few weeks ago, i have lots of head room, but to get the most flat lay, i have to loosen the ridgeline, and tighten the suspension. The combined effect is to lower the ridgeline and make the bugnet closer to my face. I think a shorter length and deeper cut will improve this issue. What do you think, based on how yours is working out?

  6. #6
    Senior Member GrizzlyAdams's Avatar
    Join Date
    Apr 2007
    Location
    Illinois
    Hammock
    GrizzBridge Ariel
    Tarp
    HG Cuben Winter
    Insulation
    DIY UQ
    Posts
    4,777
    Images
    564
    Quote Originally Posted by turkeyboy View Post
    Ramblinrev --

    This looks really good. How deep is the suspension curve? I've been thinking that I'd make my next one a slightly deeper cut (7") and a slightly shorter length (6'). I"ve been using 5" and 7'.
    I've been using 6", but I think I'll go deeper next time, more to make the hammock less tippy than to get more head room (I'm happy with what I've got).

    I too adjust the ridgeline shifting between gathered end and bridge mode, mostly because in gathered end I like sag. If I could get comfortable in the Claytor or Clark style of long and tight, I could use the same ridgeline length for both modes. I tried that at first, but went with the big sag approach in the end.

    Grizz

  7. #7
    Senior Member Ramblinrev's Avatar
    Join Date
    Apr 2008
    Location
    Milton, PA
    Hammock
    Hennessey Explorer Ultralight
    Tarp
    Hennessey Hex
    Insulation
    HH Super Shelter
    Suspension
    ring buckle
    Posts
    7,945
    Images
    101
    Turkeyboy... this is not a DMB... it is a straight bridge. It also is not done yet. I don't have the bugnet on and it won't be on until I get the zipper to attach it. So I really have no clue as to how close the bugnet will be. The other straight bridge I made that my wife uses is done totally differently as far as the end caps and net are concerned. So I can't comment from there either.

    I just build the beasties... I have no clue what I am doing in terms of lie or anything else. If I like it then it is a success, if not then I put a BEEP in it and if I don't completely trash it it is also a success. hehehe

    My arc for this was 80" and 6" deep. Seems to be a nice set of figures for me.I cut all four curves at once. The inner body and the outer body have the same cut but are hemmed differently. The inner body the 1" webbing is folded and stitched in place. It is not channeled. The outer body is simply roll hemmed. Thus there is a difference in the total width of the two bodies leaving an air space for the pads.

    It is quite comfy so far. I really like the lie and the tippiness. It is very stable while I am in it but very easy for me to turn to plant my feet and get out. This little beastie may be my go to hammock of choice for any weather instead of just colder temps. I don't know yet.
    I may be slow... But I sure am gimpy.

    "Bless you child, when you set out to thread a needle don't hold the thread still and fetch the needle up to it; hold the needle still and poke the thread at it; that's the way a woman most always does, but a man always does t'other way."
    Mrs. Loftus to Huck Finn

    We Don't Sew... We Make Gear! video series

    Important thread injector guidelines especially for Newbies

    Bobbin Tension - A Personal Viewpoint

  8. #8
    Senior Member LostCause's Avatar
    Join Date
    Jul 2008
    Location
    Houston, Tx
    Hammock
    WBBB; Bridge in progress
    Tarp
    DIY Hex
    Insulation
    Short UQ/pad combo
    Suspension
    Whoopie Slings
    Posts
    709
    Images
    19
    Good work Rev. I have plans for a bridge but my skills with the gear driven spun fiber injector were not yet at par with the ideas that are in my head so I have yet to attempt it. I've taken the advice of others and have finished snake skins and stuff sacks first. Tomorrow I will attempt the bridge. Wish me luck.

  9. #9
    Senior Member Ramblinrev's Avatar
    Join Date
    Apr 2008
    Location
    Milton, PA
    Hammock
    Hennessey Explorer Ultralight
    Tarp
    Hennessey Hex
    Insulation
    HH Super Shelter
    Suspension
    ring buckle
    Posts
    7,945
    Images
    101
    Lost Cause.... My suggestion is that you follow Grizz's Guide For you first Bridge effort. His wiriting is easy to follow, and more than that... His product is reasonably easy to make and very servicable when you do. Flamingo (my wife) has actually bagged a night in the hammock I made using thiat Guide as a model. Of course... I just had to go and play with the bugnet design. Not sure I made it any better than it was,,, curely made it ni weirse,

    Have fun,,,,, Feed that addiction.
    I may be slow... But I sure am gimpy.

    "Bless you child, when you set out to thread a needle don't hold the thread still and fetch the needle up to it; hold the needle still and poke the thread at it; that's the way a woman most always does, but a man always does t'other way."
    Mrs. Loftus to Huck Finn

    We Don't Sew... We Make Gear! video series

    Important thread injector guidelines especially for Newbies

    Bobbin Tension - A Personal Viewpoint

  10. #10
    Senior Member LostCause's Avatar
    Join Date
    Jul 2008
    Location
    Houston, Tx
    Hammock
    WBBB; Bridge in progress
    Tarp
    DIY Hex
    Insulation
    Short UQ/pad combo
    Suspension
    Whoopie Slings
    Posts
    709
    Images
    19
    I have read Griz's guide, some of TeeDee's guide, and have read over Rev's and Turkey's mods and I think I'm ready. It's far from knowing I'm ready, but I have half a bottle of Jameson's to help bolster any confidence issues. I had better get some sleep... today is a big day for me!

  • + New Posts
  • Page 1 of 2 12 LastLast

    Similar Threads

    1. TN>Land Between the Lakes>Bridge to Bridge
      By MedicineMan in forum Trip Reports
      Replies: 34
      Last Post: 12-07-2013, 11:18
    2. Bridge makers: made a cot like summer bridge?
      By Paprika bohlmann in forum Do-It-Yourself (DIY)
      Replies: 5
      Last Post: 02-02-2012, 19:53
    3. SOLD:JRB Bridge & Bridge Specific UQ
      By finskie in forum [SOLD/WITHDRAWN] Items no longer available
      Replies: 11
      Last Post: 08-23-2011, 18:56
    4. Bridge Under Pad Sleeves and Bridge Under Quilt
      By TeeDee in forum Do-It-Yourself (DIY)
      Replies: 13
      Last Post: 04-27-2009, 14:20
    5. Summer Bridge, Winter Bridge
      By Mule in forum Do-It-Yourself (DIY)
      Replies: 9
      Last Post: 09-08-2008, 20:58

    Tags for this Thread

    Bookmarks

    Posting Permissions

    • You may not post new threads
    • You may not post replies
    • You may not post attachments
    • You may not edit your posts
    •