


Recently I was changing/evolving the method I use to attach accessories to my Bridge Hammocks and looking for a simple, quick and easy method to do so.
In scrounging through my wife's sewing notions I noticed a card of "hooks", or what I have seen referred to on the forums as "bra hooks", since that is where a lot of people have seen them used. As soon as I saw them I remembered Dutch's use of them and the bulb turned on.
Well, as soon as I sat down to sew the first hook in place I recognized a big problem - sewing them in place. There are basically 2 ways to sew the hooks in place:
- by hand
, or
- by machine
Now I'm lazy, very, very lazy, and in reviewing the number that I anticipated using (more than 1
), I quickly realized that there was no way I was going to sew them by hand. So I needed a quick and simple way to sew the hooks with the sewing machine.
After a few minutes reflection on the subject I quickly realized that using my sewing machine was not only possible, but would make the use of the hooks easily possible.
In order to sew the hooks with the sewing machine, you need a machine with 2 things:
- zig zag stitch
- a means of lowering the feed dogs
Not all machines have a zig zag stitch, but all machines I have ever seen do have a means of accomplishing the second necessity.
Once you have both requirements, you need to decide on the size of the hook you are going to use (I have seen only sizes 0, 1, 2 and 3, 3 being the largest) and then experiment to determine the width of the zig zag stitch needed to span between the eyelets/holes of the hook. I use a #3 size hook. My machine has numbers ranging from 0 to 4 for the width of the zig zag stitch with 0 being a straight stitch and 4 being the widest. For a #3 hook I can use from a 3 to 4 width on the stitch width. I usually just crank the width all the way to 4.
Once you have determined the width of the zig zag stitch you are ready to sew the hooks in place using your sewing machine.
First, lower the feed dogs. If you don't do this, the fabric and hook will be moved and you stand a good chance of breaking a needle.
Now you have to position the fabric and the hook under the presser foot to get ready to stitch the hook in place. I have found 2 ways to hold the hook in place to do the stitching:
- hand stitch the hook in place with 2, 3 or 4 stitches prior to placing under the presser foot. The number of stitches used here will vary with the fabric used. On heavy, dense fabric, I have found 2 stitches is usually adequate. On light, thin fabric like silnylon, I usually need 4 stitches.
- using needle nose pliers. Wrap a rubber band around the handles of the needle nose pliers to form a vise. Insert the hook into the needle nose with the open end of the hook pointing away from you and the eyelets/holes out of the pliers.
Now you are ready to position and sew the hook in place:
- With the hook firmly stitched in place by hand or firmly held in the needle nose pliers, position the fabric and hook under the presser foot.
- with the presser foot still raised, crank the machine flywheel by hand to lower the needle into one of the eyelets. move the fabric and hook as necessary to ensure the needle is indeed in the eyelet.
- with the presser foot still up, gage the position of the hook and the needle to try to ensure that the second eyelet is in postion for the other part of the zig zag stitch
- lower the presser foot
- crank the flywheel by hand to make the second part of the zig zag stitch, moving the fabric and hook if necessary to ensure that the needle comes down in the second eyelet.
- once you have made sure the the hook is properly positioned for the zig zag stitch as above,
- run the machine to finish stitching the hook in place.
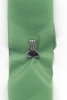
- Use only as many stitches as necessary to hold the hook. Caution: it is easily possible to use far too many stitches that creates a big hump of thread in front of the hook opening which partially blocks the opening and makes it very difficult to use the hook properly. This, of course, is not a problem when stitching the hook in place by hand.
Finished hook:
Using this procedure with the needle nose pliers, it is easily possible with practice to sew a hook in place in much less than 1 minute. It takes most of the time to position the hook and fabric and about 1 to 2 seconds to do the stitches. Far, far, far better than doing it by hand.
Hook used with guy line cord:


 Reply With Quote


")


Bookmarks