

Thanks. It's something I had been meaning to do for a while but just never got around to it. I was adding loops to my Neat Sheet Multi-Quilt and I decided to take the measurements and post the info.Originally Posted by stoikurt


Thanks. It's something I had been meaning to do for a while but just never got around to it. I was adding loops to my Neat Sheet Multi-Quilt and I decided to take the measurements and post the info.
Light thinks it travels faster than anything but it is wrong. No matter how fast light travels, it finds the darkness has always got there first, and is waiting for it." -Terry Pratchett
Today I added a method for measuring and making a top cover pattern at the bottom of post 2. I had had a few request to add this info, so there it is.
I will also be adding a video tutorial on making a roll whip in the very near future. Stay tuned.
Light thinks it travels faster than anything but it is wrong. No matter how fast light travels, it finds the darkness has always got there first, and is waiting for it." -Terry Pratchett
Huzzah!!! Once I get the means together, this design will likely be my first go at a hammock, so I am anxious to see the roll vid! Hey, I was wondering... how did you sew the "tube" at the ends.... what kinda of a stitch? Or does that really matter.
Just a straight stitch, double stitched.
Light thinks it travels faster than anything but it is wrong. No matter how fast light travels, it finds the darkness has always got there first, and is waiting for it." -Terry Pratchett

Any luck on getting the whipping video together?
Most of the video has been filmed, but I am still in the process of figuring out what editing software that I want to use. It has also been a long time since I have edited any video so I have been just playing around trying to get things worked out. It shouldn't be much longer.
Light thinks it travels faster than anything but it is wrong. No matter how fast light travels, it finds the darkness has always got there first, and is waiting for it." -Terry Pratchett

hmmmmmmmm.... i'm new here, it's approaching midnight, I can see the sewing machine from where I am.... saving grace is the lack of fabric in the house! oh, and my replaced HH exped asym on the arm chair.
Might knock one up for the wife though.

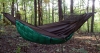
I finally finished my DIY HH (based on headchange4u’s design) but added a few design tweaks, so I decided to revive this post and share the changes. Technically, this is my second DIY HH; but the first one didn’t turn out so well, so we’ll just forget it happened.
To start, here's a couple of general photos of the hammock:

Changed Location of Tie Outs
This is I believe the most useful of the changes made. warbonnetguy had previously made a post that questioned whether or not the HH tie outs were really in the ideal location. The factory HH tie outs are located a little above your elbow and a little below your knee when laying diagonally. By moving the tie outs towards your head and feet you gain more perceived room in the hammock and can lay somewhat flatter.
The exact location may vary depending on your height. I’m 5’10” and found that a location 27” from the center of the hammock to be ideal (versus the factory HH location of 13” from center). When I lay in the hammock, that places the top tie out slightly above my shoulder and the bottom tie out right at my feet. I was by myself when I took these photos so I couldn’t get a good photo of the head; but here’s a photo of me laying in the hammock. Note the position of the tie out.
To determine the ideal location, I set up my new hammock before sewing in any tie outs or zippers. I got some of the cheap plastic clamp-on style tie outs from the hardware store and used them to try various locations while laying in the hammock.
The only downside is that your stock JRB quilt won’t have the ribbon tie out at the proper location. No problem – if you can sew a hammock, adding a ribbon loop to your JRB shouldn’t pose a sewing challenge.
I'm grateful to warbonnetguy for the inspiration for this change. I think it adds a great improvement to the overall HH design!
Tie Out Reinforcements
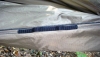
There was a discussion earlier in this topic that questioned whether the factory “tie out triangles” (I don’t know the technical term) helped to form the asym design or helped reinforce the tie outs. I frankly don’t know whether it does either of these; but I do know that adding the triangles back into the design avoided having the zipper make a 90° turn like in the original design. Note in the photo below how much straighter the zipper runs. This should both reduce the possibility of damage to the zipper and make it much easier and smoother to zip and unzip the hammock (especially in the middle of the night). I found that the zipper is even straighter than shown in the photo with when I'm in the hammock (I guess bulk does sometimes help).
I formed the triangles from a double-layer of left over 1.9 ounce nylon. The dimensions are the same as on the HH: 8” wide at the base (where the zipper is sewn) and 3” tall.
The addition of the triangles does add a couple of complexities to the design. First, it makes both edges 2” shorter (I’ll leave the mathematical description of why to the Math Gods on the site – they’ve been a little quiet lately and need something new to discuss). It’s important that you re-locate the center point of the hammock after adding the triangles and before sewing on any zippers or other tie out points.
The second complication will come later when you sew the bug net. Now instead of a simple parabola you’ll have to “chop off” two of the corners to correspond to the triangle. I haven’t sewn the bug net yet so I don’t have a specific solution; but it really should be simple and just involve a couple of additional measurements.
Hammock Length
I made my hammock a bit longer for two reasons. First to gain just a bit more space and comfort. Secondly (and this is probably the real reason) because I’m still a slow and not very good sewer. The zippers I selected were 110” long and I didn’t want to have to shorten them. Thus I calculated my fabric length before sewing as:
110” for the zippers
+ 2” for the “lost fabric” when I sew in the triangles (see “Tie Out Reinforcements” above)
+ 16” for the two ends that are sewn together into a channel, 8" each
+ 2” for the hem allowance, 1” on each edge
------
130” length before sewing
To allow for a little sloppiness on my part, I sewed in the zippers before sewing in the end channels. That way if I was a little long or short on my other measurements, I simply adjusted the length of the channel accordingly.
Combined “Loop Thingy” and Ridge Line
This is a simple one. One loop thingy I made just as described by headchange4u. For the second one, I took a 10’ length of Spyderline and tied two stopper knots in one end (one right at the end, the other about 3” away). The remainder of the Spyderline became my ridge line. I tied a quick link to one end to make the ridgeline removable. I didn’t feel a need to have a quick link on both ends. If I don’t want the ridgeline, I’ll simply remove the one end and let the other hang to the ground.
There’s really no huge advantage to doing it this way. It does produce an overly strong ridgeline and eliminates a couple of knots; but nothing else.
JRB Tie Outs
While I was at it, I decided to sew some webbing tie out points for my JRB quilts. I like these better than the JRB suspension kit. The kit is nice as it requires no modifications to your hammock; but I think the webbing tie outs better positions the hammock and makes it much less likely to become misaligned. I made the tie outs from 3/8” nylon webbing (use a 6’ dog leash for a small dog if you can’t find the webbing locally).
Here’s a photo closeup of the tie out and of the JRB attached to the hammock. I used Niteize small S-biners to attach the quilt to the hammock.
Reinforced End Channel
For some reason, the first time I layed in my new hammock, I noticed a great amount of stress on the seam that holds the channel closed on the two ends. The thread was stretched almost to the breaking point when I put my bulk into the hammock. I solved that by simply sewing some leftover 1-1/2” seat belt webbing I had leftover to the inside of the channel where the stress was. See the attached photo. You can’t see the webbing in the photo; but you can see the stitching that’s holding it.
Summary
Hopefully someone will find at least some of these ideas useful. I really, really like the original design that headchange4u came up with. This is by far the most comfortable hammock I’ve slept in. You'll have to forgive the photos. I haven't figured out yet how to do the nice "pop up" photos that I see in some of the posts.
Last edited by BurningCedar; 10-06-2008 at 00:13. Reason: Corrected my math

Congrats BurningCedar. It looks great. I want to make one for myself too and the triangle side tieout mod i will definitely have in mind. Again congrats.
"This is what i love about backpacking... Just clean your stuff by licking it." - Shug

Really really awesome, BurningCedar!!
Thanks for sharing your ideas for the changes you made... good food for thought since mine is in the planning stages !
You did a wonderful job- it really looks great !
Perkolady
 Posting Permissions

 Reply With Quote


Bookmarks