


There is a thread or two on here asking how you became a hanger. I had forgotten what brought me to this website until I thought hard and determined that it was the end result of the search for a camp chair. Along the journey I came across alcohol stoves and ultimately hammocks and of course Grizz and Shug's videos. Recently a couple of threads came up about camp chairs. First was this one showing a production chair with one leg that was adjustable.
https://www.hammockforums.net/forum/...ad.php?t=79117
This was the second time I had seen the video for this product and I got the idea to use crutches to make the adjustable leg. Someone else on here had the same idea and put it into practice before I could get to it. When I went to pick up a set of crutches I noticed that walkers were the same price ($5) and came with 4 legs, not two. I love to get my money's worth, so I started with that. I constructed a chair using the walker legs as my post.
Along the same time threads were going on about the one-legged camp chair, Pipsissewa showed us how to make a camp chair using an inverted "A" shaped bracket.
https://www.hammockforums.net/forum/...ad.php?t=80367
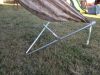
I thought this was a great idea, but wanted to make something that was a little more permanent because where I camp if wood is on the ground, most likely it is rotten and I didn't want to have to cut a tree down every time I wanted to make a chair. I had ended up picking up some crutches anyway and thought I would try to build one out of the smaller tubing that make up the upper part of the crutch. Before I could make the metal version, I needed to make a wood version, so off my son and I went on a hike in the woods around home. Once I had cut the limbs to the correct size I found out how hard it is to lash sticks together and I knew that lashing smooth metal tubing would be even harder. So I decided to use some stainless steel bolts and wing nuts to attach the cross brace. I placed 5/8" dowel pieces inside the long braces at the point where the cross-brace is bolted in to strengthen the tubing at that point. For the tips that are placed into the ground I carved some oak so that I could insert it into the bottom of the tubing. I then drilled through the oak and placed a 6" nail through it. To keep the nail from pushing up into the legs, I welded a washer onto the nail at ground level. I stained the wood to help protect it against the ground and moisture. To tie the two legs together I made a bracket out of sheet metal that would slide over the wooden tips. Ultimately I may replace these with more 5/8" dowels sharpened to stick into the ground, but for now the nails work and take a lot less effort to press into the ground.
The frame weighs about 15.5 ozs. I haven't weighed it with the chair yet. Next will be a carrying case for the pieces. I was happily surprised at how stable this was. If anyone has any questions about how I put this together, let me know.


 Reply With Quote


 W!!! That looks really good! I know--these chairs are crazy-comfortable, right? I'm pleasantly surprised your frame weighs just fifteen and a half ounces---the exact same as my (uncomfortable) camp stool I lug around with me! Thanks for posting.


Bookmarks