


Easier, Simpler Down Top Quilt
After making my Bridge Under Quilts, I decided to make top quilts, but I decidedly did NOT want to repeat the hassle of sewing and filling baffles as with the under quilts.
Since I have dedicated Bridge Under Quilts, I decided that the top quilts would be dedicated also, i.e., top quilts only. This simplified the design considerably in that I didn't have to try and design for dual use.
We've been using a Karo Step comforter on our bed for over 20 years. Originally it was a baffled chamber comforter, but many years back one or more of the baffles tore and the comforter needed to be repaired. The shop which did the repair simply opened the old comforter, sucked out the down and blew it into a new shell. The new shell was a Karo Step shell.
At first I wasn't too sure about this "Karo Step" shell, but have grown to like it much better than a "chambered" design for a comforter. The Karo Step shell has some advantages for a DIY top quilt:
- it is much easier to compute the down needed. For closed chambers you need to compute the down for each chamber. With the Karo step, simply compute the total down needed. Much easier.
- it is much easier to fill the single whole quilt, than individual chambers. With individual chambers you have to weigh the down for each chamber as you are filling the chamber. This adds to the hassle factor. I have designed our Karo step top quilts so that I use whole bags of Ed Speer's down. This makes it simpler and totally eliminates the necessity to weigh anything.
- it is much easier to redistribute the down as needed. Since it is essentially one single chamber, it is easy to move the down around where wanted. This, of course, depends on the placement of the "steps". Some step designs can be very complex and hinder down movement considerably. Depending on the intended use, you may want easy or hard down movement. On the king size down comforter we use on our bed, the loft is approximately 6" with the down evenly spread throughout the comforter. I can easily move the down to cover a smaller area to cover just one person and increase the loft to 9" or more. I think the ability to do this in a down top quilt in a hammock could be valuable.
Karo Step designs range from simple to very complex as evident from the Karo Step designs available from this web site.
When I was designing the Karo step placement, I thought it would be easier to sew the baffles for the Karo steps, than it is to sew the baffles for the closed chambers. I found out otherwise. Sewing baffles the length of a quilt may be slightly easier since you would probably have fewer baffles and long straight lines to sew. Sewing baffles on the width of the quilt would be about the same amount of work. Of course, if you used very few karo steps, then sewing the Karo steps could be much easier and quicker.
Again this depends on the design of the step placements.
There are disadvantages, of course. The most significant being that the down will sift. The amount of shift will depend on the Karo step design. When used for an under quilt, the shift of down could be problematic depending on the step design. I say "could be", since I'm sure that with proper step design the shift could be minimized or eliminated . The ability to shift the down could also be an advantage for an under quilt, enabling the user to shift more down to actual or potential cold spots or, in really cold weather, to spots where more down is needed.
Since ours will used solely as top quilts, this possible disadvantage doesn't really apply for us.
Are there any other possible disadvantages? Not that I currently know about. Maybe others have tried using Karo Step design quilts for camping and can comment on whether they encountered any disadvantages or other advantages of which I am unaware.
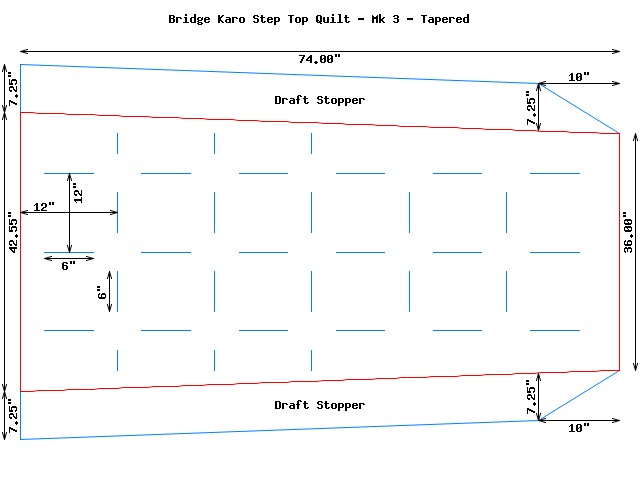
For our top quilts, I could take advantage of the Bridge Hammock design and keep the width of the quilt smaller than would be necessary for use as an under quilt. I determined that the minimum width necessary for a top quilt in my Bridge Hammocks would be 28". This width is just barely usable though. By adding 7.25" draft stoppers on each side to extend the amount tucked under the body on the sides, this width would be adequate, but just adequate when sleeping on the back and inadequate when side sleeping. I've used draft stoppers on our Ray Jardine synthetic quilts and they work very well and I consider them necessary even in a hammock.
I decided that it would be better to keep the draft stoppers and increase the width. Since I purchased the down from Ed in 3.1 oz bags, I decided to use 5 bags, 15.5 oz, per top quilt. This would include a 20% overfill.
I had already decided on a length of 74", a baffle height of 4" and a tapered design with the foot end narrower than the head end. I figured the tapered design would be more efficient use of the down. I worked backwards to compute the head and foot widths of the quilt. The equation for this is simply:
H+F = (2 * c * d)/(o * l * h)
H == head width
F == foot width
c == down fill power, e.g., 900 for Ed's
d == oz of down, e.g., 15.5 for 5 bags
o == overfill factor, 1.2 for 20% overfill, 1.10 for 10% overfill and 1.0 for zero overfill. I used 1.2
l == length, 74
h == loft, 4
Computing the two widths from the fill power, length and loft, I can use any combination of head and foot widths such that their sum is equal to 78.55", i.e.,
H + F == 78.55 == 1995 mm
So with a foot width of 36", I have a head width of 42.55".
This width is considerably more than the width of our Bridge Hammocks from sidewall to sidewall and testing has shown that it provides lots of cover. The coverage has been increased by adding 7.25" draft stoppers on 2 sides that can be tucked under the body to keep the top quilt in place. This is true whether laying on my back or side in a Bridge Hammock.
For a go-to-ground capability, the quilt is still usable for back or stomach sleepers. Side sleeping would be problematic though. When I made my Jardine synthetic quilt, I followed his method for measuring quilt width by laying on my side and measuring from the floor, over upper arm and back to floor. My measurement came to 51". That makes a 42.6" wide quilt inadequate for side sleeping on the ground.
The final dimensions of our top quilt came to 74" x 42.55" x 36" x 4". The draft stoppers bring the head end width to 57".
I used 1.1 oz DWR nylon ripstop from Quest Outfitters for the shell, black and deep purple. The black is 1.16 oz/sq yd and the purple is 1.17 oz/sq yd. For the steps I used plain white nylon Organza from Joanne Fabrics. I constantly receive 50% off coupons and purchased the Organza with one which made it less expensive than noseeum. The Organza comes to 0.8 oz/sq yard which is lighter than noseeum and the same weight as the nanoseeum I got from from Thru-Hiker.
Besides the Karo Step design, I decided to use a box style construction as I did for our under quilts. I wasn't concerned about closing the chamber baffles at the ends for the Karo Step design as I was for the under quilts, but I like the box style better than just sewing the top and bottom layers of the quilt together along the perimeter. The box style allows the down to extend full height right to the perimeter. I did something different for the box design here though. On the under quilts, I used a separate strip of fabric sewed around the perimeter. On the top quilts, I designed the perimeter strip as an integral part of the top half of the shell with a simple 1/8" hem used to give the edge structure. The hem is formed by simply folding the fabric and sewing 1/8" from the folded edge. This used less fabric, was simpler to lay out on the fabric, cut and sew.
The final design consideration was the design of the Karo step placements.
I kept the step placement design simple to facilitate both construction of the shell and filling the shell with down. To this end I simply placed the Karo step baffles to look like a box baffle design. This step design imitated the box baffle design in keeping the down from shifting too much, but is enormously simpler to sew and fill. I used fairly large boxes in my design. If I had made the boxes smaller, it would keep the down from shifting even more.
The steps are are placed as shown:
Note that I cut the bottom shell fabric width to allow for the draft stoppers so that they are not an "add-on".
I also put a draw cord channel on both the head and foot ends. That allows us to snug the head end around the shoulders and form a foot box on the foot end.
I filled the quilt the same way I did the under quilts, by hanging the top of the quilt on a line and filling through a 10" opening the in the head end box seam.
I had envisioned simply opening the bag of down, inserting the open end into the top of the quilt and letting gravity help in working the down into the quilt.
I learned on the first bag that this didn't work too well. First it is probably harder to get the down out of the plastic bag than Ed had getting it into the bag. It took me about 30 minutes to empty the first bag. On the second bag, I was getting impatient and got about 1/2 the bag emptied and some down spilled, more than I liked. I had the foresight to have the vacuum ready and standing by and quickly sucked up the small amount of down that had spilled and blew it into the quilt. I then decided to use the vacuum method for filling the quilt. I finished off filling the quilt with the remaining bags using the vacuum and spilled no further down. Lesson learned: dumping the down out of the large 3.1 oz bags from Ed is not really very simple.
With all 5 bags in the quilt. I simply finished sewing the 10" seam at the head end of the quilt and was done.
Weights:
Shell: 9.05 oz
down: 15.55 oz
Total: 24.60 oz
In stuff sack: 26.25 oz
I've pressed our Ray Jardine silnyl stuff sacks into use for the top quilts. I'll have to make more for the under quilts. We really like the Jardine stuff sack design.
I weighed the bags before opening and again when fully emptied. 4 bags contained 3.1 oz and the 5th contained 3.15 oz, for a total of 15.55 oz of down in the quilt. Zero loss of down. The only thing that would make filling the quilt using the vacuum simpler was if I had a valve so that I could easily switch from sucking to blowing. But turning the vacuum off, moving the end of the hose, inserting the end of the wand into the quilt and turning the vacuum back on isn't too hard.
Here are some pictures of a completed top quilt. I really like the box design. Integrating the perimeter box into the top shell half worked even better than I had hoped. The 1/8" hem gives good structure to the side walls and a well defined edge that accentuates the box structure. I sewed a 1/8" hem on the 4 corners of the sidewall to give good structure to the corners also.
First, the karo steps sewn on the bottom half with the draft stoppers extending both sides:
Here it is hung for filling with the down, there is already one bag in the quilt:
Here is the completed top quilt. It is easy to see the box construction and how it allows the down to extend full loft to the edges:
Here is a closer picture of the corner. You can see how the edge and corner hems give better definition to the edge and corner:


 Reply With Quote


 If I had known ahead of time, I could probably have saved Ed a lot time and had him do a single bag of 15.55 oz.
Bookmarks