

That's good info hikeeba. Thanks for taking the time to explain. Great tip about leaving a nut on when cutting threaded sections with an angle grinder.
I see you took a slightly different approach by having the braces both come from the center.


That's good info hikeeba. Thanks for taking the time to explain. Great tip about leaving a nut on when cutting threaded sections with an angle grinder.
I see you took a slightly different approach by having the braces both come from the center.
Knotty
"Don't speak unless it improves the silence." -proverb
DIY Gathered End Hammock
DIY Stretch-Side Hammock
Stretch-Side "Knotty Mod"
DIY Bugnet
Yes. I did that to minimize the total number of pieces and cuts needed. The design is a tad bit simpler, but it results in a unit that may be less portable.Originally Posted by Knotty


Good Deal Hikeeba!
Watch everyones toes that they don't get pinched under the bottom beam as someone sits in the hammock. Original design had the bottom cross boards a bit more toward the center. This reduced the amount of "squeeze" realized between the bottom of the main beams and the ground surface as weight is applied in the hammock.
I love the Pics!
TrailH4x
Didn't notice a significant amount of flex in the bottom beams when the wife and I were both in the hammock. And with her and the boy in the hammock, my shoed toes still had ample room beneath the beams. Mileage may vary on uneven ground. Also, with someone in the hammock, it is difficult to get close enough as to slip one's tootsies under the bottom beams.

I am surprised that there is not a light weight aluminum camping stand. I am starting to research a stand, which I thought would be a no brainier but it seems not. I would like one that folds down to a small storage footprint, which could be used for car camping.

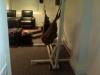
Hey Guys, I followed everyone lead and made my own as I don't have many trees here.
I made it out of 2x4 Pressure treated lumber which makes it a bit heavier at first until it dries fully, but I also used Galvanized and Stainless hardware to weather much better.
I added 7" wheels to the stand that I got from Home depot for $7.50 each and had a trial and error moment with the wheels
This looked and worked great as wheels but it left the lift bar support a bit flimsy. So I ended up putting them on the outside of the assembly:
One continuous 3/8" threaded rod going through I think it was 10" long. Works great!
As you can see in the picture I also added feet to the stabilizers.
Here it is all setup with my zipper modded HH Deluxe and SS.. I slept in there last night as I am on vacation and I didn't want to get in my wifes way as she is not on vacation.. It was great. Slept like a baby.

Nice. Whats the overall measurement from tip to tip? I was thinking of doing one for the sons dorm room at college.
Ambulo tua ambulo.
13' Tip to tip, 8 foot base and 6 foot arms with a 60 degree angle.
4 Foot supports.
Oh and I will mention that I first tried the 6" wheels and they didn't seem to have enough of the tire showing to effectively move the stand.
I LOVE the stabilizer idea. I never thought of putting pads in the outriggers, even though I look at them every day with the cranes we set up at work. Grat addition and thanks for sharing!
 Posting Permissions

 Reply With Quote


Bookmarks