

Very nice job!
What do you think the total cost was?


Very nice job!
What do you think the total cost was?
Trust nobody!

nice work,,, showed my wife and she wants me to build her one... I may just build a double (side by side).

around $75 (no shopping around). #2 pine because (bit short on covered storage space and live a bit a ways away from readily available stocks of other types of materials).Originally Posted by Cannibal

Last edited by TrailH4x; 05-28-2009 at 19:33. Reason: shortening verbiage (I'm long winded).
I'm toying with a similar concept for camping with my son (and a few other newby "elevated ones" in our Troop - they picked a summer camp program for this year with clear cut areas to "reduce" tick and redbug nusances [yeh right!]).
I think we can leave off the bottom footing 2x4's IF guy lines are properly used and reduce the footprint. [Concept: Line stands in parallel and secure side by side upright through adjacent eye bolts with cordage. Outside hammock eye bolts will be guyline secured to tarp tie out stake points. (This is a conept. If you prove it before me let me know. It will save me a few crazy looks from my wife as she walks into our back yard.)]
This is an awsome stand!
I made one a few weeks ago and used it while we were camper camping in a NY state campground.
The only thing I added was a 6" (screw in) eye both at the end of the support, so it would allow me to use my 12'x10' tarp.
Very stable.
On thing I'm going to try, to reduce setup time and reduce transporting footprint.
Is replace the 4 ft bottom footings with 4 -2 ft pieces and mount them as Headchange4u did with hindges.

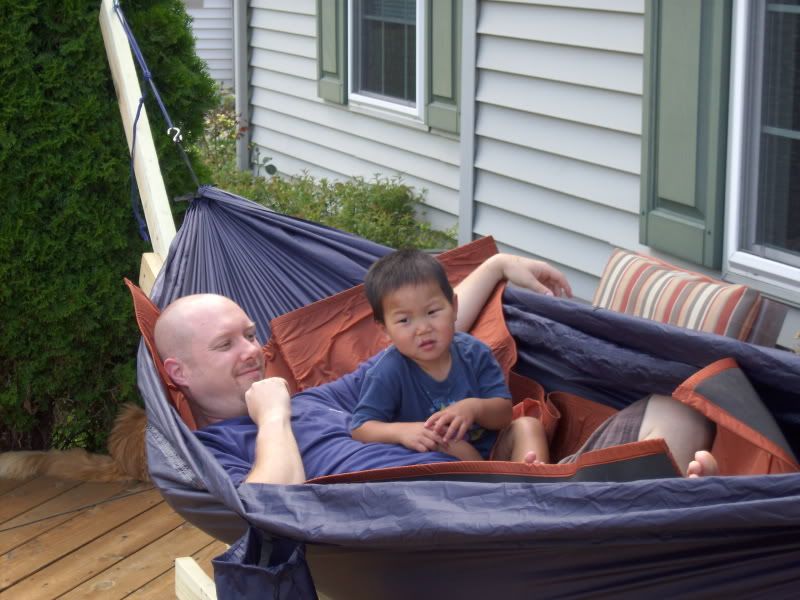
My 10 yr old daughter has been wanting to hang with me, but there just wasn't another set of trees we could setup for another hammock.
This solves the problem. Simply brilliant!!!
Great job TrailH4x !
Thanks for the great writeup, TrailH4x! I tweaked your design and made a less portable version. Completed it yesterday. Here's the first hasty hang:
We live in a relatively new development, so trees of any size are scarce. Now I'll be able to hang anytime. Yay!

Hangin' Burrito and I just put together our first prototype following this design.
Can't wait to hang tomorrow! Thanks for all your hard work.
2015 John Rock Spreadsheet.
"If you find yourself in a hole, the first thing you should do is STOP DIGGING "

Nice work hikeeba & Running Feather.
Have either of you made plans with dimensions that you can share or did you just wing it, trying to duplicate what TrailH4X showed in his pics?
Knotty
"Don't speak unless it improves the silence." -proverb
DIY Gathered End Hammock
DIY Stretch-Side Hammock
Stretch-Side "Knotty Mod"
DIY Bugnet
From memory, as best as I can remember:
I did a combination of measuring and eyeballing. Did a little trial and error before settling on the final setup.
Base is two 8' 2x4s. Uprights and supports pieces are 6' 2x4. Support 2x4s are attached in the center of the base; the hole drilled 1.75" in from the end. The support 2x4s are then attached to the uprights at the 5.5' mark from their base end. Off-hand, I do not recall where on the uprights they intersect. I will check and get back with that info.
Base has two 4' 2x4s placed out near the ends as feet. Feet are attached with 3" deck screws (4 in each; 2 into each base board).
Other hardware is 3/8" threaded rod cut to length with an angle grinder. If you do this, remember to spin some nuts onto the rod before cutting it. Spinning off the nuts will then straighten out your threads. Hardware for the roads consists of a locking nut and washer on one side, and a wing nut, split washer and flat washer on the other side. This setup allows the unit to be disassembled easily if need be. Eye bolts are big eyebolts I found near the clothesline hardware at Home Depot. I think they are 6". All hardware is stainless steel.
The neighbor thinks it is cool, and remarked that she was impressed at how quickly I assembled the stand. Tip: To impress your neighbors, do all your measuring, cutting, and rough assembly in the basement or in the garage.
 Posting Permissions

 Reply With Quote
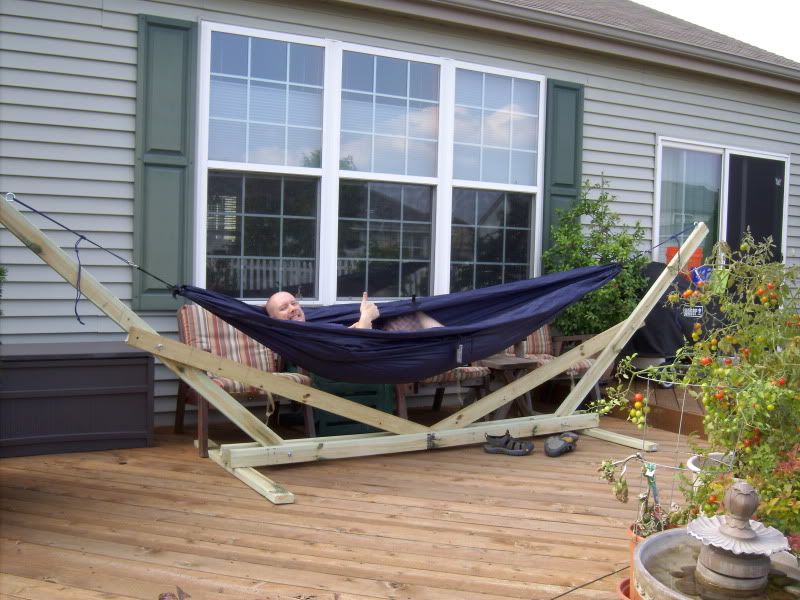
Bookmarks