

i did just about the same thing, never did well in math beyond algebra, i guess not so great minds think alike tooOriginally Posted by slowhike


i did just about the same thing, never did well in math beyond algebra, i guess not so great minds think alike too

Hey Grizz,
That is sweet!!! I especially love the way it connects to the hammock. Just got a bag of down from Ed..... hmmmmm. OK, off to the sewing table. Also love that momentum fabric... a bit dear $$ but light and silky.
Congrats on a well done project.
Shug
Whooooo Buddy)))) All Secure in Sector Seven


i'll have to go w/ dave's answer... since i wouldn't have a clue
I too will something make and joy in it's making
math was never my strong point either, but i can usually find a way to figure things out... that is, if i find it important enough to stay focused on<g>.
one complication that i knew i would run into w/ that diagram when making an underquilt in the shape of a traditional hammock (like the snugfit) is that the diagram only shows a cut away view of the middle of the hammock.
if it's going to taper toward the ends i would need to decide the best way to do that.
but that's another thread... not a problem for the bridge hammock.
I too will something make and joy in it's making

yep, 12 inches / (2 * Pi )
When I was first introduced to this I was astounded that such a large gap would exist over the entire circumference of the earth....but the thing is that the answer does not depend on the circumference of whatever you're extending at all!
Let C be the original circumference, in inches. Then we know that
2 * Pi * R = C
where R is the radius of the earth (or a balloon, for that matter). Now extend the circumference by 12 inches, and you get
2 * Pi * R' = C + 12
for the new radius R'. The distance above the earth (or a child's spherical toy balloon, if you like) that the new string is floating is R' - R.
So
2 * Pi * R' - 2 * Pi * R = (C+12) - C = 12
so
2 * Pi * (R' - R ) = 12
or
R' - R = 12/(2* Pi)
no dependence on C or R at all!
Grizz

That was my answer too
Peace Dutch
GA>ME 2003
www.MakeYourGear.com
http://dutchwaregear.com[/URL]
Visit Dutchwaregear on facebook (and like it)
Check us out on Twitter @dutchwaregear
Grizz I now needlessly know the distance around the equator, thanks.
You may also have made the following obsolete with the success you had with sewn through baffles but let me share anyhow. I made the following prototype out of grossgrain at a 2:1 scale. It is suppose to show a crosscut of differential baffles. It is basically the same as yours except the chambers are sewn together. It is just a tiny bit more weight since you sew through 2 layers and I am putting a small hem (1/4) and sewing through 3 layers. The distance of the top baffle is 4 inches, but that would be 8 to scale. The distance of the bottom or outer shell is 6 1/4 with 1/4 being used up attatching the baffle. So I measure 6 1/4 fold and hem at 3/4 and then measure another 6 1/4 from the last hem. I repeat that for 5 baffles. Then I sew the hems to the top layer at 4 inches (remember 2:1 scale).

Peace Dutch
GA>ME 2003
www.MakeYourGear.com
http://dutchwaregear.com[/URL]
Visit Dutchwaregear on facebook (and like it)
Check us out on Twitter @dutchwaregear
You'll thank me when knowing the answer to that question propels you into winning the grand prize on some TV quiz show.
I wouldn't trust a sewn through quilt like I've done for colder weather.You may also have made the following obsolete with the success you had with sewn through baffles but let me share anyhow. I made the following prototype out of grossgrain at a 2:1 scale. It is suppose to show a crosscut of differential baffles. It is basically the same as yours except the chambers are sewn together. It is just a tiny bit more weight since you sew through 2 layers and I am putting a small hem (1/4) and sewing through 3 layers. The distance of the top baffle is 4 inches, but that would be 8 to scale. The distance of the bottom or outer shell is 6 1/4 with 1/4 being used up attatching the baffle. So I measure 6 1/4 fold and hem at 3/4 and then measure another 6 1/4 from the last hem. I repeat that for 5 baffles. Then I sew the hems to the top layer at 4 inches (remember 2:1 scale).
I thought about designing mine to bring the sides together like you've done, but with double-sided tape you can get from Sailrite and use instead of sewing. I can't figure out how to sew that seam that connects two chambers with my machine when one of the chambers is already connected on the other side. Somehow the chamber that is forming has to get past the machine head....
In the end I figured since I was really aiming at the warmer side of the temperature range I would try to get away with the simpler design.
You should go for it!
Grizz

I would use one piece of material and start working from one side. Sew the material together first, leave enough extra to attach to top panel like you would a baffle, then move on to the next seam (baffle).I can't figure out how to sew that seam that connects two chambers with my machine when one of the chambers is already connected on the other side. Somehow the chamber that is forming has to get past the machine head....
I think I see what you're suggesting. The "sew-through" to attach the complicated wide piece to the simple narrow piece ends up going through two folds of the complicated part---the very bottom of the chamber wall---which is laid out on the narrower piece that goes up against the hammock, like a baffle would.
My problem was due to thinking about doing the sew-through first, and then try to connect the chamber walls. Wasn't working for me.
Your way is the way to connect those chamber walls
Grizz
 Posting Permissions

 Reply With Quote
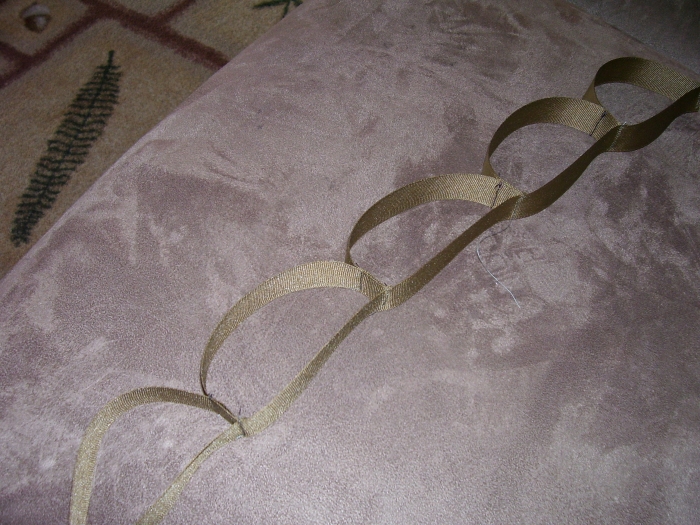

Bookmarks