

I don't think Redoleary uses a flat felled seam on the bottom. It sounds like he only uses it on the side seam and then uses a straight seam on the bottom. I'm looking forward to his pics!Originally Posted by raiffnuke


I don't think Redoleary uses a flat felled seam on the bottom. It sounds like he only uses it on the side seam and then uses a straight seam on the bottom. I'm looking forward to his pics!
Last edited by goatnuck; 11-17-2011 at 20:43.

You are correct sir, just a FFS down the side.
I took pix and a video while making it. Pix will be forthcoming directly video may take a bit to edit. Turns a stuff sack into an all day event when you have to stop at every step to take pix and a video!
Good luck,
RED
My Youtube Channel
Deep peace of the running wave to you.
Deep peace of the flowing air to you.
Deep peace of the quiet earth to you.
Deep peace of the shining stars to you.
Deep peace without end to you.
adapted from - ancient gaelic runes
OK here it goes.
Step 1. However you want to do it figure out how big your fabric needs to be. I tend to SWAG my dimensions but I do like nice straight lines, so pick a dimension and cut out your rectangle.
2. Turns out I didn't shoot this very well. Mark down one side of the fabric a line 2 cm from edge (I know cm's, math in your head is easier with cm's). Fold the edge over to the line and iron its so it takes a good crease. Now take the opposite edge and slide it into the fold you just created. I use barrettes here to hold it together and go sew down the edge of the short fold (you're sewing thru three layers.
3.Now you have a tube with one row of stitching and a 1cm tab sticking up, down the length of the bag.
4. Fold that tab over towards the side with the raw edge of fabric. If you have one put a blindhem foot on your machine and with the folded egde of the the seam riding the guide on the foot sew it down. You'll practically be turning it inside out as you go.
5. Now you have two rows of stitching visible on one side of the sack and only one row on the other side. Watch this video it will help.
Heres what both sides will look like.
I'm gonna spread this out over a couple of posts, cuz turns out there's a lot to it.
Last edited by Redoleary; 11-17-2011 at 19:22.
Good luck,
RED
My Youtube Channel
Deep peace of the running wave to you.
Deep peace of the flowing air to you.
Deep peace of the quiet earth to you.
Deep peace of the shining stars to you.
Deep peace without end to you.
adapted from - ancient gaelic runes
Step 6. Now get a separate piece of fabric that is 4 inches tall, and as wide as your stuff sack is while laid out flat. Then fold the fabric in half and sew it together along the long edge. It is now 2" tall and as long as your sack is wide.
7. With the sack still inside out, insert the piece you've just sewn, into the stuff sack at the bottom end, so its in between the sides of the sack. Shown here still sticking out some, but you want it flush with the edges of the sack.
8. Now sew straight across the bottom with a decent seam allowance, I use 1cm / 3/8". (Turns out I don't have a picture of this.
9. Now measure the the width of the bag and divide by 4 and mark the quarter points along the bottom edge. Once that is done, grab both sides of the sack in the center and pull out basically forming a square. (barrettes are just pointing at the quarter marks)
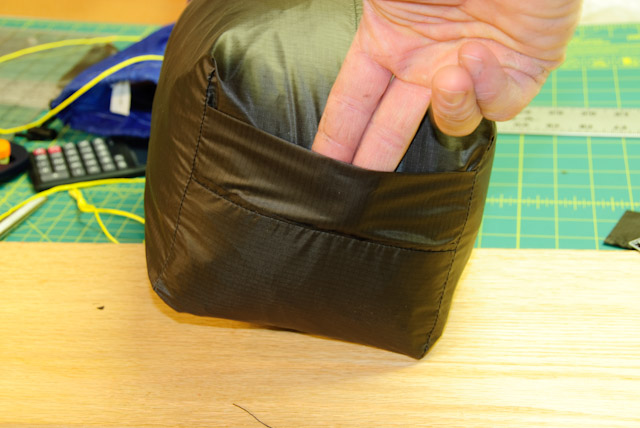
10. Next you will sew across the sack at the quarter points, perpendicular to the bottom seam. After that you will cut off the triangle of fabric outside of the new line of stitches, leave a 1/4" or so.
11. Now turn the bag right side out and you have a square-ish bottom and a little hand hold for when you're removing items from the sack.

Good luck,
RED
My Youtube Channel
Deep peace of the running wave to you.
Deep peace of the flowing air to you.
Deep peace of the quiet earth to you.
Deep peace of the shining stars to you.
Deep peace without end to you.
adapted from - ancient gaelic runes
Step 12. Now for the top. First fold over the edge toward the inside approx 1/4" (sorry for the mix of metric and standard) then measuring down from the fold mark a line at the 2"/ 5cm mark, also, from the folded edge measure down 3.5 cm and put a dot right on the center of the flat felled seam, this is where the grommet will go.
13. Don't have pix of this either.... Take a 6" piece of grosgrain and fold under a 1/4" on each side. Sew on end to the outside of the sack along the edge where you will sew the draw string channel. Now melt a hole thru the bag and grosgrain where you placed the dot and install the grommet.
14. I like to use a zipper foot for this so I can stay away from the grommet. Fold your channel down into place on the inside of the bag and take the free end of the grosgrain and hook it into the fold.. sorry no pix. Now just sew around the bag with on the inside to form the drawstring channel. Once done with that, run some wire thru and pull your drawstring in.
15. Fill it full of "stuff".
Sadly, some of the most confusing parts I don't have pictures of. Not sure I got video of it either. Like I said video could take a few days, unless it terrible then it will never show up
Good luck,
RED
My Youtube Channel
Deep peace of the running wave to you.
Deep peace of the flowing air to you.
Deep peace of the quiet earth to you.
Deep peace of the shining stars to you.
Deep peace without end to you.
adapted from - ancient gaelic runes

Great explanation Red. Wow, the man even has personalized gross grain. I'm not worthy.
Syb
Enjoy the elevation
Thanks Syb. I just like to personalize my gear with my own little logo, you can get it made pretty cheaply at strapworks.
Good luck,
RED
My Youtube Channel
Deep peace of the running wave to you.
Deep peace of the flowing air to you.
Deep peace of the quiet earth to you.
Deep peace of the shining stars to you.
Deep peace without end to you.
adapted from - ancient gaelic runes

Great explanation! Thanks for posting all of the clear pictures, that really helped explain how to make the seam. I really like the addition to the bottom for pulling on.
Thanks raiffnuke, I hope it all makes sense. I'll work on the video and hopefully that will be a bit more clear.... no guarantees tho'
Good luck,
RED
My Youtube Channel
Deep peace of the running wave to you.
Deep peace of the flowing air to you.
Deep peace of the quiet earth to you.
Deep peace of the shining stars to you.
Deep peace without end to you.
adapted from - ancient gaelic runes
I made a stuff sack following the directions in this thread for the flat felled seam and the addition to the bottom. The stuff sack turned out great! There is definitely a size limitation as to how small you can go on a particular thread injector and still make a flat felled seam. The only thing that I had difficulty with is the channel at the top. I know making a channel for a stuff sack is very easy, but I was concentrating so much on the flat felled seam that I waited until the sack was finished before making the channel. I did not use the grosgrain/grommet method; I was just going for the folded corners then roll the hem method. Well, I goofed. I accidently sewed my channel shut all the way around the sack, so I melted a hole in the channel for my cord to run thru. Any suggestions as to how to avoid that same mistake in the future? If I rolled the channel first, I think that would make the flat felled seam more difficult to make...?
 Posting Permissions

 Reply With Quote
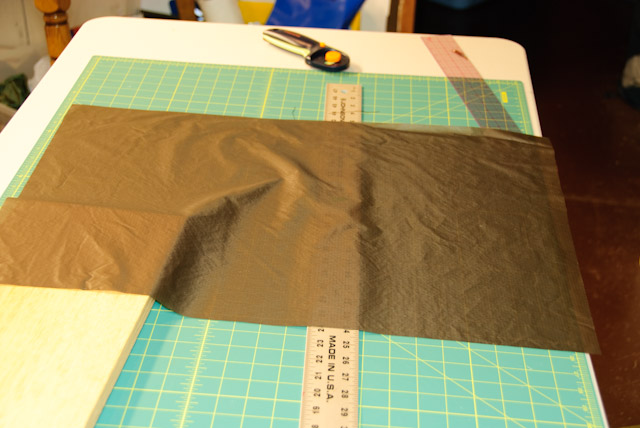


 H.Y.O.H.
Bookmarks