Page 2 of 3 FirstFirst 123 LastLast
Results 11 to 20 of 23
  1. #11
    Senior Member
    Join Date
    Apr 2011
    Location
    jacksonville
    Posts
    192

    Going with the channel end and gather it for strength

    I'm going to do the channel and gather it with the idea I have the option to change it later. I also have looked at knottys postings and pictures and they are being a great help. They are convincing me to go ahead with this project and have fun. Thanks for all the help.

    jim

  2. #12
    Senior Member WV's Avatar
    Join Date
    Feb 2008
    Location
    southeast WV
    Hammock
    DIY
    Posts
    4,820
    Images
    208
    Quote Originally Posted by gargoyle View Post
    A channel is a channel,once made there isnt a real chance of changing the lay of the hammock.

    A gathered end can be adjusted back and forth and tweaked to how you like it.
    I made a channel, then whipped below to gather it. I didn't like the floppy edge of the hammock, so I took it apart and folded down one corner of the end, putting an angle in the channel. Then I restrung the channel and re-whipped/re-gathered. It worked great. Since then I have used this to improve a hammock with a footbox and bungee cord in the sides. I like Demostix's idea of multiple curves on a test hammock for experimentation, but I'm pretty sure you'd need to whip and gather after running the channel to make it strong enough. I'd like someone to suggest the ideal curve for an end channel to give good tension to the edge and the right degree of support under your head. I can do that with my earlier adjustable hammocks that have the end replaced with multiple strings (every 3" along the end, with tiny whoopie slings for adjustment) but they are somewhat laborious to make.

  3. #13
    Senior Member Syb's Avatar
    Join Date
    Nov 2010
    Location
    Charlotte, NC
    Hammock
    DIY bridge hammock
    Tarp
    OES/WB Superfly
    Insulation
    Incubator/Burrow
    Suspension
    WB Straps
    Posts
    1,697
    Images
    44
    Quote Originally Posted by MAD777 View Post
    Syb, how many lines of stitching do you use on your channels? And do you double over the fabric, or what? Inquiring minds want to know.
    I sew a 1/4" rolled hem on the each of the short ends of the hammock. I repeat the process on the long edge (sides) and then go back and don another rolled hem, just shy of 1/2" to create the channel. This has held up well for me. In a sense, yes the fabric is doubled but I'm not sure it matters much because the ball created by the gathering of the fabric creates the "stop" to which your suspension is attached. Does that makes sense? Hmm... would pics help MAD?
    Syb
    Enjoy the elevation

  4. #14
    Senior Member Syb's Avatar
    Join Date
    Nov 2010
    Location
    Charlotte, NC
    Hammock
    DIY bridge hammock
    Tarp
    OES/WB Superfly
    Insulation
    Incubator/Burrow
    Suspension
    WB Straps
    Posts
    1,697
    Images
    44
    Quote Originally Posted by WV View Post
    I made a channel, then whipped below to gather it. I didn't like the floppy edge of the hammock, so I took it apart and folded down one corner of the end, putting an angle in the channel. Then I restrung the channel and re-whipped/re-gathered. It worked great. Since then I have used this to improve a hammock with a footbox and bungee cord in the sides.
    WV, this is giving me some great ideas. How far down did you fold the corner? Did it create too much tension on the long edge? Did your footbox hammock have a bugnet sewn in? Curiouser minds want to know.

    I have 3 hammocks in production right now (doing my best to let my ADD get the best of me) and I want to experiment with your ideas.
    Syb
    Enjoy the elevation

  5. #15
    Senior Member hppyfngy's Avatar
    Join Date
    Feb 2011
    Location
    Weaverville, NC
    Hammock
    Some Gathered End or Other
    Tarp
    DIY CamoHexMonster
    Insulation
    DIY Down UQ
    Suspension
    Whoopies and etc.
    Posts
    3,377
    Images
    36
    Hey Syb,

    Q: Will two people with ADD get more or less done than one person with ADD?
    A: LET'S RIDE BIKES!

    (Apologies to anyone suffering with ADD. I've learned to appreciate mine.)
    Some say I'm apathetic, but I don't care. - Randy

  6. #16
    Senior Member WV's Avatar
    Join Date
    Feb 2008
    Location
    southeast WV
    Hammock
    DIY
    Posts
    4,820
    Images
    208
    Quote Originally Posted by Syb View Post
    WV, this is giving me some great ideas. How far down did you fold the corner? Did it create too much tension on the long edge? Did your footbox hammock have a bugnet sewn in? Curiouser minds want to know.

    I have 3 hammocks in production right now (doing my best to let my ADD get the best of me) and I want to experiment with your ideas.
    Folded the corner down about 3 or 4 inches, I think - maybe less. The triangle might have been 3" - 6" - 6.7" (the fold on the hypotenuse). It does make the edge tight, but not excessively so. I found myself wishing I had a little more tension just inside the edge, so try using 3" - 12" - 12.35" (maybe ... I think ...
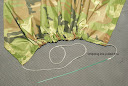
). Without a footbox, you could do the same thing at the other end ... possibly ... if you feel like it ... etc.

    On one hammock there wasn't enough edge tension, so I undid it and folded it again. Gets tough to find the channel after a while when you do that. You're better off guessing right the first time.

    Bugnets were sewn along one edge (right side, foot side) and draped over a bungee ridgeline. The left side was sewn only down to the shoulder tie-out point. The rest draped over the side of the hammock with a flashlight pocket to weigh it down. Make the pocket narrow and deep or you'll spray flashlights around when you flip the netting back to sit in the hammock.

    I used a structural ridgeline above the bugnet so it would be available to tie prussicked UQ support lines to. I'm learning a lot about underquilts recently, simultaneously getting better at them and liking them less and less.

    No pics - it must not have happened. Maybe I dreamed the whole thing. Actually I slept in one of these hammocks pretty comfortably a couple of nights ago, dreaming by then of the next one. Good luck.

  7. #17
    Senior Member MAD777's Avatar
    Join Date
    May 2009
    Location
    White Mountains, New Hampshire
    Hammock
    DIY, WBBB & Switchback
    Tarp
    HG cuben,OES Spinn
    Insulation
    DIY 3/4 UQ/TQ, UGQ
    Suspension
    Dynaglide / Dutch
    Posts
    10,950
    Images
    39
    Quote Originally Posted by Syb View Post
    I sew a 1/4" rolled hem on the each of the short ends of the hammock. I repeat the process on the long edge (sides) and then go back and don another rolled hem, just shy of 1/2" to create the channel. This has held up well for me. In a sense, yes the fabric is doubled but I'm not sure it matters much because the ball created by the gathering of the fabric creates the "stop" to which your suspension is attached. Does that makes sense? Hmm... would pics help MAD?
    Excellent, Syb! Thanks
    Mike
    "Life is a Project!"

  8. #18
    Senior Member MAD777's Avatar
    Join Date
    May 2009
    Location
    White Mountains, New Hampshire
    Hammock
    DIY, WBBB & Switchback
    Tarp
    HG cuben,OES Spinn
    Insulation
    DIY 3/4 UQ/TQ, UGQ
    Suspension
    Dynaglide / Dutch
    Posts
    10,950
    Images
    39
    Quote Originally Posted by hppyfngy View Post
    Hey Syb,

    Q: Will two people with ADD get more or less done than one person with ADD?
    A: LET'S RIDE BIKES!

    (Apologies to anyone suffering with ADD. I've learned to appreciate mine.)
    This is PERFECT for my wife!!
    Mike
    "Life is a Project!"

  9. #19
    Senior Member DemostiX's Avatar
    Join Date
    Jan 2011
    Location
    Like Lewis & Clark: Wintrin' o/t Columbia again: PDX
    Hammock
    Clark w 2QZQ mod,Tropical, NX;Nano
    Tarp
    Clark micro
    Insulation
    Major down
    Suspension
    7/64 SK75 +strap
    Posts
    2,322
    Images
    13
    Quote Originally Posted by WV View Post
    <snip> I like Demostix's idea of multiple curves on a test hammock for experimentation, but I'm pretty sure you'd need to whip and gather after running the channel to make it strong enough. I'd like someone to suggest the ideal curve for an end channel to give good tension to the edge and the right degree of support under your head. I can do that with my earlier adjustable hammocks that have the end replaced with multiple strings (every 3" along the end, with tiny whoopie slings for adjustment) but they are somewhat laborious to make.
    Several interesting things here.

    First, we can be very wrong about materials. If nylon, channels, and contemporary polyester thread were not strong enough, we would not see commercial vendors making hammocks with them. There is no reason to expect intuition about which are strong and strong to what. For example, I couldn't believe that so much rope was being carried on rope until I read about sailing usage, and further that Dyneema (tm) and similar can have no better chafe guard than more of the same, it is that chafe resistant.

    Second, I'll bet there is no predictability on the way the nylon fabric find will behave under the kind of load we apply, and our loads in particular. We don't know what we have, beyond one or two parameters. You need only to look at stretch vs % load curves for rope of different materials to see that. This accounts for such variation in experience, for example of discomfort with the edge. The more reason, I think, and a very strong reason to be able to adjust what you've made to your needs.

    Third, I would much appreciate learning more what you've learned from your multiple whoopie strings along the edge that allow you to shape the effective arc of the end channel and tune your bed.

  10. #20
    Senior Member MarshLaw303's Avatar
    Join Date
    Oct 2008
    Location
    Winona, MN
    Hammock
    11' gathered end
    Tarp
    Hex 11' DIY
    Insulation
    Revolt/Enigma
    Suspension
    Whoopies
    Posts
    383
    I don't believe Syb is talking about a channel end hammock. I believe he is talking about a hammock with a drawcord tube on each end used to whip like WB or Knotty's video. A true channel end hammock would need a much larger channel than 1/2" and it would nee to be heavily reinforced.


    These pics from Knotty's instruction show the end channel used to make the whipping ball or bundle at the end. This is what I believe Syb is talking about. This would not be enough strength for a channel end hammock where the suspension is just put through the channel like on a switchback, DD, grand trunk, claytor ect...

    -Tim

  • + New Posts
  • Page 2 of 3 FirstFirst 123 LastLast

    Similar Threads

    1. gathered/whipped vs sewn/end channel
      By spelt in forum General Hammock Talk
      Replies: 10
      Last Post: 01-11-2017, 10:46
    2. Gathered end hammock vs channel end
      By Ankylosed in forum Do-It-Yourself (DIY)
      Replies: 6
      Last Post: 03-21-2014, 22:12
    3. Will amsteel cut thru end channel?
      By Passinthru in forum Suspension Systems, Ridgelines, & Bug Nets
      Replies: 3
      Last Post: 01-08-2014, 20:56
    4. ENO YouTube channel?
      By Steven Hall in forum Eagles Nest Hammocks
      Replies: 2
      Last Post: 09-06-2012, 14:28
    5. Channel end bridge?
      By TFC Rick in forum Do-It-Yourself (DIY)
      Replies: 1
      Last Post: 08-08-2010, 22:33

    Tags for this Thread

    Bookmarks

    Posting Permissions

    • You may not post new threads
    • You may not post replies
    • You may not post attachments
    • You may not edit your posts
    •