


So a few weeks back I made a DIY hammock similar (but larger) to the Claytor Jungle Hammock. Here's a link to that thread: http://www.hammockforums.net/forum/s...ht=king+jungle
I originally made the suspension with sewn straps through the end channel connected to a pair of rings / straps etc... This worked fine but one of the features of the JH (that BTW I hope I do not need to use) is that by removing the suspension and placing the hammock on the ground it would function as a bug proof bivi shelter. With my suspension system you would have to cut the straps to remove so it took away one benefit of this design. So I wanted a simple system that would connect the JH to a set of rings or cinch buckle as I now prefer that to whoopie slings (YMMV).
I looked at others that were connecting their end channel hammocks to suspensions using a fixed loop for a chain link but did not like the way this connect cinched down on the channel. I wanted a method thast allowed the channel to stay more open and allowed the hammock to somewhat shift and float on the suspension in the channel. That is essentially what the original double strap suspension of the Claytor JH does.
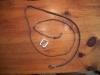
I started with 95" of 7/64" amsteel and measured 30" from the end and made a mark. I then went 40" farther down the line to insert my splicing tool (I use doubled over wire to pull my splices FWTW). I then threaded it down to the mark and exited at 30" from the end. After tapering the end of the line I pulled it back through the core and left it completely buried. Be sure that you don't close the loop all the way though! For detailed instructions look up the soft shackle instruction thread that Opie made as I essentially followed those instructions just much larger. Now at the far end I tapered the end by removing three strands, did a back splice and made my stopper knot just like Opie showed. At this point you have this:
The way a smaller soft shackle is made it places the termination of the bury and the termination of the bury at the backsplice end to end and they end up in the middle of the stopper knot. This keeps the soft shackle bury from sliding out when you loosen the loop to open the shackle. Since in my use the soft shackle is being used as a loop the end of the bury is secured when the loop is secured to the cinch buckle with a lark's head. Once in place the bury will not slip but if you try and loosen the loop prior to securing the lark's head you might pull out your bury and have to start over...
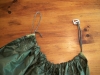
From this point I threaded the loop through the channel and then opened the soft shackle so I could thread the line onto the cinch buckle and form the second larks head. At this point both ends of the soft shackle loop are attached to the cinch buckle. I also attached my structural ridgline to the cinch buckle.
In the last picture you can see the adjustable end of the whoopie sling that I am using for an adjustable ridgeline. That adjustable end conncets to the cinch buckle with a regular soft shackle and the other end has a small fixed loop that attaches with a larks head.
End result, easy to use, easy to remove and lighter weight than an original Claytor suspension.


 Reply With Quote


Bookmarks