Results 1 to 5 of 5
  1. #1
    Senior Member Gailainne's Avatar
    Join Date
    Oct 2007
    Location
    Central Scotland
    Hammock
    DIY Bridge/DD Travel
    Tarp
    Kathmandu/Superfly
    Insulation
    Exped/DIY UB
    Posts
    178

    1st sewing project, Bridge hammock

    After seeing GrizzlyAdams DIY Bridge hammock in the summer at Loch Ken, I was determined to have a go myself, it would also utilise some of the innovative suspension systems that have been discussed recently.

    Because this is just a test piece I didn't want to buy any additional material, just use what was to hand. I had some ripstop, which although slightly stiff and crackly (kite or sail material I think) and bright blue it would suffice.

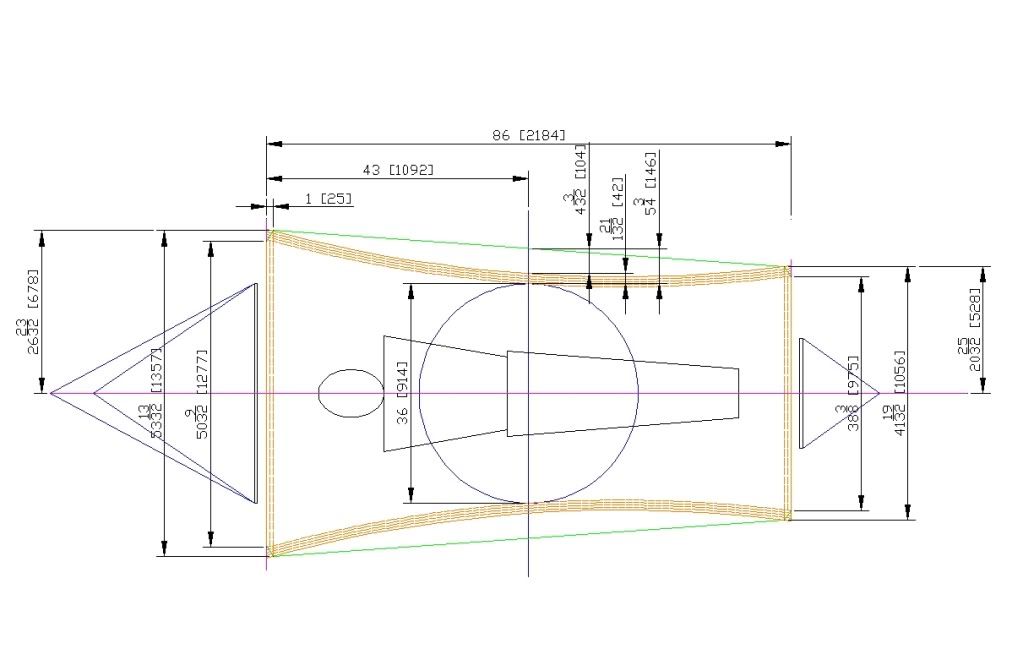
    I used information that Grizz kindly sent me to draw up the design;


    Because it was a symmetrical design, I folded the material before laying the design out, I used a long piece of plastic tubing to get the curve, not perfect but close enough, and cut it out, btw first score to the hammock, those circular cutters are efficient, but they are very sharp.

    Now the bit I was dreading, the sewing, I bought the machine over a year ago, made a couple of stuff sacks, and its been gathering dust ever since.

    I had to reread the manual just to remember how to do the simple things, I also did a lot of searching here and using google to get a better understanding on folds, stitches to use and tension. The ripstop sat there for about a month, before this weekend I decided to get it done.

    Surprisingly it wasn't as bad as I feared, the hardest part was getting the ripstop to stay folded, I ended up ironing it, which was a serious pain and took four times longer to do than the actual sewing.

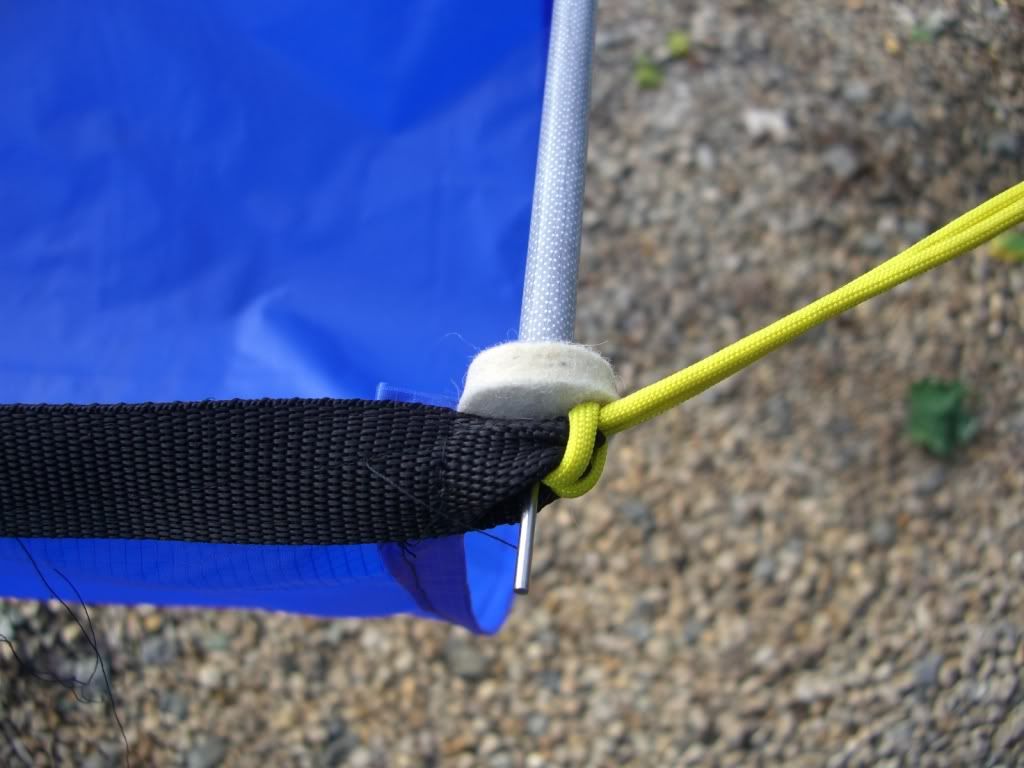
    I used some very strong 25mm wide webbing I had, to create loops at each corner, 250mm long doubled over, to give me a minimum of 100mm to sew in.


    I knew there would be strong stresses local to each corner, and looking at the corners while I am in the hammock, it will as I thought need reinforcing, or a different method of spreading the load.


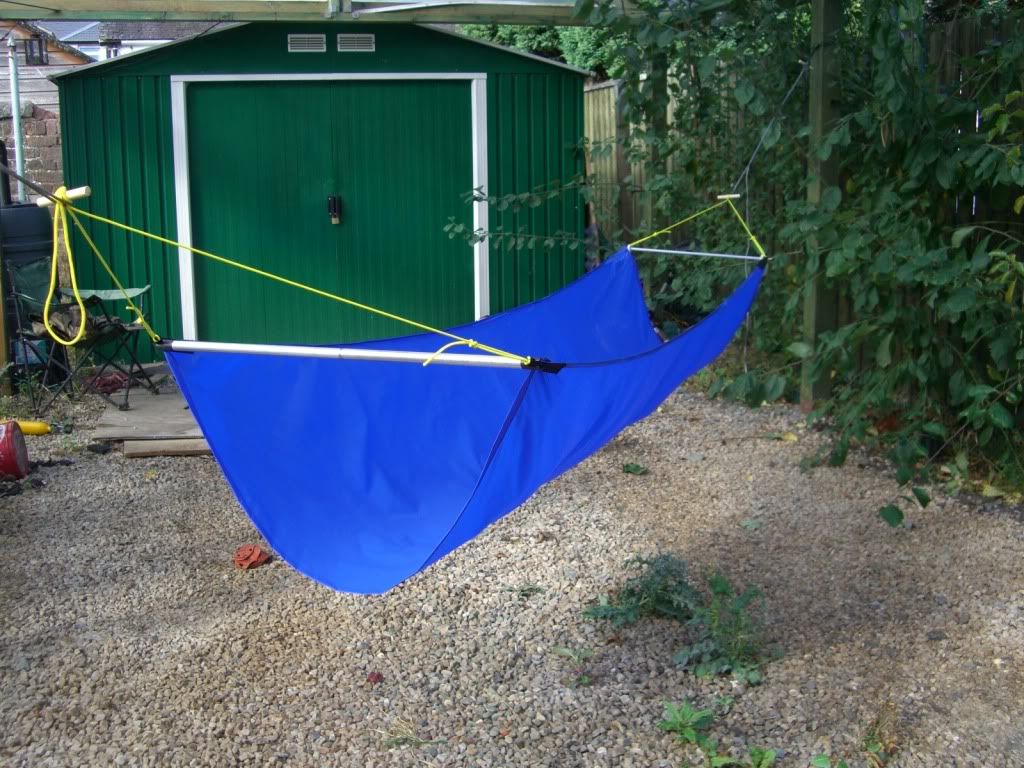
    The suspension system;

    I had had a set of UCR’s made from a ships chandlers and wanted to use them, tree huggers as usual , but I wanted to try the “Marlinspike hitch”. So how to tie the hammock to the UCR’s, the UCR’s as per normal would use the Marlinspike hitch to attach to the tree huggers.


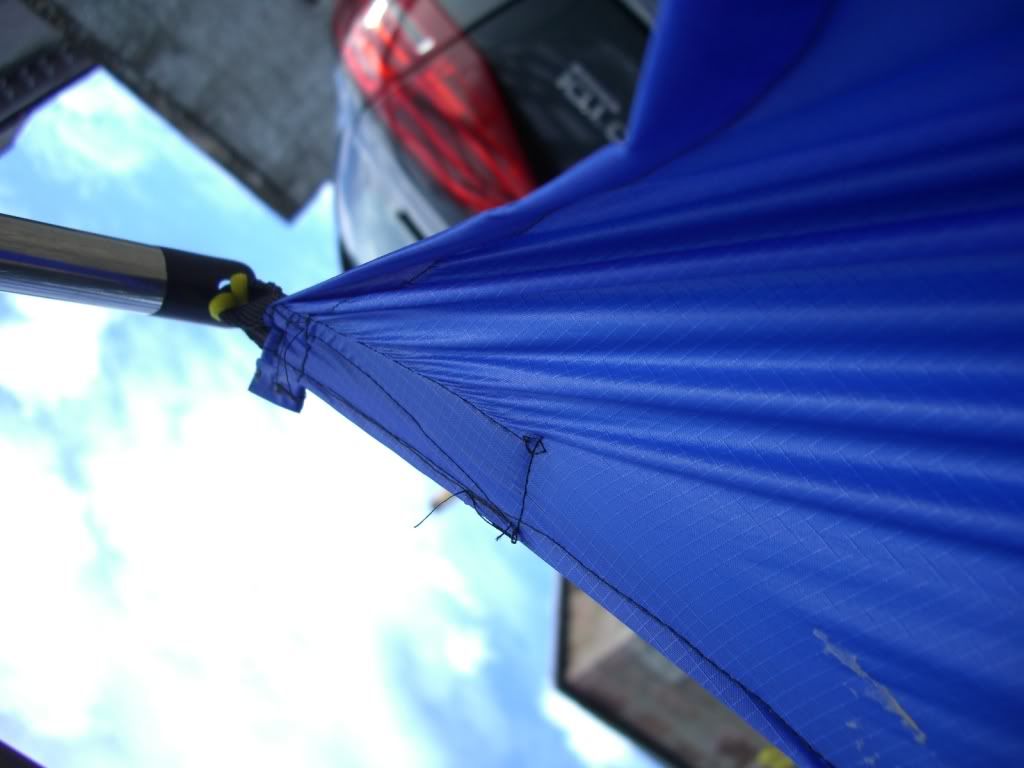
    In the end I kept it simple, use another set of toggles, larks head those to the suspension triangle from the hammock;


    The complete set-up;


    Interesting experiment, I learned quite a lot from it;

    Sewing long straight lines isn’t easy, being one of them !

    I want to say thank you very much to Grizz for freely giving information and dimensions for his Bridge hammock.

    Next, buying the expensive material, and I’m already thinking a down underblanket can’t be THAT hard……..can it ?

    Cheers

    Stephen

  2. #2
    Senior Member GrizzlyAdams's Avatar
    Join Date
    Apr 2007
    Location
    Illinois
    Hammock
    GrizzBridge Ariel
    Tarp
    HG Cuben Winter
    Insulation
    DIY UQ
    Posts
    4,777
    Images
    564
    great job Stephen!
    The hook is set now, isn't it?
    That dust will stay off the sewing machine now.

    Grizz

  3. #3
    Senior Member Gailainne's Avatar
    Join Date
    Oct 2007
    Location
    Central Scotland
    Hammock
    DIY Bridge/DD Travel
    Tarp
    Kathmandu/Superfly
    Insulation
    Exped/DIY UB
    Posts
    178
    Grizz

    Thanks, yeah I've already ordered some breathable coated ripstop, to make a "proper" one, also I used 9mm grosgrain as edging reinforcement on the test piece, its too small, it was difficult to get precise folds with it, and the material twisted, I've ordered some 15mm for the next.

    I will probably be taking advantage of the down group buy from Speers, and making myself a down under blanket that will hopefully fit not only the bridge but my Blackbird as well. I'll be using pertex 4 for that.

    Cheers

    Stephen

  4. #4
    Senior Member Merganser's Avatar
    Join Date
    Mar 2009
    Location
    Apple Valley, MN
    Hammock
    DIY (BASHIN)
    Tarp
    DIY 'winter' tarp
    Insulation
    DIY CS UQ
    Suspension
    whoppie slings
    Posts
    247
    Images
    4
    Say that is a very impressive drawing. What did you use to make that? I'm kind of in search of a CAD program (free/cheap) for doing my design work instead of drawing every thing by hand. Much easier to make changes.

    I like the use of the toggle on the suspension triangle. I use one at the webbing but never anywhere else. I must learn to think outside the box. Is that amsteel blue on the woopie sling?
    Last edited by Merganser; 10-10-2009 at 13:41.

  5. #5
    Senior Member Gailainne's Avatar
    Join Date
    Oct 2007
    Location
    Central Scotland
    Hammock
    DIY Bridge/DD Travel
    Tarp
    Kathmandu/Superfly
    Insulation
    Exped/DIY UB
    Posts
    178
    Quote Originally Posted by Merganser View Post
    Say that is a very impressive drawing. What did you use to make that? I'm kind of in search of a CAD program (free/cheap) for doing my design work instead of drawing every thing by hand. Much easier to make changes.

    I like the use of the toggle on the suspension triangle. I use one at the webbing but never anywhere else. I must learn to think outside the box. Is that amsteel blue on the woopie sling?
    I used an old copy of Autocad, but I think Google do a free 3d drawing tool ?

    Yep here you go, there are others out there.

    I must admit I like the simplicity of the toggles, it means I can separate the 3 components easily, and its very simple to put up.

    They are actually UCR's and its the same family as Amsteel, Dyneema SK-75, breaking load is over a 1000 kg for the 3mm stuff.

    The yellow is paracord, I didn't want to use up the good stuff until I have dialled in the suspension triangle lengths.

    Cheers

    Stephen

  • + New Posts
  • Similar Threads

    1. My first real sewing project, ever.
      By mako231 in forum Do-It-Yourself (DIY)
      Replies: 13
      Last Post: 11-18-2013, 14:10
    2. First Sewing Project! : Hammock Underquilt
      By cmich in forum Do-It-Yourself (DIY)
      Replies: 32
      Last Post: 10-25-2012, 21:27
    3. Second Sewing Project! : Top Quilt
      By cmich in forum Do-It-Yourself (DIY)
      Replies: 10
      Last Post: 09-30-2012, 13:54
    4. Good first sewing project?
      By zetroe in forum Do-It-Yourself (DIY)
      Replies: 11
      Last Post: 08-15-2012, 12:18
    5. My DIY top quilt - first sewing project
      By jofish in forum Top Insulation
      Replies: 30
      Last Post: 10-21-2009, 06:35

    Tags for this Thread

    Bookmarks

    Posting Permissions

    • You may not post new threads
    • You may not post replies
    • You may not post attachments
    • You may not edit your posts
    •