Page 1 of 2 12 LastLast
Results 1 to 10 of 14
  1. #1
    Senior Member Arkwater's Avatar
    Join Date
    Oct 2006
    Location
    Arkansas
    Hammock
    DIY Bridge
    Tarp
    DIY cat diamond
    Insulation
    DIY down UQ & OQ
    Posts
    234
    Images
    19

    First Attempt - Down Underquilt


    I started out by cutting 2 pieces of 1.1 oz DWR ripstop to 48x84 in. and no-see-um netting into 3x48 in. strips. I used a rotary cutter and cutting mat, using a yard stick as a straight-edge.


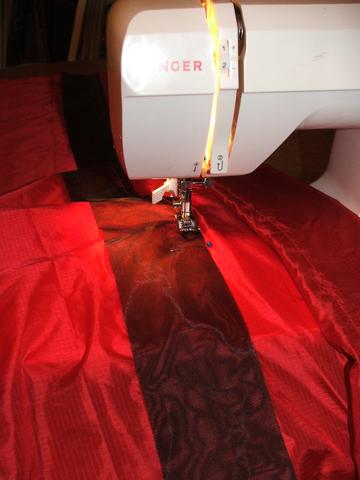
    I proceeded to sew the strips at about 9 in. intervals across one of the pieces of ripstop. I kept the material folded for easier feed thru the throat of the machine.


    After attaching all the strips (8 total) I attached the second piece of ripstop to the first along one short side. Keeping everything folded for ease of feed I then proceeded to attach the sewn strips to the second piece of ripstop.


    After all the strips were attached, one of the long sides and the other short side were closed up.


    Now it was time to break out the down!?!


    I took everything I thought I might need into the bathroom and hung the quilt from the shower rod to make stuffing the baffles a little easier.


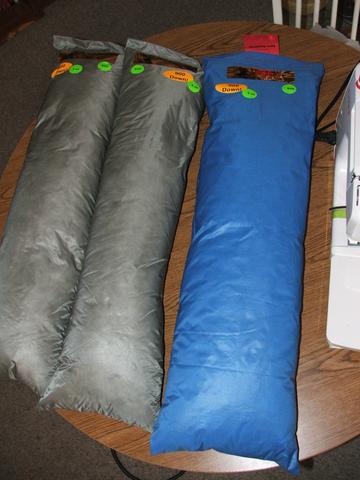
    I measured the down into 28.3 gram increments using the subtraction method. Setting the down on the scales and removing by handfulls and stuffing 1 baffle until the weight of the bag had been reduced by 28.3 grams. This would have worked well if there had been 3 oz in each bag. Although they were labeled 3 oz they varried from 2.5 to 2.8 oz each. All said and done I only had 8.1 oz of down. I paid for 9 . At this point I shuffled down between baffles trying to make them all equal, but after finishing I find that a couple have a little less than the rest. Live & learn!!!!
    At this point I sewed the last side shut.


    Across the short sides I created a drawstring channel using 1.25 in. grossgrain.


    Then using .75 in. grossgrain I finished the long sides.


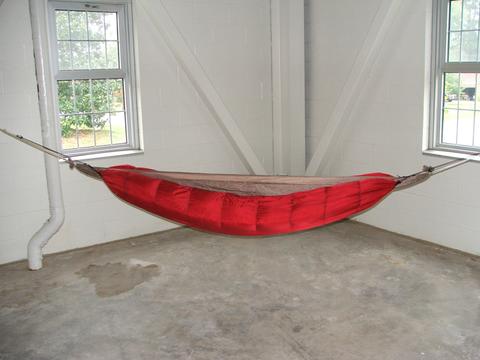
    Here is the finished product!

  2. #2
    Senior Member headchange4u's Avatar
    Join Date
    Oct 2006
    Location
    Kentucky
    Hammock
    Dual Layer WB Blackbird
    Tarp
    OES Cuben
    Insulation
    SnugFit
    Posts
    6,249
    Images
    35
    Nice job. Looks really good. I never thought red would look so good for a underquilt.

  3. #3
    Senior Member Arkwater's Avatar
    Join Date
    Oct 2006
    Location
    Arkansas
    Hammock
    DIY Bridge
    Tarp
    DIY cat diamond
    Insulation
    DIY down UQ & OQ
    Posts
    234
    Images
    19
    Quote Originally Posted by headchange4u View Post
    Nice job. Looks really good. I never thought red would look so good for a underquilt.
    Wasn't sure I would like it either, but I already had the material. Thinking about adding omni-tape and using as a top quilt and making or buying a nother for the bottom. I'm sure the red would just "GLOW" in the woods. Thats if my wife does'nt claim it!

  4. #4
    Senior Member Just Jeff's Avatar
    Join Date
    Oct 2006
    Location
    Charlottesville, VA
    Hammock
    Blackbird
    Tarp
    MacCat Standard
    Insulation
    Winter Yeti, MWUQ4
    Suspension
    Whoopie Slings
    Posts
    7,924
    Images
    32
    Looks great - have you tested it yet? How's the fit?
    “Republics are created by the virtue, public spirit, and intelligence of the citizens. They fall when the wise are banished from the public councils because they dare to be honest, and the profligate are rewarded because they flatter the people, in order to betray them.” ~Judge Joseph Story

    - My site: http://www.tothewoods.net/
    - Designer, Jeff's Gear Hammock / Pack Cover by JRB

    IMPOSSIBLE JUST TAKES LONGER

  5. #5
    Administrator attroll's Avatar
    Join Date
    Oct 2006
    Location
    Denmark, Maine
    Hammock
    Warbonnet Ridge Runner
    Tarp
    MacCat Ultra Spinn
    Insulation
    Warbonnet Lynx
    Suspension
    Straps
    Posts
    3,293
    Images
    45
    How much did it cost you to make the whole under quilt?

  6. #6
    Senior Member Arkwater's Avatar
    Join Date
    Oct 2006
    Location
    Arkansas
    Hammock
    DIY Bridge
    Tarp
    DIY cat diamond
    Insulation
    DIY down UQ & OQ
    Posts
    234
    Images
    19
    Quote Originally Posted by Just Jeff View Post
    Looks great - have you tested it yet? How's the fit?
    Fit is great! may be a little wider than I need but not much. I haven't tested for temp. yet but I expect the rating to be somewhere around 40 deg. I was shooting for 30 but being shorted an oz on down will push it up some. It has just under 2in loft.

  7. #7
    Senior Member Arkwater's Avatar
    Join Date
    Oct 2006
    Location
    Arkansas
    Hammock
    DIY Bridge
    Tarp
    DIY cat diamond
    Insulation
    DIY down UQ & OQ
    Posts
    234
    Images
    19
    Quote Originally Posted by attroll View Post
    How much did it cost you to make the whole under quilt?
    Heres the breakdown:
    Material $10.00-ebay
    Down $81.00-Cottage shop
    No-see-um $2.00-WM
    Thread $2.00-Local shop
    Grossgrain $4.00-WM
    Hardware $1.00-ebay
    Labor 12 hours

    Total $100.00
    Weight 19.89oz

  8. #8
    Senior Member Arkwater's Avatar
    Join Date
    Oct 2006
    Location
    Arkansas
    Hammock
    DIY Bridge
    Tarp
    DIY cat diamond
    Insulation
    DIY down UQ & OQ
    Posts
    234
    Images
    19

    Back yard test

    Tried it last night with a ray-way alpine top quilt in a HH BackpackerUL that came in the mail yesterday. Had a cotton t-shirt, fleece hood, light weight nylon pants & cotton socks. It was 42 from midnight until I got up around 6, with a few breezes. I had moved the down to the center before I got in. I had stayed out side after sunset to make sure I was chilled before I got in. Stayed pretty warm most of the night. Had a couple cold spots when I shifted but not too bad. I think with thermals, warm socks and gloves it would be good to 35 or 36 if the wind was'nt too bad.

  9. #9
    Senior Member Jazilla's Avatar
    Join Date
    Oct 2006
    Location
    Carencro, Louisiana
    Hammock
    Dream Hammock
    Tarp
    Superfly
    Insulation
    20* zepplin/DIY TQ
    Suspension
    Straps/Buckles
    Posts
    1,990
    Images
    108
    Do the grossgrain channels run along the length of the quilt or just at the head and foot?

  10. #10
    Senior Member Arkwater's Avatar
    Join Date
    Oct 2006
    Location
    Arkansas
    Hammock
    DIY Bridge
    Tarp
    DIY cat diamond
    Insulation
    DIY down UQ & OQ
    Posts
    234
    Images
    19
    Quote Originally Posted by Jazilla View Post
    Do the grossgrain channels run along the length of the quilt or just at the head and foot?
    Just across the head and foot. The grossgrain on the sides is just for protection and strength.

  • + New Posts
  • Page 1 of 2 12 LastLast

    Similar Threads

    1. The ERL Attempt
      By Caveman in forum Trip Reports
      Replies: 19
      Last Post: 06-09-2013, 00:42
    2. First DIY attempt
      By tanker0707 in forum Do-It-Yourself (DIY)
      Replies: 8
      Last Post: 01-31-2012, 22:58
    3. My attempt at a sleeping bag underquilt
      By uneekwahn in forum Do-It-Yourself (DIY)
      Replies: 6
      Last Post: 06-20-2011, 00:23
    4. First attempt a DIY
      By Kaminari in forum Do-It-Yourself (DIY)
      Replies: 7
      Last Post: 09-21-2010, 00:03
    5. Replies: 23
      Last Post: 06-16-2007, 19:26

    Bookmarks

    Posting Permissions

    • You may not post new threads
    • You may not post replies
    • You may not post attachments
    • You may not edit your posts
    •