

HANGnOUT,
Nice job on the hammock. I really like how your spreader bars are set up.


HANGnOUT,
Nice job on the hammock. I really like how your spreader bars are set up.
Light thinks it travels faster than anything but it is wrong. No matter how fast light travels, it finds the darkness has always got there first, and is waiting for it." -Terry Pratchett

Thanks HC4U
I have been out hanging in it and like it more than I thought I would. The only thing I don't like so far is how the bars go into the tarp when you get in from the side. I have been sliding in from the end and I can get the tarp lower this way. The bad news is that I tried my Cuben Fiber tarp and it is not going to work.
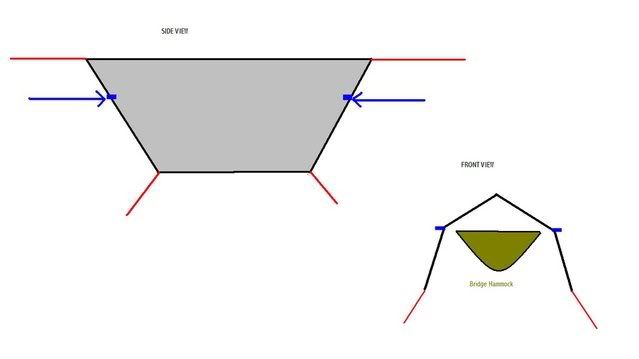
Have you guys that have had problems with spreader bars and having enough room under your tarp tried adding tie outs to your tarp like indicated by the blue arrows below? That way you could pull the tarp out and give you the room you need, where you need it.
Last edited by headchange4u; 12-17-2007 at 21:05.
Light thinks it travels faster than anything but it is wrong. No matter how fast light travels, it finds the darkness has always got there first, and is waiting for it." -Terry Pratchett
I tried this shape and I think it will work best. It does not solve the problem of the bars flipping up when you get in but the shape looks like it will block more wind and rain. The blue arrows would be handling most of the tension so the bottom tabs would only be used to shape the tarp. The stakes and lines on the bottom tabs could be very light duty. If I keep the top of the tarp close to the hammock my cuben fiber tarp covered the hammock fine. It was not going to have adequate side coverage pitched in the conventional A frame.Have you guys that have had problems with spreader bars and having enough room under your tarp tried adding tie outs to your tarp like indicated by the blue arrows below? That way you could pull the tarp out and give you the room you need, where you need it.

So slowhike and HC4U separately suggested, and HANGnOUT tested the idea of using side tie-outs on a tarp to pull its sides out far enough to accommodate the spreader bars on a bridge hammock.
I tried it out on my MacCat Deluxe.
To pull the sides out I used Grip Clips.
The clips ought to be positioned so that when you're in the hammock they are more or less level with the spreader bar.
Caveats
(a) even bringing the tarp down as close as I can to the hammock like this, the hammock is going to get hit by wind-blown rain from the wrong angles. I think the hammock would be fine with sil end-caps (such as I have on my hammock sock) or something like Tim's end-cap, or beaks attached to the ends. I'm thinking about making a couple of beaks.
(b) to pull the tarp out as flat as it needs to be in order to clear the bars and also reach the ground, the side tie-outs have to be LONG. In the photos they are 12'. Not something I'm going to do with a bunch of Boy Scouts charging around.
(c) The Grip Clips slide pretty easily on sil. That means for them to work here they need to have resistance in the direction they are being pulled. This means that you need to pull the tie-out lines away from the center of the hammock so that the tie-outs wedge against the hem on the tarp's edge... so that means you have to stake them out separately, pulled to the side and to the front (alt., back) of the hammock. The footprint of this set-up is pretty large.
(d) Getting in and out means disconnecting a corner stake.
Now I don't have to bring the sides in so close, e.g.
What you can't see from the photo though is that the hammock has less coverage than when it was snugged up as before. But again, some sort of protective end-cap will take care of that.
Next up I'll try this tie-out business out on my comparatively cavernous JRB 11'x10' tarp.
later EDIT : 'tis done. Posted on the JRB tarp thread.
Grizz
Last edited by GrizzlyAdams; 12-21-2007 at 14:25.
Adding beaks to your tarp would give you great weather coverage with only a small addition in weight. The beak would run down from the ridge line to the point to where you have the Grip Clips attached.
Light thinks it travels faster than anything but it is wrong. No matter how fast light travels, it finds the darkness has always got there first, and is waiting for it." -Terry Pratchett
you better believe I've been thinking about that!Originally Posted by headchange4u

A couple of factors here. One is that the suspension lines from my bridge emerge at a much lower height from the tarp's coverage. So a beak will need either to have separate upper and lower portions, or have a deep slit to let the lines out. The other is whether I'm aiming to get "winter tarp" coverage too, meaning going to the ground on all sides. The MacCat Deluxe just isn't big enough for that, but the JRB 11x10 is. Expect I'll make beaks for it first, and as we head into the warmer temps make beaks for the MacCat Deluxe. Geometries are different so these are separate projects.
Thanks for the beak pictures. I'll be all over those. Just watch the "views" count go up on them!
Grizz
I would do them just like T-Back did: separate beaks for each side that seal down the middle with Omni tape.That way the suspension lines could pass through any point of the beaks.
Light thinks it travels faster than anything but it is wrong. No matter how fast light travels, it finds the darkness has always got there first, and is waiting for it." -Terry Pratchett


even if they just tied together at the bottom, there would be very little room for wind or rain to come through the slit, & it would be simpler & lighter.
you could open & close them the way you want by adding cords to one or both of the bottom corners... also reduce flapping.
just a thought.
I too will something make and joy in it's making
The problem is that the tarp does not completely contain the suspension triangle. So I've got two lines coming out of the tarp that have to make passage through the beak. And neither of them is going through the middle!
Grizz
 Posting Permissions

 Reply With Quote


Bookmarks