Page 1 of 2 12 LastLast
Results 1 to 10 of 13

Thread: New DIY Hammock

  1. #1
    Senior Member GvilleDave's Avatar
    Join Date
    Feb 2009
    Location
    Greenville SC
    Hammock
    DIY Camo Cocoon
    Tarp
    Tricked out SWT
    Insulation
    DIY 4 layer IX
    Suspension
    straps & buckles
    Posts
    517
    Images
    185

    New DIY Hammock

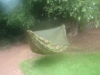
    I just finished my latest DIY hammock. I utilized the HH clone instructions that HC4U posted and modified them based on the instructions from Knotty's gathered end tutorial. Thanks to both of you and all the posters that lent advise in those threads.

    First off - let me say the hammock with an attached net was almost as easy as the simple gathered end & a separate bug net. The hardest part for me was the zipper installation - my advise: go slow & don't stretch the zipper or the fabric - keep them lined up and no big deal. I had to remove and restart on part of the zipper because I did stretch and got my allignment off near the end. Easy fix w/ the trusty seam ripper.

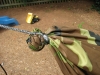
    I made my hammock out of a single layer 1.9 oz ripstop I bought locally. I also found the olive colored insect net at a local army navy store. Given that I am 6'2" I wanted a big, comfortable hammock. I started with fabric 60" wide x 11' 8" and after seams, etc. the finished length is 11' 5". I installed a fixed ridgeline of 108" that connects through the gathered end to the WS suspension.

    Weight:

    Hammock: 22.3 oz
    WS & Straps: 3.4 oz
    Dutch Clips: .8 oz

    Total: 26.5 oz

    Certainly not ultralight but certainly managable considering the large size and added comfort.

    Initial reaction is it lays very flat. In fact I did not even feel the "ridge" under the knees that I often get in my WBBB. Plenty wide, no shoulder squeeze at all.

    I also treated the hammock with Permethrin since its single layer.

    Here are some pics:


    I am really enjoying making my own gear these days. I guess all said and done I have about 6 hours labor in this hammock and about $50 in materials. So if you're counting the value of your time you're better off buying a hammock from a manufacturer like Warbonnet. But, for me I don't count the labor so it feels like a good deal...

  2. #2
    Senior Member NCPatrick's Avatar
    Join Date
    Oct 2006
    Location
    Winston-Salem, NC
    Hammock
    WB Traveler
    Tarp
    Custom OES tarp
    Insulation
    JRB Down UQ/TQ
    Suspension
    Whoopie slings
    Posts
    8,797
    Images
    40
    Awesome job. Nice reminder about stretching the zipper material too. I like this one a lot. Going to have to get back on the gear-making bandwagon myself after seeing what a great job you did.


    "Civilization is the limitless multiplication of unnecessary necessities."
    - Mark Twain
    “I go to nature to be soothed and healed, and to have my senses put in order.”
    - John Burroughs

  3. #3
    Senior Member wirerat123's Avatar
    Join Date
    Apr 2010
    Location
    Guntersville, AL
    Hammock
    DIY DigiCamo Hennessy Clone
    Tarp
    DIY Hex tarp
    Insulation
    Modded CCF Pad
    Suspension
    Whoopies!
    Posts
    432
    Images
    56
    Very nice looking hammock!
    Fulfillment is living a life that makes the lives of others worth living.
    DIY is addicting and fulfilling!
    "If guns kill people, then pencils mispell words, cars cause people to drink and drive, and spoons made Rosie O'donnell fat."

  4. #4
    Senior Member Lonely Raven's Avatar
    Join Date
    Jul 2010
    Location
    Bolingbrook, IL
    Hammock
    WarbonnetBlackbird
    Tarp
    Olive Superfly
    Insulation
    Incubat Dempsey TQ
    Suspension
    Stock Webbing
    Posts
    1,487
    Very nice looking!

    Where did you score that material? My fiance is talking about buying or making a hammock, and that body material would be perfect.

  5. #5
    Senior Member GvilleDave's Avatar
    Join Date
    Feb 2009
    Location
    Greenville SC
    Hammock
    DIY Camo Cocoon
    Tarp
    Tricked out SWT
    Insulation
    DIY 4 layer IX
    Suspension
    straps & buckles
    Posts
    517
    Images
    185
    My local Hancock Fabrics stocks the camo 1.9 oz ripstop. The other colors they had were all pretty bright - blues, reds... Unfortunately it was $7 / yd but since there was no shipping it ended up a better deal than ordering. I will be looking out for a coupon to save next time...

  6. #6
    Senior Member gargoyle's Avatar
    Join Date
    May 2009
    Location
    Muskegon MI
    Hammock
    G-Bird II/Bridge
    Tarp
    Ogee tarp
    Insulation
    DIY TQ DIY Down UQ
    Suspension
    whoopies
    Posts
    6,686
    Images
    45
    Looking good in Gville!
    Ambulo tua ambulo.

  7. #7
    Senior Member Knotty's Avatar
    Join Date
    Mar 2009
    Location
    Denville, NJ, USA
    Hammock
    DIY Stretch-Side
    Tarp
    DIY Cat Cut Hex
    Insulation
    Phoenix and Nest
    Suspension
    cinch buckles
    Posts
    4,377
    Images
    227
    Nice work GvilleDave!

    Tell us about the last pic. Did you smooth out the zipper curve at the tie out by moving the actual tie out point away from the material edge or did you add material inside of the tie out?
    Knotty
    "Don't speak unless it improves the silence." -proverb
    DIY Gathered End Hammock
    DIY Stretch-Side Hammock
    Stretch-Side "Knotty Mod"
    DIY Bugnet

  8. #8
    Senior Member GvilleDave's Avatar
    Join Date
    Feb 2009
    Location
    Greenville SC
    Hammock
    DIY Camo Cocoon
    Tarp
    Tricked out SWT
    Insulation
    DIY 4 layer IX
    Suspension
    straps & buckles
    Posts
    517
    Images
    185
    I added a triangle of extra material that flattened out the turn for the zipper run and reinforced the pull out point. I got the idea from HC4U's HH clone thread - Burning Cedar did the same with his hammock. Here's a pic from his that I used as a guide.

    http://www.hammockforums.net/gallery...&imageuser=456

  9. #9
    Senior Member PKT's Avatar
    Join Date
    Nov 2009
    Location
    WEST PALM BCH, FL
    Hammock
    WBBB DL 1.7 Leftie + Traveler
    Tarp
    MacCat
    Insulation
    DIY Artic KaroStep
    Suspension
    Adjustable webbing
    Posts
    185
    Images
    5
    Nice lookin hanger! and yea thanks for the zipper tip, I've avoided zippers so far but
    that needs to change. What size is that? The pic makes it look larger than most, I like it.

  10. #10
    Senior Member GvilleDave's Avatar
    Join Date
    Feb 2009
    Location
    Greenville SC
    Hammock
    DIY Camo Cocoon
    Tarp
    Tricked out SWT
    Insulation
    DIY 4 layer IX
    Suspension
    straps & buckles
    Posts
    517
    Images
    185
    Thanks PKT - I started w/ 11'-8" long x 60" wide ripstop. After hemming the edges and sewing the channels on the ends the finished length is 11'-5" with a 108" ridgeline. I guess that extra 1'-5" in length really lets this thing open up wide and flat.

  • + New Posts
  • Page 1 of 2 12 LastLast

    Tags for this Thread

    Bookmarks

    Posting Permissions

    • You may not post new threads
    • You may not post replies
    • You may not post attachments
    • You may not edit your posts
    •