

Anyone do a DIY of this:
http://www.mollymacpack.com/box.html
Or something like this? Looking to get the sewing machine rolling and I have some extra silnylon around...


Anyone do a DIY of this:
http://www.mollymacpack.com/box.html
Or something like this? Looking to get the sewing machine rolling and I have some extra silnylon around...

How a bout a pack cover/gear hammock from Just Jeff's site...
http://www.tothewoods.net/HomemadeGe...arHammock.html
"Do or do not, there is no try." -- Yoda

I saw the MMG gear box at Mac's house last Friday. It looks pretty nice.
I've had fabric spread on my floor the past few days where I was going to attempt my own version... but haven't yet. Even after looking the MMG in person, I'm having to think a bit too much about dimensions and how to whip the end without leaving a gap for water to get in when the flap is folded over. Also debating material.
I'm leaning towards a smaller sil flap than the MMG uses, and sizing the whole thing as a pack cover as well. However, I was also thinking of making the body out of nylon (not silnylon) so that any water that gets in can drain out... just making the top flap of sil... but then it won't work as a pack cover.
Decisions, decisions.
I may try both ways and see which I like best.
Edit: I just checked out the link that John posted. I'm liking that design and thinking of adding a flap that can fold over the top when used as a gear hammock. That would mean making the whole thing from sil and abandoning my original though of using regular nylon (which I have much more of).
Last edited by rjcress; 12-14-2010 at 20:27.
"I keep telling myself that if I make perfect seams, nobody will believe that I made it... " -JohnSawyer
My outdoor gear review site http://gear-report.com
Gear reviews, DIY / MYOG projects, Outdoor gear discounts, sales and coupons updated daily
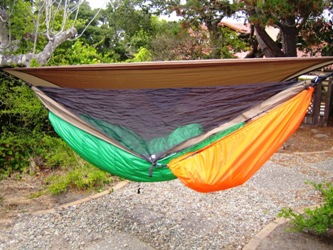
I have been using a covered gear hammock for awhile now. It is similar to the Gear Box, but I am sure the sizes and flaps are different. Admittedly, Mac is a gear genius, and when I saw the weighted pocket he uses I “borrowed” the idea and retrofitted mine with it.
Here is how I have made mine in the past.
Materials:
- 1 – Square piece of SilNylon (Usually 60 x 60 ish) I have used 48 x 48 as well, a bit smaller but works
- 1 – 8” x 12” SilNylon
- 2 – 6 foot 2.2 Zing-It woopie slings with an eye on then end
- 1 – 5’ 2.2 Zing-it woopie sling (Ridge Line)
- 1 – 6” piece of Grosgrain ribbon
Directions:
I will use a 60 x 60 piece of silNylon, so the measurements will reflect it. If I am using a different size main piece I divide the width by 3, and use that number as my cover starting point. Example: If I am using a 48” x 48” piece of SilNylon then I would start my cover at 16” (48 / 3 = 16)
1. Pick a side to be the edge of your cover. Measure 20” down the sides, and 24” across the top to form the angle of the cover. Cut out the triangles on each corner
1.5 (Update) Cut 6" corners on the opposite side
2. Put a ¼ rolled hem around the 8x12 pocket. Leave one short edge un-hemmed
3. Sew the pocket to inside of the cover edge
a. Align the center of the cover edge with the center of the un-hemmed pocket4. Sew a 6” Grosgrain loop to the inside center point of the cover edge
b. Do not sew the top of the pocket closed (Don’t know why I had to say that)
a. Note: Align the raw edge of the grosgrain with the raw edge of the cover & pocket. The loop should be towards the inside. When you put your rolled hem around the bottom edge it will include the cover, pocket, and loop. You can sew the loop pointing out after the hem if you want.5. Put a ¼ Rolled Hem around the entire piece of SilNylon (cover and body)
6. Sew a 2” Channel on both side of the hammock body
a. This is creating a simple gathered end hammock (http://www.hammockforums.net/forum/s...ad.php?t=15205)6.5 (Update) Sew a 2" Channel on the end opposite of the cover for the ridge line to go through. Don't close the ends. I usually cut a 6x6 triangle from the corners
7. Gather and Tie off the ends of the hammock body (Make sure to wrap the cover around the hammock body to prevent water from leaking in.
8. Attach your 6’ woopies to the ends of your hammock body using a Larks head
a. Note: I usually feed the woopie through the channels, loop them around the body once or twice and then tighten the loop in the end. This way I don’t have to tie off the ends separately.9. Attach the ridge line over each woopie sling, and adjust it to preference
10. Done
I usually make a bag out of the scraps, but have been toying with just packing it all into the pocket.
Last edited by WLMiller54; 12-15-2010 at 13:39. Reason: Update directions
- William -
How can a young man keep his way pure? By living according to your word. - Psalms 119:9

hmm.. don't know if this will help- I made a rought approximation of the MMGB with 1 yard of calendered nylon(-scrap suitable for prototyping)
Put channels along the same 2/3rds of both of the long sides, and a hanging/ridgeline channel along the short side, that connects to the two other channels ...if you can picture that.../
ran 10 ft of 550 cord thru the short channel, about 3 ft of shock cord and toggles in each of the 2/3 channels
Cinched up the short sides, and tied paracord ends to hammock suspension, then discovered the ridgeline channel -also- gathers up when weight is applied, so have added a couple of stitches to keep it stabilized at not quite max, so flap drops over ridgeline and covers both the gathered ends. sort of looks like a hammock "sporran", and is handy for rummaging at night when in hammock, as bug net is over everything.
hope that helped- still a bit of work in progress...KM
ps WLM beat me to it- tho I did not taper flap ends or put in weighted pocket...yet!
Last edited by KerMegan; 12-15-2010 at 11:15.


You guys are very close to cloning the Gear Box!
The ridgeline should be 4' long, whether or not it passes through a 5' channel. That is what gives the Gear Box it's depth. It also gives the box top some bagginess at the ends, so it can cover the hammock ends.
The advantage of running the ridgeline through one side channel is that it keeps things from falling out.
Good work!
- MacEntyre
P.S. Isn't it cool that the whole thing can be made from a single piece of fabric? I love it!
- MacEntyre
"We must, indeed, all hang together or, most assuredly, we shall all hang separately." - Ben Franklin
www.MollyMacGear.com
Oh yeah, there is another channel on the opposite edge of the hammock body for the ridge line. Thanks Mac, thats what I get for thinking through the steps without looking at the finished product. This set-up is easy to make, and works great. Mine has ridden out a couple of storms with very little water getting in. Plus every one (including ground dwellers) have asked for them. .......Originally Posted by MacEntyre

Which reminds me. When you are tightening your end straps to the gear hammock, mack sure the cover is pulled over the inside of the wraps or you may get water coming in from the edges.
(Updating My post above)
- William -
How can a young man keep his way pure? By living according to your word. - Psalms 119:9
Did you tell them how to contact me?
- MacEntyre
"We must, indeed, all hang together or, most assuredly, we shall all hang separately." - Ben Franklin
www.MollyMacGear.com
Made one tonight using roughly the dimensions that William listed and some $1/yd WM nylon (not rs or sil). I wanted to see how close it looks to the real thing, and validate that the dimensions work with my pack before I use sil.
Still deciding what type of tarps to make next and don't know how much sil I'll have left over from those projects anyway.
Anyhow, started with a 60" x 60" square. Measured in 20" on each side from one end and cut along the lines from those points to the ends of a 20" wide straight edge in the middle of that end to shape the flap. (William used a 12" wide straight edge on the flap). Hemmed all the way around, leaving the corners at either end of the ridgeline tapered and open.
The pocket in the flap was made a bit wider than William specified.
Other than that, its according to his plans.
I was pleasantly surprised at how much it looks like the MMG product.
Of course, my workmanship is far inferior, but it should be usable... although it will likely need to stay under the tarp since it is not waterproof or DWR.
I need to mix a batch of diluted silicone to seam seal my DIY HH Hex tarp clone. I may mix a bit extra and try soaking this gear hammock to see if it emerges any more waterproof than it is now.
I'll try to take pictures soon. The pics I've taken inside are no good, as I used black nylon and it just looks like a black blob with my cheap camera.
"I keep telling myself that if I make perfect seams, nobody will believe that I made it... " -JohnSawyer
My outdoor gear review site http://gear-report.com
Gear reviews, DIY / MYOG projects, Outdoor gear discounts, sales and coupons updated daily
Cool, let me know how it works for you.
Here is what I found:
- IF you make the pocket too large things will actually fall out of it, or it invert and fall away from the hammock body
- make your pocket proportional. Wide + Deep.
- Try a larger cover edge, and putting a pull on each corner.
- Too much material on the cover edges will end up blowing the cover open unless they are held down. Sort of a balance thing. Plus they make noise in the wind.
- William -
How can a young man keep his way pure? By living according to your word. - Psalms 119:9
 Posting Permissions

 Reply With Quote

Bookmarks