Hey, Tritan -- just saw your PM. It looks like the issue you are having is with measuring out the length you want for your loop. In the video, the first measurement, 4 inches in from the end, is my bury length. The second measurement, 7 inches in from the end -- or 3 inches from our first mark -- is the "length of the loop" measurement. The length of my loop for this guy-line application is 3 inches of total masons line, but, since the loop is folded over, the actual length of the loop itself is 1 and 1/2 inches. Make sense? It's prob'ly hard to visualize -- sorry about that.
Anyhoo, seeing how small those new-fangled Dutch hooks are (which I WILL also be ordering sometime soon -- thanks so much for that, Dutch

), I'd have a very small length measured out for your loop -- say somewhere between 1/2 to 1/4 of an inch, depending on the thickness of the line you're using. So, you're first mark for the bury length would be our original 4 inches from the end of the line and the second mark would be around 4 and 1/2 inches from the end of the line (see about 45 seconds in for the explanation of what the two marks represent in terms of the locked brummel structure). Try that and re-follow the instructions and see if that will get you closer to what you want. You may have to fiddle with the loop length to get it perfect.
One final note, for your bury line, when you actually bury the line (see 5:08 minutes in), you want to start your needle well beyond where your bury line ends to get it to tuck fully inside once you feed it through. That way, you won't have to trim off the excess, like you had to before.
I really hope this helps. If you need more explanation and maybe some more pictures or another video, please don't hesitate to ask.
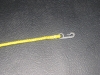
Take another photo when you get it nailed!


Originally Posted by Roadrunnr72


 Reply With Quote


Bookmarks