


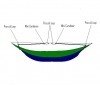
My setup allows me to adjust without having to move much in the middle of the night. I can adjust the head or foot end w/o trouble. It takes 4 prussik loops on the ridgeline and a couple of carabiners. I've been really happy with this setup. Hope my mad paint skills helps explain it:

 Reply With Quote


Bookmarks