Page 16 of 20 FirstFirst ... 61415161718 ... LastLast
Results 151 to 160 of 195
  1. #151
    Senior Member MAD777's Avatar
    Join Date
    May 2009
    Location
    White Mountains, New Hampshire
    Hammock
    DIY, WBBB & Switchback
    Tarp
    HG cuben,OES Spinn
    Insulation
    DIY 3/4 UQ/TQ, UGQ
    Suspension
    Dynaglide / Dutch
    Posts
    10,950
    Images
    39
    Looks nice and simple and clean, however, you will be constantly changing the length of your ridgeline with each adjustment of the sheaths. That will change the comfort of the hammock lay. Also, the sheaths are UCR's which are notorious for letting go if the line is bumped. That can be solved with a prussik pulling on the far end of your sheath, but that's adds another component.
    Mike
    "Life is a Project!"

  2. #152
    Senior Member bowl-maker's Avatar
    Join Date
    Jul 2012
    Location
    Knoxville, TN
    Hammock
    Hennessy Explorer UL
    Tarp
    DIY Winter Dream
    Insulation
    DIY UQ/JCP TQ
    Suspension
    WS/MSH
    Posts
    575
    Images
    24
    I think the movement of the sheaths is more to take into account different distances between trees while still maintaining an appropriate hang angle.

  3. #153
    New Member
    Join Date
    Mar 2013
    Location
    Downingtown, PA
    Hammock
    ENO DoubleNest
    Tarp
    DIY Tyvek
    Insulation
    DIY underquilt
    Suspension
    Ever evolving SLS
    Posts
    15
    That sounds exactly like my setup. But my sliding UCRs aren't 12". They may be 3-4" and haven't slipped yet. I have my ENO Double soft shackled through an eye in the UCR on each end and also OVER the suspension line. That way the UCR is tensioned in line with the suspension and not being pulled open at an angle from the suspension.

  4. #154
    New Member
    Join Date
    Jun 2014
    Location
    Vermont
    Hammock
    Skeeter Beater Pro (First Hammock)
    Posts
    34
    Quote Originally Posted by Teach_em View Post
    JC, welcome! This past camping season, I made a change to my system and am very happy with the results. I have poly straps with loops sewn into the ends. I just wrap, thread one end through the loop and attach a biner via a marlinespike. This way I can minimize the length of the webbing.

    To that, I clip my Amsteel line, run it across to the other tree, and tighten by passing through the biner marlinespiked to the other strap, back through a descender, then back through the biner again. This makes a nice easy pulley system to adjust tightness. Tarp, hammock (ENOUGH Double), and DIY bugnet are already attached to te line. My hammock is soft-shackled to the suspension line through a length of UCR at each end.

    What this allows me to do is adjust the position and sag of the hammock when the line is already tight. My thoughts on ridgeline length are that a couple inches of variance will not likely make that much difference. I just eyeball it to 30 degrees each time.

    This system also allows me to hang asymmetrically between trees, closer to one than the other, if necessary without having to raise the far strap much higher.

    I'll post pics when I can. I'm a huge fan of the SLS so far. With this all-in-one system, I can go from hiking in the rain to lying under a tarp is around 3 minutes.

    This is very similar to the suspension system I've been contemplating, and haven't been able to find many examples online, so I'm wondering if there was a problem I wasn't seeing. My thought is a very tight line, with fixed hammock tie points (using alpine butterfly loops). I'm new to hanging, so maybe I'm making some bad assumptions:
    - For a given hammock, once I dial in a structural ridgeline length I like, it isn't affected by setup location/distance between trees. (it doesn't change)
    - With a structural ridgeline, the 30 degree hang angle no longer really applies (at least it has nothing to do with angle of the end attachment.)

    Here's the setup I envision. Several feet of amteel with tarp and hammock attached. Tree straps with loops at both ends. Loop around tree, pass end through loop and tie one end of amsteel to loop in tree strap. Same thing on other end, but use truckers/mccarthy hitch and make it very tight. Tarp is already mounted and should be tight on the ridgeline, so just tie out corners of tarp and done. It seems like this would remove nearly all the fiddling once the setup was dialed in. (ie, fiddle in the backyard, not in the woods). It could be made easier by using something like a garda hitch and descender rings on both ends to allow easy adjustment of hammock position at the expense of some weight.
    PLEASE weigh in if there's something I've obviously overlooked here. I haven't tried this yet, but plan to soon.

  5. #155
    New Member
    Join Date
    Mar 2013
    Location
    Downingtown, PA
    Hammock
    ENO DoubleNest
    Tarp
    DIY Tyvek
    Insulation
    DIY underquilt
    Suspension
    Ever evolving SLS
    Posts
    15
    I would advise against a truckers hitch to tighten your main suspension line. I've found them to bind after considerable loading. I don't worry about the overall tension. I used a game scale on one end and after tightening and loading it only registered 320 lbs. but the truckers hitch lip used bind and really require some serious pulling to undo.
    I also found it easier to adjust the tarp/hammock along the suspension rather than adjusting at the tree straps. I used to use climbing 'biners with a few turns of suspension line wrapped around. They were easy to slide once tension was released. But now my UCR loops can be adjusted even while the suspension is under tension.
    The weather is finally nice so maybe I'll have an opportunity to take some pics and post.

  6. #156
    New Member
    Join Date
    Apr 2015
    Location
    Thailand
    Posts
    34
    Quote Originally Posted by headchange4u View Post
    Not long ago, while lying in my hammock, I had an idea for a suspension system. It's a kind of hodge podge of features from different systems with a new twist: the ability to adjust the ridge line length/ hammock sag on the fly. I'm calling it the Single Line Suspension (SLS).

    The reason that I'm referring to it as the SLS is because the suspension lines and the ridge line are all one long piece of cord. The system is very similar to the Trucker's Hitch suspension, in that it uses tree huggers and a pair of the SMC descending rings. It's also a very light system at 4.8 oz for 50' total of Amsteel Blue and 2 descending rings. The tree huggers I am using for this writeup add an additional 2.8oz but I plan on making a lighter set in the near future.


    Materials needed for this project:


    ~50' of a single braid rope (45' for the main line and 5' for the hammock lines). Amsteel 12 or Amsteel Blue recommended, available here.
    2 X SMC descending rings
    2 X Tree huggers


    For this suspension I am again using the 3mm Amsteel Blue for the main line (2500 breaking strength, .08 oz per ft). The total length on the main line is 45'. I came up with 45' by assuming that I would need about 15' of suspension line on each end of the hammock, and I also took into account the normal length of my ridge lines (approx 101"). I then added a few extra feet of line 'just in case'. You can always trim off extra line but it's hard to add needed length.

    I HIGHLY recommend using a single braid line for this project, something like Amsteel Blue of the Amsteel 12. The reason I am calling for the use of single braid line is because of the use of clove hitches in the suspension system. I have found that a clove hitch will tend to lock when using a double braid and it very hard to get undone. I have found that single braid lines with the Samthane coating like the Amsteel allow the clove hitch to release, even after sleeping in the hammock overnight.

    I installed this system on my ATHH hammock and used it on an overnight excursion and it worked very well. You could use this suspension on almost any type of non-spreader bar hammock but it works very well on hammocks with the channel sewn into each end, which would include HAAB style hammocks like ENO, TTTM, Trek Lite, Travel Hammock, etc and also hammocks like the Claytors. It even works on my Warbonnet El Dorado, although it moves the ridge line to the outside of the hammock instead of the internal ridge line I am currently using.

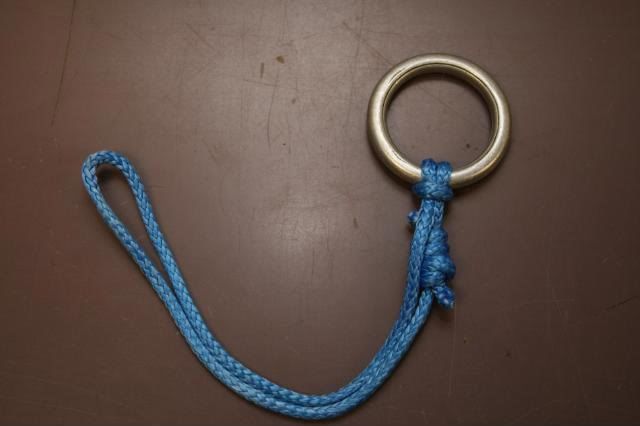
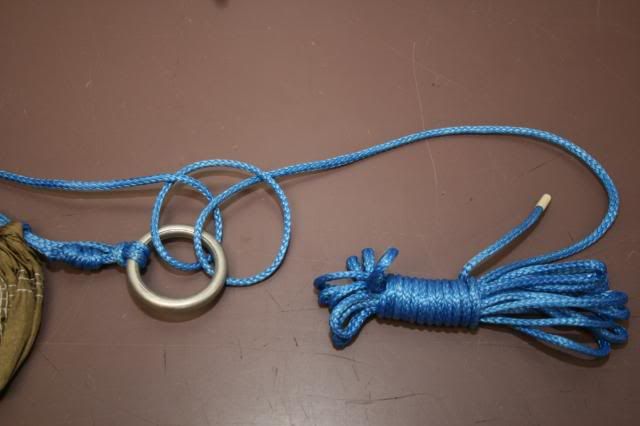
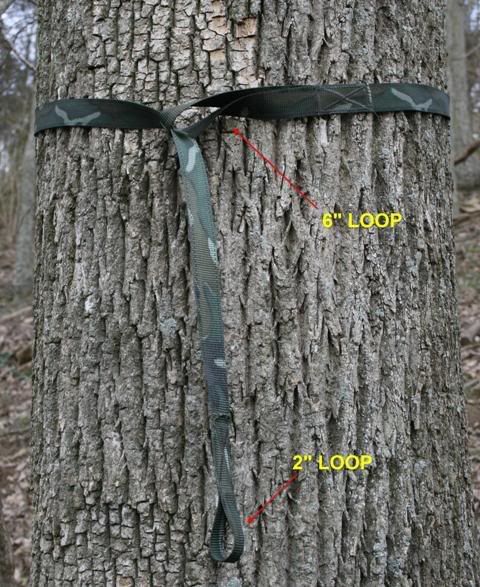
    The first step is to make a pair of hammock lines (HL). The HL consists of a 28" piece of rope that uses a Double Fisherman's Bend to form a loop. Once you have formed a loop, attach the line to the descending ring with a Lark's Head. I went with 28" because the stock line that I removed from the ATHH hammock was 32" but the diameter was much larger than the line I was using. I subtracted 4" to compensate for the smaller line. When you are finished you should have something that looks like this:


    Besides the descending rings being the point that ties the main line and the HL together, I think it's gonna offer a couple more benefits. The rings will create a break in the path of any water that might be running down the suspension lines, helping to keep the hammock dry (in theory). I also think the rings will make great attachment points for things like hammock socks, bug netting, under quilts, weather shields, etc.

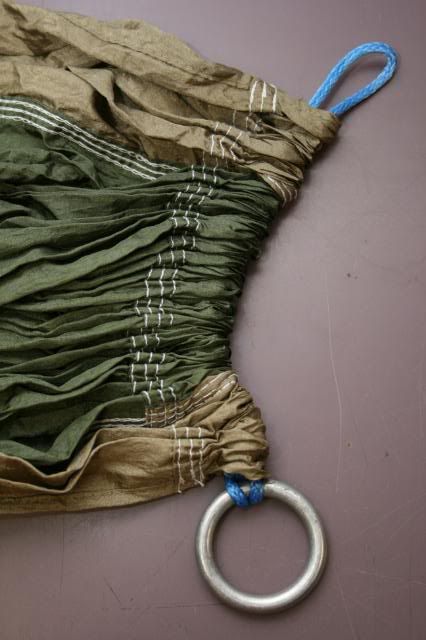
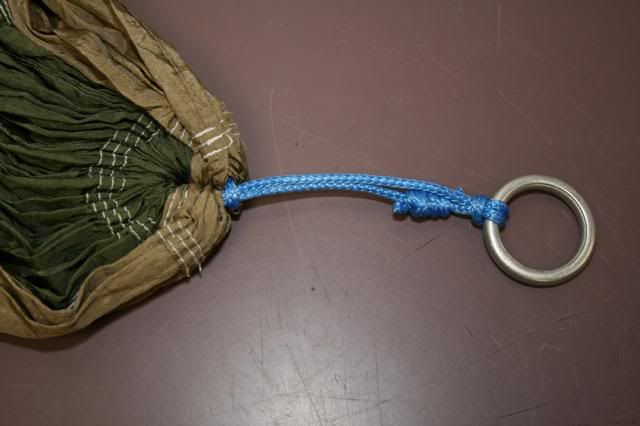
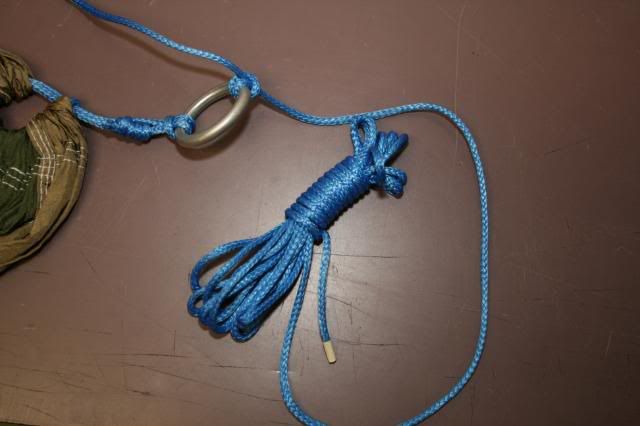
    After you have made a pair of HLs, it's time to install them on the hammock. It's pretty easy to do. If you have a hammock that has the channel sewn into the end, simply passed the HL through the end of the hammock, pass the ring through the loop, and cinch it down tight:


    If you are using a hammock that has whipped ends, like a DIY Speer-style hammock, just form a Lark's Head and cinch it right behind the whipping:
    <pics coming>

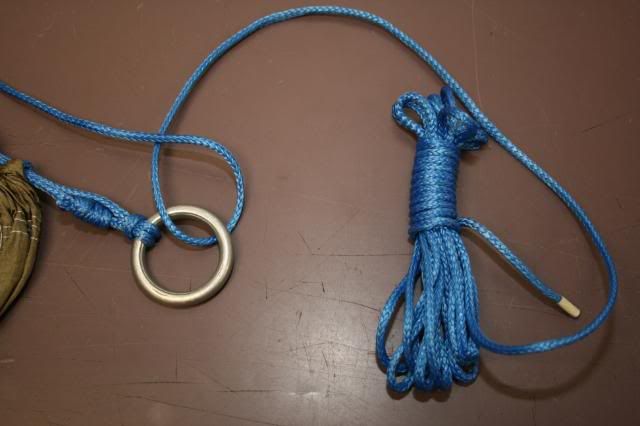
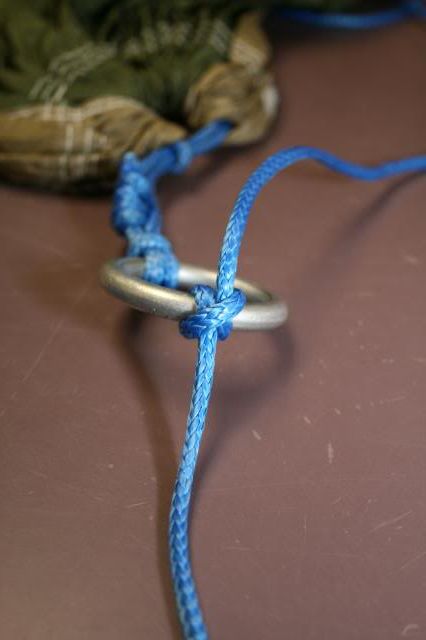
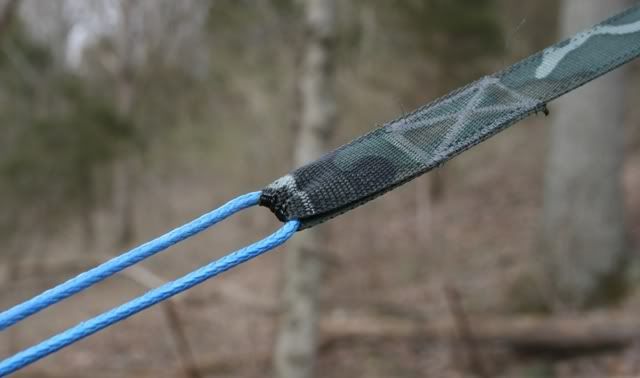
    Now that you have the HL attached to the hammock you are ready to add your Main Line (ML) that serves as both the ridge line and your suspension lines.The ML is attached to the rings with the clove hitch. The clove hitch is what makes the system adjustable. You can see how to tie the clove hitch to the rings in these pics:


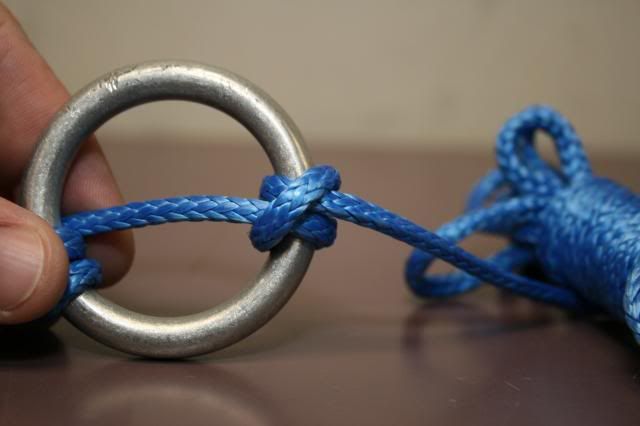
    Here's a detail of the Clove hitch once it tightened down on the ring:


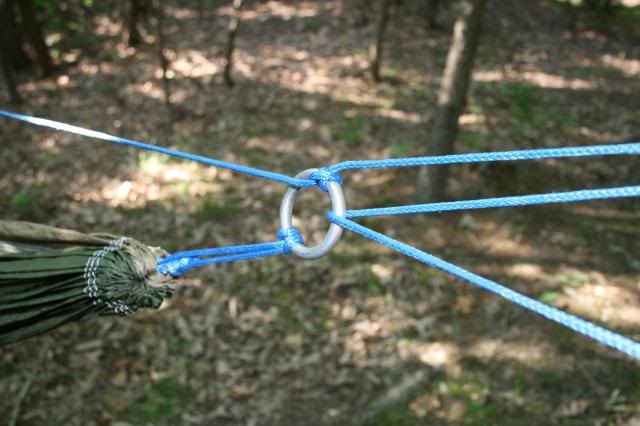
    Although it's not shown in the pics, I used a Sharpie to mark the center of the ML. I also made marks 50.5" on each side of the center mark that gave me a guide to set the rings at 101", which is my normal ridge line length. You could make marks for different, pre-measured ridge line lengths if you wanted to experiment. Here's an example of how I positioned the ring right a one of the marks.

    You are now ready to hang the hammock. Step 1 is to put the tree huggers on the tree. I am using the same trees huggers that I used for the Trucker's Hitch system:


    Next take the line coming from the hammock and pass it through the tree hugger and then take it back down and pass it through the descending ring. This allows you to tighten the suspension just like the Trucker's Hitch, giving the 3:1 mechanical advantage:


    After passing the line through the ring take back up and pass it through the tree hugger again. In the past of would tie the knot at the ring, but I now tie it at the tree hugger for a couple of reasons. The first is because if you tie the knot at the tree hugger, it acts as a drip string and it also requires less rope because you don't have to take the line back down to the ring.

    I first tie a slip knot then a half hitch to secure things:


    The coolest part about this suspension system is that it allows you adjust the sag of the hammock pretty quickly. It's kinda fun to play around with the sag in very small increments. You can adjust this thing an inch at a time to really dial in the comfort of the hammock. To adjust the the ridge line you first loosen the suspension. Once you have some slack in the suspension lines you can loosen the clove hitch and move the ring's position on the ML to lengthen or shorten the ridge line section, giving you more or less sag as needed.

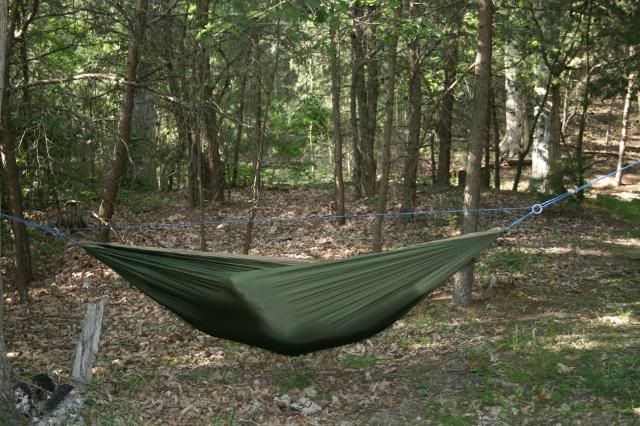
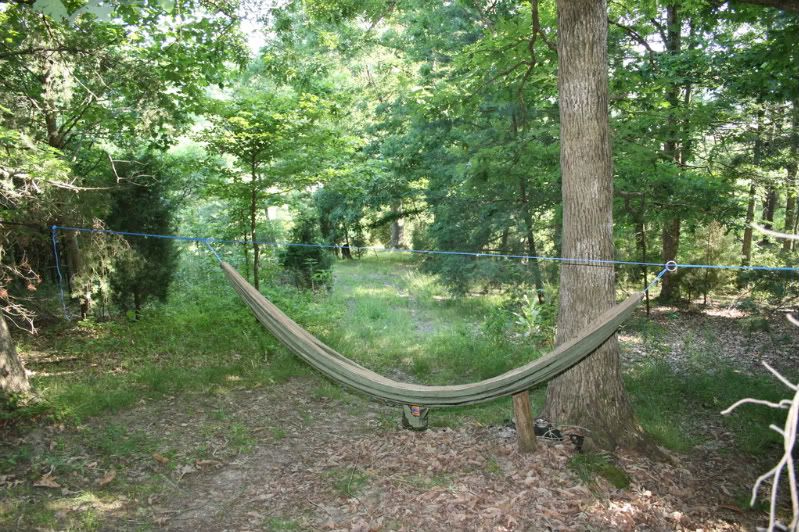
    In this first pic of me in the hammock the ridge line is set to my standard 101":


    Here is a pic of the ridge line set to about 80", giving the hammock a really deep sag. The sag was so much that I would have had to raise the tree huggers above my head to get in the hammock without my butt hitting the ground:


    Here's a shot with the ridge line at it's maximum length, with almost no sag in the unoccupied hammock.I went from a 80" ridge line length to a setup that has almost no sag at all and it took less than three minutes to adjust between the two.
    Im really curious what kind of stitch you are using? Do you mind sharing?

  7. #157
    Member cv66seabear's Avatar
    Join Date
    Mar 2013
    Location
    Wild Rose, Wisconsin
    Hammock
    Hennessy/ENO/DIY
    Tarp
    Mosquito Diamond
    Insulation
    pad
    Suspension
    Whoopies
    Posts
    96
    Ok I missed something, I thought at first you said you could adjust it while you were in your rack - but you adjust it by taking up slack or releasing tension at the ring on either end?

    Really great write up and pictures! Thanks
    To become Old and Wise, First be Young and Foolish.

    "A man who will not read, has no advantage over a man who cannot read." - Attr. Mark Twain

  8. #158
    New Member
    Join Date
    Aug 2014
    Location
    Colorado Springs
    Hammock
    HH Hyperlite
    Tarp
    Superfly
    Insulation
    UGQ 20*/30*
    Suspension
    Whoopies
    Posts
    38
    I'm curious why the fisherman's knots as opposed to making a continuous loop on the descending ring? I assume the knots are bombproof compared to a short burry?

  9. #159
    New Member
    Join Date
    Jun 2014
    Location
    Vermont
    Hammock
    Skeeter Beater Pro (First Hammock)
    Posts
    34
    I'm working on a modified SLS. Basic idea is a single line with whoopies at both ends. Now, to combat the minimum hang distance compromise with whoopie slings, I'm contemplating putting the whoopie sling bury inside the hammock hang points. It definitely changes the way the tension is applied to the outer sheath, but unless the structural ridge line portion is slack, there is still tension on both sides. Anyone ever tried this? Dangerous idea, or should it work? The bury could be much longer than a standard whoopie sling since the only compromise is more rope. Here's a very rough drawing of what I'm proposing. It's not clear from the drawing, but the hammock connection point is to the fixed side of the adjustable loop only.

    DoubleSling.jpg

  10. #160
    New Member
    Join Date
    Jun 2015
    Location
    Haverford, PA
    Posts
    3
    This looks pretty cool. Is there a reason you used the double fisherman's bend instead of splicing continuous loop for the hammock?

  • + New Posts
  • Page 16 of 20 FirstFirst ... 61415161718 ... LastLast

    Similar Threads

    1. My take on single line suspension
      By Rekay in forum Suspension Systems, Ridgelines, & Bug Nets
      Replies: 13
      Last Post: 10-25-2013, 13:34
    2. Help with a new Single line suspension idea.
      By randomsteve95370 in forum Suspension Systems, Ridgelines, & Bug Nets
      Replies: 26
      Last Post: 09-04-2013, 12:42
    3. Best way to attach to a single line suspension
      By Bitts in forum Suspension Systems, Ridgelines, & Bug Nets
      Replies: 8
      Last Post: 07-09-2011, 14:50
    4. Single line suspension using UCR?
      By TZBrown in forum Suspension Systems, Ridgelines, & Bug Nets
      Replies: 13
      Last Post: 01-15-2010, 19:20
    5. Single Line Suspension Whoopified
      By KMACK in forum Suspension Systems, Ridgelines, & Bug Nets
      Replies: 5
      Last Post: 12-23-2009, 20:40

    Tags for this Thread

    Bookmarks

    Posting Permissions

    • You may not post new threads
    • You may not post replies
    • You may not post attachments
    • You may not edit your posts
    •