

Thx gmcttr. Just what I was looking for. Couldn't tell from the pictures, what is this pin you speak of? Are you drilling thru the pole? I thought the tension of the poles spreading would hold the lash.

Thx gmcttr. Just what I was looking for. Couldn't tell from the pictures, what is this pin you speak of? Are you drilling thru the pole? I thought the tension of the poles spreading would hold the lash.
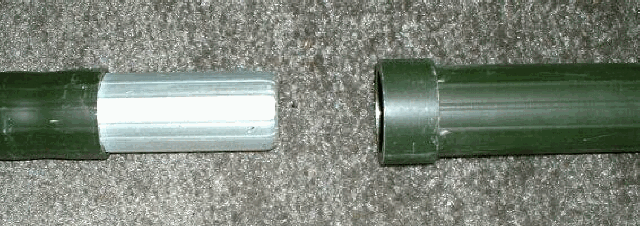
I was referring to the silver connecting pins in the end of each section (see 4th photo above). The larger diameter of the pole insures the lashing can't slip down from the connectors.Originally Posted by fagan

Whether your lashing will slip on the pole itself will depend on many factors so it's safer to recommend staying on the connectors. As with all things hammock...experiment and find what works for you.
Well, sometimes life gets in the way. However, to reply to your question (albeit a bit late) I believe that I got this set up from Lowes and used a Dowel Pin.
Here are the images...Hammock Stand Tripod Clinch 1.jpgHammock Stand Tripod Clinch 2.jpg
The holes in the Dowel Pin allow for adjustments with regards to pitch and yaw on uneven ground or height adjustments. Works well and I leave it on one of the Tripod Legs so it is always available. Worked out pretty well.20140525_100926.jpg
The above picture is with the MSR Twin Brothers and I had lashed the poles together, used 4-poles for the ridge, turned out OK, so I modified the lashing with the Dowel Pin addition, just to keep things simple and use the cordage for other things.
So, why the free standing hammock? Well, here is a quirky video about South Padre Island National Seashore, which is the longest undeveloped barrier island in the world, 77 miles in length. Trees? Not so much.
https://youtu.be/DvNTDLyrO2Q
Last edited by joe_guilbeau; 06-23-2015 at 16:28.

How are the eyebolts secured in the ends of the poles? That's pretty slick. I'm planning to just lash my rig together initially (waiting on my poles to arrive) but I'll likely "upgrade" when I figure out the best way to go.
That would be post #341 of this thread... all purchased at Lowes Hardware. I used Red Locktite to secure. Home Depot had the same types of hardware, but Lowes seems to have higher end (polished vs. brushed SST or Chromed Steel).
Last edited by joe_guilbeau; 06-23-2015 at 19:16.
So, as we stand on the shoulders of the giants who came before us, a thought has occurred to me based upon the most excellent write up of Thumbstand's thread, referred to in the above post.
https://youtu.be/pOQlE221pmY
The image below comes from The Mast Company
We can modify four of the aluminum mast sections, to make up a portable hammock stand using no lashing or hardware to assemble. We will also need a 3/16-inch aluminum plate that is 1-foot square. Use a hack saw to cut that diagonally to make up two triangles.
Picture a freestanding swing-set.
We sacrifice four mast sections and cut or grind off each of the female ends, so we now have 4 severed female ends and four sections with male ends still attached.
So, looking at the right side of the picture above, imagine grinding off the female end at a 15-degree angle. Do that to the four sections of severed female ends. We now have four female end sections with 15-degree angles.
Place them with the 15-degree ends together and weld them together, or use epoxy, JB Weld, or whatever.
Repeat… you now have your two endcaps (picture a swing-set again) that should be very close to 30-degrees ready to accept the legs of your portable hammock stand.
We now need a method to attach the ridgeline made up of 3-4 aluminum mast sections.
A 1-foot square aluminum plate of 3/16-inch, cut on the diagonal is used. We attach one male mast end section and one female mast end section respectively to the two triangles. These then will accept the ridgepole made up of 3-4 mast sections.
One of the triangles will have a hole cut to accept the male end of the ridgepole, which will stick through the triangle plate that will be welded or epoxied, and provide the anchor point for one end of the hammock ridgepole suspension.
The other end cap triangle will have a male end section (salvaged from one of 4 sections with the female end removed). A male section is welded so that it will accept the female end of the ridgepole, and if you ensure that enough of the male section protrudes through the 3/16-inch plate, it provided an anchor point for the hammock suspension as well.
We end up with two triangles, each made with 3/16th inch thick aluminum plate. Each having two female mast sections as the "legs" of each end of the "swingset". Just add 1 or 2 mast sections to make a 4-foot or 8-foot high "swingset".
One end cap accepts the male end of the ridgepole and the other end cap accepts the female end of your assembled ridgepole.
Each end section has legs of mast sections inserted to raise to appropriate height, and the left over mast sections that have the female ends removed (you should have three sections leftover with male ends) become your adjustable lengths for uneven ground.
Last edited by joe_guilbeau; 06-26-2015 at 12:47.
About 2 weeks ago I gave my husband about 18 hours notice to build me a turtledog stand for my hammock. To make it on short notice, he used 2x2's and hinges with fence rail. Before he even started it, he wanted to make me one out of aluminum.
Thank you to everyone who has contributed to this thread so we didn't have to come up with design ourselves.
We just picked up the poles from our local military surplus store to make an aluminum stand for me and our son. I can't wait until they're done.
Last edited by RRlisa; 02-15-2016 at 16:14. Reason: Spelling

It's a great project the yields a setup that can be used for many years to come. Totally worth the effort, especially when so many have taken the guesswork out of much of the project.
Cheers to you and enjoy.
Have sherpas, will travel...
Triangles, it's all about the triangles.
H30º
HTA
8.7167º

I have been away for a while and havent kept up with the thread.
You know, when I made this stand, it was based off of necessity and others designs here and there. I am amazed at how successful it became as well as how many others contributed and made it even better. That is what I love about this place.
If your husband finds any more improvements that he could share, please feel free to let us know.
While its still winter here, I cant wait to get back out there to use it again.
Thanks everyone for making this a great stand.
I like this idea, but cannot see how its possible to put together inside the 4 ft tube.
Also, is there a nut at the very bottom of the eyebolt past the last washer on the right?
Can someone explain the steps to do this?aluminum poles.jpg
 Posting Permissions

 Reply With Quote

Bookmarks