Page 1 of 4 123 ... LastLast
Results 1 to 10 of 32
  1. #1
    Member Banana Hammock's Avatar
    Join Date
    Sep 2010
    Location
    Southern Ohio
    Hammock
    DreamBonnet MockingBird
    Tarp
    OMW SuperBird
    Insulation
    Obesity
    Suspension
    a bit of everythin
    Posts
    73

    TurtleLady/TurtleDog stand version #187: eyebolts and conduit, no drilling or lashing

    I used 8 eyebolts and 3/4" conduit (no welding - a perfect press-fit). The eye-bolts took the place of tripod-lashing, hinge-hardware, through-bolts arranged in a "T", welding, or drilling any holes. Micro-adjustable and works extremely well.

    First, the two "quirks":

    1.) One pole doesn't "fold" flat, but can just be unscrewed from the eye-bolt relatively easily for transporting.

    2.) The tripods have a bit of play, when unweighted. I'm talking just a smidgen. The amount of space left from two half-inch thick eye-bolts not-quite-filling in all the space of the one eyebolt's hole. When weighted down, they are solid, without any movement at all, I swear. I was amazed. (I was having slippage issues with my poor attempts at tripod lashing with rope, so I'd rather have these two quirks)

    I have a welder, but didn't need to use it. The 1/2" eyebolt nuts are just press-fit into the 3/4" conduit, and rated at 300 lbs each. I "lightly" hammered them in, and they ever-so-slightly deformed the tubing, in the most perfect way. Since all the forces are "downward", pulling the eyebolts INTO the tubes, I found it to be extremely secure without any welding.

    The entire cost was less than $50.

    8 eyebolts (1/2" x 6") w/nut @ 2.41 each = $19.28
    7 conduit poles (3/4" x 10') @ 3.12 each = $21.84
    Total cost = $41.12 before tax

    You could save money by going with 5' long tripod poles, needing 3 less conduit poles - the eyebolt configuration raises the height of your ridgepole, compared to tripod-lashing.

    (I already had a tubing cutter, climbing carabiners, and Amsteel)

    (I stole the eyebolt design from Scott at meatfiregood.com - the only part I thought of was using his "press-fit-eyebolt" idea on the ends of the ridgepole). Except I hung my ridge-pole from the rear pole's eyebolt, sandwiched between the two front side-poles, so it's weighted correctly and cannot slip out.

    All other credit goes to TurtleLady & OldDog.

    I didn't feel comfortable with a heavy fence-post hanging above me (in case of failure), so I threw some eye-bolts into the ends of a 10' piece of 3/4" conduit. I found that as long as your hangle is close to 30º, it hardly puts any load on the ridgepole at all (besides compression). (I even used some thin-walled aluminum before I went to conduit, and even though it was as rigid as a wet noodle, 30º + my body weight didn't even deform it at all - so 3/4" conduit is plenty sturdy for the proper "hangle".) This even makes the ridgepole length micro-adjustable, by screwing out the eyebolts to lengthen or shorten the points of attachment. I didn't feel like drilling holes, and the eyebolts make for a smooth and rounded place for Amsteel or carabiners. (I've since changed to carabiners for both upper and lower ridgepole-eye-bolt attachments - shown in last photo)


    All pitched up without the use of a single tree! And that nifty little wood-stove with the chimney makes the ambience very "campy", as well! (the smells of burning trees, and the crackles of twigs a flame - I don't hug trees; I burn them!)


    I went with 7' long tripod poles, without "limiters" since it will be used on carpet or grass - hasn't slipped at all, and looks clean. Works great indoors and the dog likes it:


    At night, outside, I just clip the dog's leash where the dromedary bag is attached in this picture. It's extremely secure, even when he tries to dart after a squirrel:


    Here's information on how I opened and closed the one eyebolt for the rear tripod leg: . I found hammering directly on the nut, into the (factory cut) ends of the poles worked best for me. You can hear when you're hitting the lip of the conduit, beating around it until the nut is seated flush all around. Make sure to screw the eyebolts all the way tight for the ends of the ridgepole, so they'll face the same way (up), during use. I point all my gaps towards the sky (eyebolt "gaps" up/poles down).

    One caveat: The "rear" pole would need to be a half-inch longer, if you wanted perfectly equal legs, although I could also unscrew that eyebolt by a half inch and equal things out as well. By design, the "rear" pole sits above the others. The other two aren't exactly equal either. It's hard to explain, but they're just a smidgeon off from each other. You could get perfection by unscrewing the eyebolts slightly, or figuring out precise measurements that would change depending on how far the legs are splayed. The micro-adjust-by-unscrewing is a real solution for those obsessive compulsive days at camp.
    Last edited by attroll; 01-05-2019 at 16:59.
    - The original Banana Hammock

  2. #2
    Senior Member Yojimbo's Avatar
    Join Date
    Sep 2012
    Location
    Herndon, VA
    Posts
    1,275
    Very interesting take on the tripod. I like the extra height gain. Any idea on the total weight? How feasible is it to make the poles sectional? When the tripod poles are packed up, do they lay straight together?
    Life is Good!
    Hammocks * Scouts * Kites
    用心棒

  3. #3
    Senior Member jbrescue's Avatar
    Join Date
    Apr 2013
    Location
    North Ridgeville, Ohio
    Hammock
    Skeeter Beeter Pro
    Tarp
    ENO Housefly
    Insulation
    DIY underquilt
    Suspension
    DIY Whoopie Slings
    Posts
    120
    Do you think you could daisy chain these together for multiple hammocks? What if you added one tripod and ridge pole for additional hammocks?

  4. #4
    Member Banana Hammock's Avatar
    Join Date
    Sep 2010
    Location
    Southern Ohio
    Hammock
    DreamBonnet MockingBird
    Tarp
    OMW SuperBird
    Insulation
    Obesity
    Suspension
    a bit of everythin
    Posts
    73
    Quote Originally Posted by Artjrk View Post
    Very interesting take on the tripod. I like the extra height gain. Any idea on the total weight? How feasible is it to make the poles sectional? When the tripod poles are packed up, do they lay straight together?
    Sure, it weighs exactly 25 lbs and 5 ounces, with all four carabiners, and two Amsteel™ Nacrabiners™ (without hammock). *Weighed with Park Tool DS-1 digital hanging scale*

    It is very feasible to make the poles sectional! I was thinking how easy it would be to use the "Press Fit" nut technique with studs (double ended threaded bar), since all the loads are compressive. This would work for both the legs and the ridge pole. 
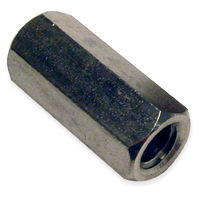
Just slice the poles in half, "press-fit" nuts into the ends, and thread them together with a stud. Maybe even slice the ridge-pole into thirds? (I'd have to hack-saw them, to not deform the inner-diameter as my pipe-cutter does - to fit the nuts nicely) It would be well-advised to use a guide, such as Park Tool SG-6 tubing cutter guide, to ensure the pieces will mate perfectly square. (or a more permanent solution would be to weld a bolt in one half, and the nut inside the other half - just little quick spot welds would do the trick) The neat thing about this method of sectioning, is that it will look seamless, as long as you get the nuts in there straight.

    No, the legs don't lay straight, unless you unthread the rear-most pole (see Quirk #1, above). The two "side" poles nest straight together, and once you unthread the "rear" pole, you can move that eyebolt out of the way for straight nesting in my station wagon. I found this "quirk" acceptable, weighing the benefits of easy assembly and secure functionality.

    The main reason I went this route, is because I'm LAZY! The thought of drilling a bunch of holes in steel, really put me off - things get hot, cutting oil is recommended, and I'd probably dull my bit before finishing the job. The thought of welding would require painting, since my beads wouldn't be galvanized. Tripod-Lashing didn't work well for me, as my poles kept slipping.
    Last edited by Banana Hammock; 06-29-2013 at 21:09.
    - The original Banana Hammock

  5. #5
    Member Banana Hammock's Avatar
    Join Date
    Sep 2010
    Location
    Southern Ohio
    Hammock
    DreamBonnet MockingBird
    Tarp
    OMW SuperBird
    Insulation
    Obesity
    Suspension
    a bit of everythin
    Posts
    73
    Quote Originally Posted by jbrescue View Post
    Do you think you could daisy chain these together for multiple hammocks? What if you added one tripod and ridge pole for additional hammocks?
    Just add one more single tripod, and two ridge-poles for hanging three hammocks in a triangle, like in silvertitan's picture (his only shows two, but you get the idea):


    Or a whole bunch, like this:


    Since the Ridge Pole is attached at the VERY END (via the eye-bolts), hanging a threesome is quite doable, since they won't get in the way very much.
    - The original Banana Hammock

  6. #6
    Senior Member olddog's Avatar
    Join Date
    Jan 2011
    Location
    Lakeland, Fl
    Hammock
    WL Snipe
    Tarp
    WL Tadpole
    Insulation
    WL SS UQ, WL SS TQ
    Suspension
    Dutch speedhooks
    Posts
    4,324
    Images
    3
    Like the concept BH, it looks like another interesting take on the TurtleLady stand. Looking forward to seeing how your idea develops.
    Most of us end up poorer here but richer for being here. Olddog, Fulltime hammocker, 365 nights a year.

  7. #7
    Member Banana Hammock's Avatar
    Join Date
    Sep 2010
    Location
    Southern Ohio
    Hammock
    DreamBonnet MockingBird
    Tarp
    OMW SuperBird
    Insulation
    Obesity
    Suspension
    a bit of everythin
    Posts
    73
    Quote Originally Posted by olddog View Post
    Like the concept BH, it looks like another interesting take on the TurtleLady stand. Looking forward to seeing how your idea develops.
    Thank you, OldDog. I just realized I didn't use your hinge idea in my variation of TurtleLady's tripod stand. I was confused by the different names of the different construction techniques. Much respect and thank you for the kind words.
    - The original Banana Hammock

  8. #8
    Senior Member
    Join Date
    Jan 2013
    Location
    Ohio
    Hammock
    DIY Tablecloth Double
    Tarp
    Hennessy Hex
    Insulation
    PLUQ, Wool, Down
    Suspension
    DIY Whoopies
    Posts
    175
    Any idea of what these stands will hold, weight wise? For the larger hangers among us.

  9. #9
    Member Jhb627's Avatar
    Join Date
    May 2012
    Location
    West point,NY
    Hammock
    ENO DN
    Suspension
    stock / webbing
    Posts
    83

    TurtleLady/TurtleDog stand: 8 eyebolts and 3/4 conduit, no drilling or lashing

    Any chance of a video on how you made these. I am very interested in building one

  10. #10
    Senior Member flatline's Avatar
    Join Date
    Nov 2010
    Location
    high point, nc
    Hammock
    Wilderness Logics Night/Lite Owls
    Tarp
    WL-TP/OMW/BF
    Insulation
    WL-TQ/UQ x3
    Suspension
    Dutch-n-Whopies
    Posts
    2,162
    Images
    48
    Thanks for your really interesting research and design.
    Your variation of the TDS is the design that I will build for myself this fall.

    While watching your ridge extension attempt, this came to mind.
    It seams that perhaps these may stabilize the connection enough to make it work? just a thought.
    They may require some melding of the angles of the inserted end prior to pressing them into the conduit?

    Thanks again BH,
    __bob__

  • + New Posts
  • Page 1 of 4 123 ... LastLast

    Similar Threads

    1. turtlelady's Bamboo Stand
      By turtlelady in forum Do-It-Yourself (DIY)
      Replies: 846
      Last Post: 09-03-2021, 13:47
    2. Variation for tripod lashing on hammock stand
      By Yojimbo in forum Do-It-Yourself (DIY)
      Replies: 4
      Last Post: 09-18-2014, 22:48
    3. My new Lashed TurtleLady stand Please Review for Error.
      By Gristlehead in forum Do-It-Yourself (DIY)
      Replies: 31
      Last Post: 07-22-2013, 13:01
    4. Lashing together a hammock stand
      By ZooBee in forum Do-It-Yourself (DIY)
      Replies: 7
      Last Post: 04-15-2010, 16:54
    5. Conduit Hammock Stand
      By wiscscoutmaster in forum Do-It-Yourself (DIY)
      Replies: 6
      Last Post: 10-29-2009, 04:42

    Tags for this Thread

    Bookmarks

    Posting Permissions

    • You may not post new threads
    • You may not post replies
    • You may not post attachments
    • You may not edit your posts
    •