Results 1 to 9 of 9
  1. #1
    Senior Member
    Join Date
    Dec 2010
    Location
    San Joaquin County, California
    Posts
    228
    Images
    14

    Converted Puffer Jackets into a top quilt last night

    I don't think the JC Penney Puffers have been available at clearance for almost a year, but I just traded for a 3rd jacket and sewed up a top quilt yesterday and today, so I thought I'd show it off.

    This top quilt is made from (2) orange 3XLT, and (1) black 2XLT down puffer jackets from the infamous JC Penney clearance bonanza earlier this year. The quilt is two layers throughout, and lofts to 2". It measures 43" wide at the neck, 47" at the torso, and 42" at mid-calf. The footbox is fairly roomy, but not all that long at 13". The overall length is just about 72". for the most part, the bottom layer baffles run perpendicular to the top-layer baffles. Hopefully this adds a bit to the dead space and helps some of the limitations of sewn-through baffles.


    The top baffles run the width of the quilt. I took the left front panel from each jacket, and sewed it between the back panel and the right front panel of the same jacket (the pocket seams in the picture make the layout easier to understand) to make half of the layer. I rotated one of the identical halves 180 degrees before sewing them together along the panel tops. The two collars add a little length to the layer.

    The bottom layer has most baffles running the length of the quilt. I took 6 arms and separated them into upper arm panels and lower arm panels. I flipped the lower arm panels armpit-to-wrist, and alternated 6 panels in a row. The other six panels are sewn in the same manner, except I cut half of one of the upper arm panels and grafted it onto the opposite side. I did the same rotate 180 degrees trick like the top layer and sewed the two halves together along the wavy line at the tops of the upper arm panels. If you look at the black panels you can see the wavy seam. I added two side panels linked with a shoulder/yoke panel across the top of this layer to make it the same length as the upper layer. I also stitched 1-1/2 shoulder panels together and used them to lengthen a side panel. These are used to create the bump-out wings on each side of the layer. I folded each wing in half and stitched its ends together to get the whole layer ready to attach to the top layer. When I sewed the two layers together I added the slider half of the separable zipper from one of the jackets to the bottom seam of the quilt.


    The footbox (black) is detachable and can be worn as a vest. My kids joke this will be too stinky to wear after the first night I use it, but it was easier to take the vest portion of the jacket and cinch/zip things closed than it would be to take it apart and re-sew it into a foot box. I used zippers from the other two jackets and a cord from one of the stuff sacks. T the cord and squeeze toggle allow me to cinch the collar closed. One of the front zippers was added to the bottom hem so that can be closed. Two pocket zippers were added to the arm holes and close them off about half way. The matching half of the separable zipper from the main quilt is sewn straight across the midpoint of the back so the footbox can be connected to the rest of the quilt. For vest mode everything is unzipped and un-cinched and it wears normally. For footbox mode, I zip and cinch all the openings, then push the collar and top half of the vest inside the bottom half. The zipper at the back of the vest is then ready to connect to its mate on the quilt.


    The whole thing weighs 2-1/4 lbs, and packs into a modified stuff sack that came with the jacket. I added a 3" piece of one stuff sack to increase the diameter of the original stuff sack.

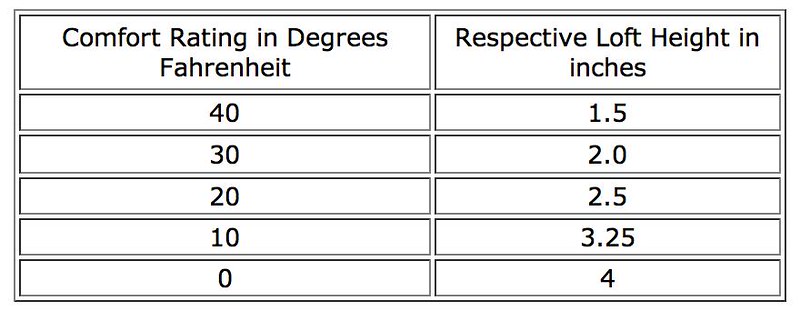
    Does 2" of loft get me to 30 degrees?

  2. #2
    Member G Maurice's Avatar
    Join Date
    Sep 2011
    Location
    Arizona
    Hammock
    ENO DN at home, WB Traveler camping
    Tarp
    Silnylon 8X10
    Insulation
    Dry Down
    Suspension
    Whoopie Sling
    Posts
    84
    Can't answer your question about loft and temerature, but can say nice work and clever dual use design.
    "The clearest way into the Universe is through a forest wilderness." John Muir

  3. #3
    all secure in sector 7 Shug's Avatar
    Join Date
    Oct 2007
    Location
    Minnesota
    Hammock
    I have many so....
    Tarp
    Blackcrow DIY Tarp
    Insulation
    FrankenquiltUQ/Pod
    Suspension
    Whoopie Slings
    Posts
    23,416
    Images
    62
    Here is a chart I copied…..if the baffles are sewn through instead of baffled the results may vary.
    Shug

    Whooooo Buddy)))) All Secure in Sector Seven

  4. #4
    Senior Member Kapang!'s Avatar
    Join Date
    Apr 2012
    Location
    Sac, CA
    Hammock
    SLD Streamliner
    Tarp
    Zpacks 8x11
    Insulation
    E.E. RevelationX
    Posts
    463
    That's killer! I love the footbox/vest. Great work.

  5. #5
    Senior Member
    Join Date
    Dec 2010
    Location
    San Joaquin County, California
    Posts
    228
    Images
    14
    Quote Originally Posted by G Maurice View Post
    Can't answer your question about loft and temerature, but can say nice work and clever dual use design.
    Thanks, G. It turned out a lot better than my first one. It was a 2-jacket top quilt sized for my son. The size and loft worked out, but no footbox and I had problems keeping straight in my head which sides to put together to keep the seams on the right side of the finished quilt. I wound up with raw edges all over the place I had to cap with bias tape. I was able to keep tings straight on this one, so there were no exposed raw edges except around the arm holes in the vest. I used some of the elastic edging from the orange jackets to clean those up. My sons all say it's a Halloween theme bag and vest.

    Quote Originally Posted by Shug View Post
    Here is a chart I copied…..if the baffles are sewn through instead of baffled the results may vary.
    Shug
    Thanks, Shug. That matches what I remember from looking around before. As I mentioned, I hope the cross-wise layers will keep the sewn-through baffles from robbing it of potential.

    -Mike

  6. #6
    Member
    Join Date
    Nov 2013
    Location
    New York, NY
    Posts
    53
    Do you know what the fill weight is on these jackets? How much of the 2.25 lbs is from the fill?

  7. #7
    Member G Maurice's Avatar
    Join Date
    Sep 2011
    Location
    Arizona
    Hammock
    ENO DN at home, WB Traveler camping
    Tarp
    Silnylon 8X10
    Insulation
    Dry Down
    Suspension
    Whoopie Sling
    Posts
    84
    Quote Originally Posted by OneEye View Post
    Thanks, G. It turned out a lot better than my first one. It was a 2-jacket top quilt sized for my son. The size and loft worked out, but no footbox and I had problems keeping straight in my head which sides to put together to keep the seams on the right side of the finished quilt. I wound up with raw edges all over the place I had to cap with bias tape. I was able to keep tings straight on this one, so there were no exposed raw edges except around the arm holes in the vest. I used some of the elastic edging from the orange jackets to clean those up. My sons all say it's a Halloween theme bag and vest.


    Thanks, Shug. That matches what I remember from looking around before. As I mentioned, I hope the cross-wise layers will keep the sewn-through baffles from robbing it of potential.

    -Mike
    Halloween. Hmm perhaps the colors will keep the "bad elements" away.
    "The clearest way into the Universe is through a forest wilderness." John Muir

  8. #8
    Senior Member
    Join Date
    Dec 2010
    Location
    San Joaquin County, California
    Posts
    228
    Images
    14
    Quote Originally Posted by Kapang! View Post
    That's killer! I love the footbox/vest. Great work.
    The kids tell me I have it all wrong; I should wear the vest like a snuggie, then the quilt zipped to it will wear like a blanket down past my toes.

    Quote Originally Posted by sdf View Post
    Do you know what the fill weight is on these jackets? How much of the 2.25 lbs is from the fill?
    The down is 650fp, so based on volume somewhere between 3-1/2 to 4 oz per jacket, or 10-1/2 to 12 oz for the whole quilt. Certainly could be lighter without the redundant layers of fabric, but I like it all the same.

  9. #9
    Senior Member Agfadoc's Avatar
    Join Date
    Aug 2009
    Location
    Up North
    Hammock
    Dangerbird, HHED
    Tarp
    WB Superfly Camo
    Insulation
    HG UQ, SS
    Suspension
    Whoopies
    Posts
    684
    Images
    96
    I made a TQ from these and for me, I consider it my 50 degree top quilt.
    Mine is only a single layer though.

  • + New Posts
  • Similar Threads

    1. WTB: JCP Puffer Jackets x4
      By Craigthor in forum Archived WTB
      Replies: 4
      Last Post: 07-21-2013, 14:05
    2. WTT: JCP Down Puffer Jackets
      By Schafer in forum Archived WTB
      Replies: 1
      Last Post: 07-20-2013, 22:09
    3. FS: Asst. JCP puffer jackets [9 total]
      By inspectorguy in forum [SOLD/WITHDRAWN] Items no longer available
      Replies: 19
      Last Post: 03-13-2013, 20:01
    4. JCP down puffer jackets, several available
      By vtrek in forum [SOLD/WITHDRAWN] Items no longer available
      Replies: 1
      Last Post: 02-24-2013, 19:05
    5. JCP down puffer jackets size XLT black
      By vtrek in forum [SOLD/WITHDRAWN] Items no longer available
      Replies: 4
      Last Post: 02-22-2013, 20:16

    Bookmarks

    Posting Permissions

    • You may not post new threads
    • You may not post replies
    • You may not post attachments
    • You may not edit your posts
    •