


Homemade Down Pants
Ive been wanting some down pants for a while now but just didnt want to come up with the money for them. I had a good stock pile of dollar bin material from WalMart I found a few years back and still had 1 pound of 800 fill down from making my RMS Clone Poncho Quilt. So I decided I might just as well try making them myself.
The Pattern:
I figured down pants were nothing more than 2-layer lounge pants stuffed with down so I searched and found instructions for making lounge pants on the Instructables website and used that as a general guide. The pants are 4 identical pieces to make the front and back for both legs. For down stuffed pants youll need 8 pieces. Upon hindsight I might try to find a pattern that gives a little more room in the butt which would require 2 patterns, 1 for the front and 1 for the back.
Fold the lounge pants you are using for the pattern and draw around them. Add about 1 ½ inches to account for the seams and also add a couple inches in width to account for the puffing of the down to take up some of the width. Add several inches to the leg length and to the waist length for the same reason.
Cutting:
Pin the pattern to the material. Youll need 4 layers of material for the front of the legs and 4 layers for the back of the legs. I dont recommend cutting more than 4 layers. For best results use the flat blade on a soldering gun to cut out the pattern. This also melts the edges to keep them from unraveling.
Hemming the Inseam:
As mentioned, for my project, all the pieces are the same size so thats how Ill refer to the steps. If you use different patterns the first step sews the inseams together for each leg, so make sure you line up the inseam from the double-layer front with the double-layer back.
With the four layers of material together, roll the hem and stitch 2 rows on the rolled hem near the edges.
Open them up and sew a single stitch line about 1 inch inside the edge around the U of the crotch.
Sewn-Through Baffles:
I marked the baffles using a china marker. Mine are about 5 inches apart. The narrower the baffles, the harder it is to stuff. Sew over the marked lines to create the tubes for stuffing with the down. At this point the only areas not sewn should be the outseam. The 2 layers of material might be heat-welded together from the cutting so be careful to separate them to access the baffle pockets. The seam at the bottom of the legs and at the waist should be in far enough to roll a hem for elastic at the ankle and elastic or a draw-string channel at the waist.
Calculating the Down:
Measure the square inches of each baffle pocket and multiply by your desired loft for cubic inches of down required; 1 inch is probably plenty for pants. Divide your down fill power by the cubic inches required to get the ounces of down required. Mine only required about 1.8 ounces down; I decided to overstuff with 3 ounces. Calculate the percentage of cubic inches in each baffle and multiply that percentage by the total ounces of down to be used to get the ounces for each baffle. I converted to grams because I felt like I could be a little more accurate with my scale.
Weighing and Stuffing the Down:
You will not get an exact weighing with the down, some of it is a little guess work. I set up my old tent (havent slept in it since I began hammocking in 2005) in the living room and measure and stuffed the down inside it to keep it from floating throughout the house. I used a quart-sized zip-loc bag to measure the down for each baffle and would measure for all the baffles in one of the leg sections at one sitting. Others have posted ways to handle the down. Zero out the weight of a zip-loc bag on the scale, I put the baggie in the big bag with the down, grabbed some and put it in the baggie. Weigh it again and repeat till you are satisfied with the amount of down in the baggie.
Heres the quickest and easiest way I transferred to down to the baffles. Put your hand into the baggie, compress the down as much as possible and grabbing it. Then open the baffle, stick your hand into it as deep as you can and release the down. Put a few pins about an inch in from the open edge to hold the down in.
Run a line of stitching down the outseam about an inch in to lock in the down.
Ankle Elastic:
I put a rolled hem at each ankle. Threaded some ¼ inch elastic through it, stretched it, and bar-tacked it at each end.
Joining the 2 Halves:
Attached the left leg half to the right leg half by pinning the crotches together and using a rolled hem. This is a little hard because of the curves so use as small of a rolled hem as possible.
The Outseam and Waist:
Turn the pants inside out (when finished, all the rolled hems should be on the inside). Put a rolled hem from waist to ankle along the outseam and sew the hem. I decided to use a draw-string inside a rolled hem. I cut 2 slits with the soldering gun cutter for the cords to come out placing them so they would be inside the rolled hem. Sew the rolled hem at the waist. Use a safety pin to thread the cord through the hem.
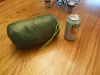
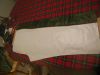
Pictures of the Completed Project:


 Reply With Quote


Bookmarks