Page 3 of 4 FirstFirst 1234 LastLast
Results 21 to 30 of 31
  1. #21
    Senior Member Refreshing's Avatar
    Join Date
    Sep 2011
    Location
    Sioux Falls, SD
    Hammock
    DIY Climbing Spec Hammock
    Tarp
    TREEfool Rainfly
    Insulation
    DIY RSBTR Kit
    Suspension
    Climb Spec Webbing
    Posts
    639
    OMG I LOVE YOU GUYS! The picture of the too loose vs too tight and the link to my sewing machine manual allowed me to solve the problem! (I think). I did a bunch of tests on a scrap piece of nylon and after tightening it by 50% the problem hasn't happened.

    SO THANKS GUYS!!!!

    If the problem comes back when I start sewing long sections I will let you guys know.
    v
    v

    TREEfool.com < < hammock dangerously
    ^
    ^

  2. #22
    Senior Member
    Join Date
    Oct 2012
    Location
    Near North, ON
    Hammock
    DIY Bridge db layer 1.1
    Tarp
    DIY 12'
    Insulation
    DIY Climashield
    Suspension
    amsteel/tree strap
    Posts
    812
    Post pics of the new stitching for inspection by the crew here.

    Also, what all have you sewn with the machine before the tension fix?

  3. #23
    Senior Member Refreshing's Avatar
    Join Date
    Sep 2011
    Location
    Sioux Falls, SD
    Hammock
    DIY Climbing Spec Hammock
    Tarp
    TREEfool Rainfly
    Insulation
    DIY RSBTR Kit
    Suspension
    Climb Spec Webbing
    Posts
    639
    Thanks so much guys! My entire hammock is basically finished and I didn't have a single problem (except user error when I got too careless on a few stitches). I will post up pictures as soon as it is completed.
    v
    v

    TREEfool.com < < hammock dangerously
    ^
    ^

  4. #24
    New Member tinner58's Avatar
    Join Date
    Nov 2013
    Location
    Ohio
    Hammock
    DIY
    Tarp
    DIY 10' w/Doors
    Insulation
    DIY 3/4 UQ DIY TQ
    Suspension
    Webbing
    Posts
    9
    I had the same problem, but not as bad as your picture shows. I would get a couple of extra loops on the back side. I tried every tension available with different needles and different size needles. I also cleaned the bobbin area, thinking that would fix the problem. It didn't. It appeared to me that the culprit was the top thread. I finally tried holding onto the upper thread behind the foot and supplying just a little bit of tension as I began stitching. Worked perfectly. I also start with a short front stitch, then backstitch over the previous front stitch, then continue on with the front stitch. It was a little bit awkward at first, but am quite used to it now. Probably could take the machine in for tuning, but this worked for me.

  5. #25
    Senior Member JLeephoto's Avatar
    Join Date
    Nov 2013
    Location
    TRIAD, NC
    Hammock
    Wilderness Logics Light Owl
    Tarp
    WL Tadpole
    Insulation
    Down SB, WL UQ
    Suspension
    Whoopies
    Posts
    185
    Quote Originally Posted by tinner58 View Post
    I had the same problem, but not as bad as your picture shows. I would get a couple of extra loops on the back side....I finally tried holding onto the upper thread behind the foot and supplying just a little bit of tension as I began stitching. Worked perfectly.
    Sounds like you got your problem resolved. I have a new fangled Brother with automatic tensioning, etc. and was still getting a couple of occasional loops on the back at the start of my stitching. Reading the manual closely, I saw that it suggested rotating the needle down to pin the fabric and pulling taught the tag end BEFORE dropping the foot and beginning my stitch. In doing so you start with a tight thread instead of allowing the needle to throw a loop from the raised position. This cured my issue when I remember do follow the sequence.
    Your problems were more severe, but might be worth noting if you get the occasional loop at the bottom.

  6. #26
    Senior Member e_2's Avatar
    Join Date
    Nov 2013
    Location
    Wisconsin
    Hammock
    DIY RS custom
    Tarp
    DIY winter custom
    Insulation
    DIY UQ+TQ &amp;/or bag
    Suspension
    DIY Whoopie+Straps
    Posts
    245
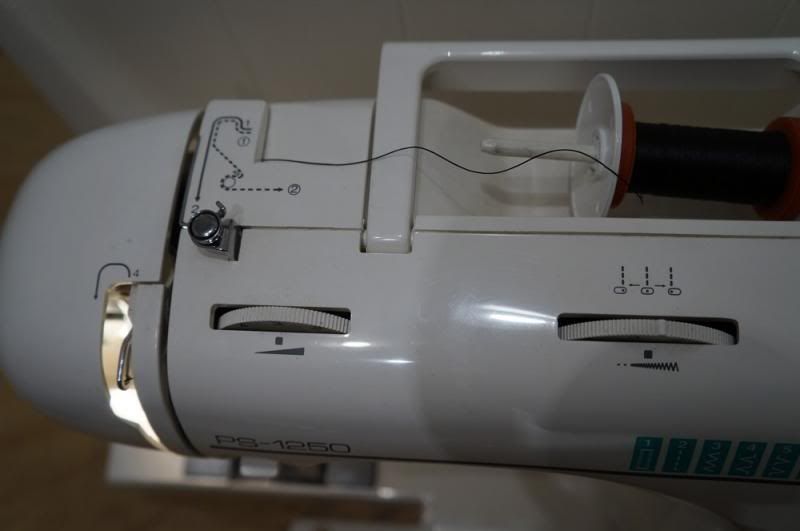
    Quote Originally Posted by Refreshing View Post
    I'm pretty sure you're supposed to wind the thread around that chrome bit on top to help remove jerks and lurches in the thread... it should also improve the tension adjustability (i.e. set the tension back to zero/normal/auto/whatever and have better consistency of adjustments) quite a bit.

  7. #27
    Senior Member
    Join Date
    Jul 2013
    Location
    Victoria, BC
    Hammock
    Exped Ergo
    Tarp
    Exped Combi
    Insulation
    Sleeping bag+pad
    Suspension
    Eyelet line+ biner
    Posts
    1,468
    Quote Originally Posted by e_2 View Post
    I'm pretty sure you're supposed to wind the thread around that chrome bit on top to help remove jerks and lurches in the thread... it should also improve the tension adjustability (i.e. set the tension back to zero/normal/auto/whatever and have better consistency of adjustments) quite a bit.
    I had a machine with a very similar threading system (Pfaff 150) and the 'chrome bit on top' was the tensioner for the bobbin winder (out of picture to the right??), not part of the regular thread path for sewing.
    Attached Images Attached Images
    Last edited by VictoriaGuy; 02-25-2014 at 20:01. Reason: Added pics

  8. #28
    Senior Member Refreshing's Avatar
    Join Date
    Sep 2011
    Location
    Sioux Falls, SD
    Hammock
    DIY Climbing Spec Hammock
    Tarp
    TREEfool Rainfly
    Insulation
    DIY RSBTR Kit
    Suspension
    Climb Spec Webbing
    Posts
    639
    Thanks E_2 for the input but VictoriaGuy is correct in that the dotted line diagram is for the bobbin.
    v
    v

    TREEfool.com < < hammock dangerously
    ^
    ^

  9. #29
    Senior Member
    Join Date
    Dec 2010
    Location
    Somewhere near Parkville, MO
    Hammock
    DIY Knotty/Speer special, RED
    Tarp
    Warbonnet Superfly
    Insulation
    50 extree pounds
    Suspension
    Whoopy slings
    Posts
    1,393
    Awesome, I'm glad you got it fixed. I had these problems with my wifes machine and after working on it multiple times we finally took it in for service which is what it needed all along.

    Sometimes things just break and this one broke in a way that it would be working just fine and then all of a sudden there'd be a birds nest underneath the fabric.

    But your's responded correctly so it was just tension

  10. #30
    Senior Member Refreshing's Avatar
    Join Date
    Sep 2011
    Location
    Sioux Falls, SD
    Hammock
    DIY Climbing Spec Hammock
    Tarp
    TREEfool Rainfly
    Insulation
    DIY RSBTR Kit
    Suspension
    Climb Spec Webbing
    Posts
    639
    Quote Originally Posted by MrClean417 View Post
    Awesome, I'm glad you got it fixed. I had these problems with my wifes machine and after working on it multiple times we finally took it in for service which is what it needed all along.

    Sometimes things just break and this one broke in a way that it would be working just fine and then all of a sudden there'd be a birds nest underneath the fabric.

    But your's responded correctly so it was just tension
    Indeed, it is so nice to sew things and not spend half the time redoing stitches! DIY projects became a lot more cost effective just by turning a dial.
    v
    v

    TREEfool.com < < hammock dangerously
    ^
    ^

  • + New Posts
  • Page 3 of 4 FirstFirst 1234 LastLast

    Similar Threads

    1. Picture
      By mikenmel08 in forum General Hammock Talk
      Replies: 13
      Last Post: 04-27-2013, 21:52
    2. Picture help!
      By Shadowmoss in forum Feedback, Suggestions, and Site Questions
      Replies: 1
      Last Post: 07-04-2011, 20:15
    3. Need help with a picture.
      By RockStar in forum General Hammock Talk
      Replies: 0
      Last Post: 07-31-2007, 14:09

    Bookmarks

    Posting Permissions

    • You may not post new threads
    • You may not post replies
    • You may not post attachments
    • You may not edit your posts
    •