Results 1 to 10 of 10
  1. #1
    Senior Member
    Join Date
    Mar 2014
    Location
    Villa Rica, Georgia
    Hammock
    Dutch Chameleon Hexon 1.6
    Tarp
    Dutch Xenon SilHex
    Insulation
    HGIncubator/Burrow
    Suspension
    Dutch BeetleBuckle
    Posts
    148
    Images
    9

    Integrated Tarp Tie-out pouches

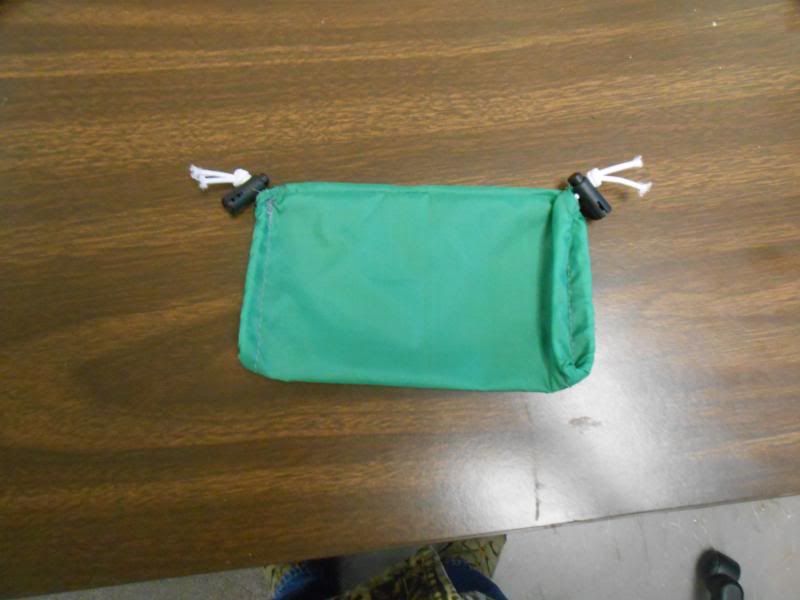
    So in my quest to make a lightweight and fast setup/takedown tarp, I added some 2 gram pouches on the opposite side of each tie out point. The idea is that I can quickly stuff the line with my line tensioner and lineloc attached to the Tie-out D ring. The pouch is made from an 8"x8" square piece of pocket mesh, a 16" piece of 1.75 Zing-It and a mini cord lock. It allows me to cinch up the pouch and lock it, ensuring when I take out my tarp, I don't have a bunch of cables all tangled together and I didn't have to spend the time to wrap or figure 8 the cables.
    00_IMG_20140429_115552_447.jpg

    1) I started with an 8" x 8" piece of pocket mesh (this when folded into a triangle is the same size as my triangle tie-out reinforcement on the other side). Use what you want to cut, but for this type of work, I prefer rotary cutters on cutting boards.
    01_IMG_20140429_110324_113.jpg

    2) Next fold over into a triangle and stitch around the 90 degree sides
    02_IMG_20140429_112041_020.jpg

    3) Make a slit in one side of the non stitched side (if you remember the Pythagorean theorem, it would be the hypotenuse side ;-)
    03_IMG_20140429_123657_125.jpg

    4) Weave your cord/line around the slit and add the mini cord lock
    04_IMG_20140429_113108_137.jpg

    5) As you stitch it to the other side of you tie-out reinforcement, you can ruffle up the edge to make the pouch more pronounced and effective
    05_IMG_20140429_114609_336.jpg

    Here it is on my DiY tarp. This is that awesome Argon 1.06 Sil Nylon from Dutch, with a piece of Oxford 200D sewn to the main side.
    06_IMG_20140429_114144_112.jpg

    Since I used Gold Gutermann Mara on the Oxford 200D and black Gutermann Mara to attach the pouch, you can barely see the pouch stitching on the front. You can see the cord lock poking around from the back..
    07_IMG_20140429_115931_188.jpg

    Each pouch with mesh, the line and cord lock weighs only 2 grams.
    08_IMG_20140429_124425_708.jpg

    After getting the first one the way I wanted it, I kicked out the other 5...
    09_IMG_20140429_203137_234.jpg
    07_IMG_20140429_115931_188.jpg
    Deja Moo: "The feeling you have heard this bull before"

  2. #2
    Senior Member boulderv7's Avatar
    Join Date
    Jun 2013
    Location
    Grand Rapids, MI
    Hammock
    DIY
    Tarp
    DIY
    Insulation
    DIY Down UQ
    Suspension
    Whoopies
    Posts
    1,151
    Nice work. I like the use of pocket mesh. Very cool.
    My head is an animal

  3. #3
    Senior Member
    Join Date
    Mar 2014
    Location
    Villa Rica, Georgia
    Hammock
    Dutch Chameleon Hexon 1.6
    Tarp
    Dutch Xenon SilHex
    Insulation
    HGIncubator/Burrow
    Suspension
    Dutch BeetleBuckle
    Posts
    148
    Images
    9
    has anyone tried something like this?
    Deja Moo: "The feeling you have heard this bull before"

  4. #4
    Banned
    Join Date
    Dec 2011
    Location
    Rosenberg, TX
    Hammock
    DIY 12' Channel end
    Tarp
    HH Hex w/doors
    Insulation
    Underwoobie T/UQ
    Suspension
    RacerLoops w/Cinch
    Posts
    4,703
    Images
    8
    Quote Originally Posted by Hangs4Fun View Post
    has anyone tried something like this?
    Click on the Pawn Bags link in my signature block.

  5. #5
    Senior Member
    Join Date
    Mar 2014
    Location
    Villa Rica, Georgia
    Hammock
    Dutch Chameleon Hexon 1.6
    Tarp
    Dutch Xenon SilHex
    Insulation
    HGIncubator/Burrow
    Suspension
    Dutch BeetleBuckle
    Posts
    148
    Images
    9
    Quote Originally Posted by sargevining View Post
    Click on the Pawn Bags link in my signature block.
    I like the addition of the Dutch biners (I assume those are the Dutch Titanium karabiners?) to your Knight bags ;-)

    I really like the idea of these. Whereas mine are part of my tarp now, yours could be put on another tarp (easier) and reused...

    One suggestion, you might consider using noseeum or pocket mesh, which besides being lighter, would also allow the system to dry better and better see what is going on inside ;-) (I also made my tarp stuff sack out of pocket mesh, so that I can dry out better).


    btw, just a slight typo on your page, Bishop bags are not double sided stuff sacks. Bishop bags are simply a stuff sack with a small button hole or grommet on the opposite end that the line comes out of ;-) At least that is my understanding, though I digress I am a NOOB here.
    But that is where I'm curious. Are you pawn bags, really just smaller double sided stuff sacks or is one side of them solid with a small hole and you just have a cinch string there to tighten things up? When I think of Bishop bags, I think of a bag that can only be opened/cinched on one side with a small hole that I pass my suspension through. I can't tell from the pictures which way if you could clarify.
    Deja Moo: "The feeling you have heard this bull before"

  6. #6
    Senior Member doogie's Avatar
    Join Date
    May 2012
    Location
    Birdsboro, PA
    Hammock
    Hammeck Envy or DIY
    Tarp
    DIY hex or winter
    Insulation
    WL 3/4 UQ, DIY TQ
    Suspension
    Speed Hooks (IGD)
    Posts
    1,455
    Images
    138
    Quote Originally Posted by Hangs4Fun View Post
    Are you pawn bags, really just smaller double sided stuff sacks or is one side of them solid with a small hole and you just have a cinch string there to tighten things up? When I think of Bishop bags, I think of a bag that can only be opened/cinched on one side with a small hole that I pass my suspension through. I can't tell from the pictures which way if you could clarify.
    If you follow his link you can see clearly that they are double sided stuff sacks.
    "Mountains should be climbed with as little effort as possible and without desire. ... To live only for some future goal is shallow. It’s the sides of the mountain that sustain life, not the top. Here's where things grow." - Robert M. Pirsig

    Subscribe to my YouTube channel: http://www.youtube.com/user/PaCampingDad

  7. #7
    Senior Member Dos's Avatar
    Join Date
    Oct 2011
    Location
    Daytona Beach
    Hammock
    WBB
    Tarp
    HG Cuben
    Insulation
    Baby Orca/Klymit
    Suspension
    straps/c buckles
    Posts
    2,451
    Images
    11
    Quote Originally Posted by sargevining View Post
    Click on the Pawn Bags link in my signature block.
    Thank you SOO much for this!!

    I took my Superfly out for the first time last week and I was entirely frustrated
    by this problem.

    Search and ye shall find
    ~~~~~~~~~~~~

    AT '12. AT '14. FT '15. CA '15.

  8. #8
    Senior Member
    Join Date
    Mar 2014
    Location
    Villa Rica, Georgia
    Hammock
    Dutch Chameleon Hexon 1.6
    Tarp
    Dutch Xenon SilHex
    Insulation
    HGIncubator/Burrow
    Suspension
    Dutch BeetleBuckle
    Posts
    148
    Images
    9
    doogie, even in the picture you sent me, it only shows what looks like one side can open up. and the other pictures on his site only ever show one side of the bag open. The right side in that picture definitely opens. It is possible that the left side is stitched shut with a hole to make what he himself refers to as a small Bishop Bag (and the cinch on the left side could just be used for cinching the material tight, not for closing an open bag).

    So either he is making an incorrect reference to a Bishop Bag (and really means a double sided stuff sack)... or it really is a small Bishop bag; open on the right side, with a small hole on the left and cinch's on both sides. None of the pictures on his site shows this. The reason I am trying to clarify, is because I think it makes a lot of sense to NOT be a double sided stuff sack and more like a small Bishop Bag with a second cinch that is not used to close the opening, but rather cinch the material together.

    I really like mine pouches so far and plan to keep them, but I am considering this concept (well, his newer Knight Bags) for my CRL.
    Deja Moo: "The feeling you have heard this bull before"

  9. #9
    Banned
    Join Date
    Dec 2011
    Location
    Rosenberg, TX
    Hammock
    DIY 12' Channel end
    Tarp
    HH Hex w/doors
    Insulation
    Underwoobie T/UQ
    Suspension
    RacerLoops w/Cinch
    Posts
    4,703
    Images
    8
    Quote Originally Posted by Hangs4Fun View Post
    I like the addition of the Dutch biners (I assume those are the Dutch Titanium karabiners?) to your Knight bags ;-)

    I really like the idea of these. Whereas mine are part of my tarp now, yours could be put on another tarp (easier) and reused...

    One suggestion, you might consider using noseeum or pocket mesh, which besides being lighter, would also allow the system to dry better and better see what is going on inside ;-) (I also made my tarp stuff sack out of pocket mesh, so that I can dry out better).


    btw, just a slight typo on your page, Bishop bags are not double sided stuff sacks. Bishop bags are simply a stuff sack with a small button hole or grommet on the opposite end that the line comes out of ;-) At least that is my understanding, though I digress I am a NOOB here.
    But that is where I'm curious. Are you pawn bags, really just smaller double sided stuff sacks or is one side of them solid with a small hole and you just have a cinch string there to tighten things up? When I think of Bishop bags, I think of a bag that can only be opened/cinched on one side with a small hole that I pass my suspension through. I can't tell from the pictures which way if you could clarify.
    The Dutch biners are actually on the CRL that is inside the 'knight bag'' which is a slightly larger bag for the ends of the tarp. They also work to police up your tree strap if you're using cinch buckles and Dutch clips on your hammock suspension.

    They are open ended stuff sacks. They are intended to be easily moved from one tarp to another and making them open on both ends means you don't have to futz around trying to figure out which end is which. The ones in the pics are V1.0. I'm using V3.0 now. Slightly bigger, heavier fabric, and stronger stitching. I found that they see more use than I had originally anticipated, so I'm stitching stronger at the high use areas. Making them bigger also cuts down on abuse in handling. I've got them on everything that has a line or strap. I know right where everything is all the time, never get lines caught on things in the pack, and no tangles even though all I'm doing is basically stuffing line into a bag. They also work great after the tarp is set up yo stuff excess line into so that its not lying on the ground ready to trip you up at night or when you're carry in dinner around,

    I did consider mesh, but with the bags being close to the ground a lot, mesh tends to pick up twigs and forest duff, so I'm sticking with 1.9 DWR. Its good weight as far as I'm concerned.
    Last edited by sargevining; 05-16-2014 at 07:21.

  10. #10
    Senior Member
    Join Date
    Mar 2014
    Location
    Villa Rica, Georgia
    Hammock
    Dutch Chameleon Hexon 1.6
    Tarp
    Dutch Xenon SilHex
    Insulation
    HGIncubator/Burrow
    Suspension
    Dutch BeetleBuckle
    Posts
    148
    Images
    9
    "..mesh tends to pick up twigs and forest duff.."

    Thanks Sargevining, that is why I love this site, you get field testing info to make better gear from. hopefully, for my "pouches", being attached at the tie-out point, I won't get too much of the forest duff ;-)

    I also liked you comment on making the bags bigger, as typically my instinct has been to make a stuff sack as small as possible such that the cinch string is usually need to keep the contents from exploding out, ha. So far, 1 of my stuff sacks was just slightly bigger than my normal. I gotta say from it being easier to get "stuff" in and out and the obvious less strain on the material, I think you have something there. I use Dutch's 1.06 Argon SilNylon on all my stuff sacks, dry sacks, back packs and that material is so light, I'm leaning towards converting to not having things so tightly packed. Mainly because I don't have a space problem in my pack. It is nice though to see just how small all my gear can get down to. But like you for the functional aspect, those pawn bags get used at least a couple times every trip, so fatigue and wear should be considered.

    As for stitching, that is definitely one place I don't have any problems. My Janome HD3000 does such a great job with the Gutermann Mara and Tera on all of this lightweight material, that I find myself doing lots of extra stitches. That Argon SilNylon from Dutch is so slippery, yet the HD3000 feet superbly grab it and don't let go. I find myself starting out every project putting a double rolled hem around every edge. Then as I do hems or seams, I always first carefully lay a single stitch until I get it just the way I want it. And if all looks good, I lay down a triple stitch after that.

    Any way, thanks again for sharing your work and tricks.
    Deja Moo: "The feeling you have heard this bull before"

  • + New Posts
  • Similar Threads

    1. Replies: 28
      Last Post: 07-15-2014, 21:39
    2. An integrated 'tarp' could save a LOT of weight
      By burtonator in forum General Hammock Talk
      Replies: 11
      Last Post: 05-09-2013, 15:26
    3. Fast up and fast pack of Clark standard w. integrated fly /tarp
      By DemostiX in forum Clark Jungle Hammocks
      Replies: 11
      Last Post: 07-03-2011, 17:41
    4. WTB Grey/Green Superfly tarp with integrated doors
      By hutzelbein in forum Archived WTB
      Replies: 2
      Last Post: 04-11-2011, 23:19
    5. tarp tieout/guyline pouches/pockets
      By spidennis in forum Weather Protection
      Replies: 14
      Last Post: 11-17-2009, 09:13

    Bookmarks

    Posting Permissions

    • You may not post new threads
    • You may not post replies
    • You may not post attachments
    • You may not edit your posts
    •