


Hello all, I've been lurking around for a while and finally decided to get hanging. I've got quite a few things on the way from DIYGearSupply for making a hammock, but while I'm waiting on it to get here I have to take care of another issue - my backyard has no place to hang from. I'll also be camping some with my son's Webelos Den and I'm not sure if we'll always have soem good trees around.
So, my first DIY project is making a TurtleDog stand. After reading through all the posts in this thread, I headed out and got the following supplies:
- 5/16" x 2" bolts (x8)
- 5/16" fender washers (x8)
- 5/16" locknuts (x8)
- 5" heavy duty gate hinges (x2)
- 3/8" snap links (x2)
- 3/8" x 3" eye bolts (x2)
- 3/8" fender washers (x2)
- 3/8" locknuts (x2)
- 2" x 2" x 8' pressure treated lumber (x6)
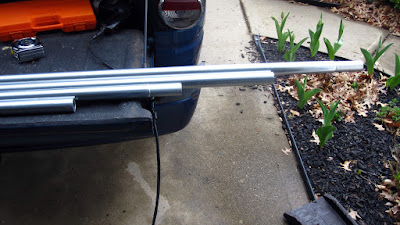
- 10' 3" (10' 6" counting the taper) 17-gauge chainlink fence top rail (x2)
Total cost for the supplies was right at $60. Going with regular 2x2s would bring the price down a good bit, but the pressure treated stock was in a whole lot better shape than the regular lumber and I think the treated will hold up a little better anyway.
Here's the steps I took...
The Stands
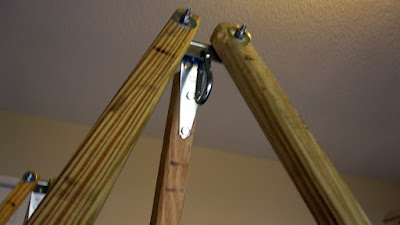
I wanted the legs to fold pretty closely together, so I started by clamping three of the pieces of wood so I could line up and place the hinges for the two outside legs.

After drilling the holes and bolting the hinge to the two legs with fender washers and locknuts, I adjusted the center leg down and out a bit to line it up for drilling.

The center leg gets two bolts, washers and locknuts.

At this point, I set the first stand up to check out the hinge action. Everything seemed OK,so I went ahead and put the second stand together.
I am planning to hang the crossbar from the stands similar to hppyfngy's setup except that instead of using an s-hook, I'm using a snap link. The only problem is that the snap link is just a little bigger than the holes in the hinges, so I had to do a quick enlargement with the drill first.

With that taken care of, the stands were pretty much done until I get my order in from DIYGearSupply and put some limting cordage around the legs to keep them from separating. I also need to cut them down from the full 8' length, but I'll wait and do that once I have something to hang on it.
The Crossbar
I only had time to cut the crossbar, I'll have to drill and install the eye bolts later. I cut the two top rails by measuring one 4' and the other 6' from the non-tapered ends.
The end result is four pieces:
- 4'
- 6' 3" (with 3" tapered end for connecting)
- 6'
- 4' 3" (with 3" tapered end for connecting)

With these various piece lengths, I can create a crossbar with the following lengths:
- 8' 3" (4' + 4' 3")
- 10' 3" (4' 3" + 6' or 6' 3" + 4')
- 12' 3" (6' 3" + 6')
- 14' 6" (6' 3" + 4' 3" + 4')
- 16' 6" (6' 3" + 6' + 4' 3")
- 20' 6" (6' 3" + 6' + 4' 3" + 4')
I'm not sure which length I'll need yet, so the options are good to have.
Now to wait for the rest of my supplies to come in and get started on the hammock itself. At least now, I'll be able to test it out as I build it.


 Reply With Quote
Bookmarks