Page 2 of 6 FirstFirst 1234 ... LastLast
Results 11 to 20 of 52
  1. #11
    Senior Member Just Jeff's Avatar
    Join Date
    Oct 2006
    Location
    Charlottesville, VA
    Hammock
    Blackbird
    Tarp
    MacCat Standard
    Insulation
    Winter Yeti, MWUQ4
    Suspension
    Whoopie Slings
    Posts
    7,924
    Images
    32
    Quote Originally Posted by jred View Post
    I'm not one of those "it has to be straight & even!!!!" guys, I just want it to work
    That's good...b/c it probably won't be very straight for your first couple projects! Just take your time and go slow, and it's not that hard. Pretty soon you'll speed it up and they'll get straighter. Sometimes my seams still aren't perfectly straight...but they still hold the project together.

    Besides, if someone feels the need to criticize my stitching, they're probably not my style of hiking partner anyway.
    “Republics are created by the virtue, public spirit, and intelligence of the citizens. They fall when the wise are banished from the public councils because they dare to be honest, and the profligate are rewarded because they flatter the people, in order to betray them.” ~Judge Joseph Story

    - My site: http://www.tothewoods.net/
    - Designer, Jeff's Gear Hammock / Pack Cover by JRB

    IMPOSSIBLE JUST TAKES LONGER

  2. #12
    Senior Member GrayDog's Avatar
    Join Date
    Jan 2010
    Location
    Orlando, FL
    Hammock
    Skeeter Beeter Pro
    Tarp
    WB Mamajamba
    Insulation
    WL3/4 - GoLite TQ
    Suspension
    Whoopies
    Posts
    358
    Images
    8
    Like walking it's all about your viewpoint. If you are looking at just the area where the needle is injecting, your lines will be all over the place. The further out you can change you field of vision, the easier it is to sew a straight line.
    hammock [ham-uhk] noun
    Man's successful attempt to sleep on a cloud

  3. #13
    Senior Member WV's Avatar
    Join Date
    Feb 2008
    Location
    southeast WV
    Hammock
    DIY
    Posts
    4,820
    Images
    208
    I'm of the fold and sew school generally, but if I'm doing a catenary curve in silnylon I cut the curve with a small soldering iron on a sheet of masonite. Then I fold 1/4" over and "spot weld" the fold down by just touching the tip of the iron to the fold every inch or so. You need to hold the edge taut with your fingers just long enough for the melted pieces to stick to each other - about half a second. Two fingers push down and spread the fabric while you weld one or two spots between them). With a bit of practice it's faster than pinning, and there are no pins to remove later. Then I fold the seam once more as I sew through the three layers.

  4. #14
    Senior Member Ramblinrev's Avatar
    Join Date
    Apr 2008
    Location
    Milton, PA
    Hammock
    Hennessey Explorer Ultralight
    Tarp
    Hennessey Hex
    Insulation
    HH Super Shelter
    Suspension
    ring buckle
    Posts
    7,945
    Images
    101
    Quote Originally Posted by GrayDog View Post
    Like walking it's all about your viewpoint. If you are looking at just the area where the needle is injecting, your lines will be all over the place. The further out you can change you field of vision, the easier it is to sew a straight line.
    The importance of this can not be overstated. Do not look at the needle... its not going anywhere except up and down. (Of course you need to know where it is so you don't puncture your finger.) You want to focus on what ever guideline you have established to line up the edges. Then extend your vision several inches ahead of the guideline as you track the fabric through. What comes out the back of the presser foot is already done. Don't bother tracking it. What you are interested in is the section of fabric about to line up to go through the presser foot. I have probably made it sound more complicated than it is. You'll get the hang of it pretty easily.
    I may be slow... But I sure am gimpy.

    "Bless you child, when you set out to thread a needle don't hold the thread still and fetch the needle up to it; hold the needle still and poke the thread at it; that's the way a woman most always does, but a man always does t'other way."
    Mrs. Loftus to Huck Finn

    We Don't Sew... We Make Gear! video series

    Important thread injector guidelines especially for Newbies

    Bobbin Tension - A Personal Viewpoint

  5. #15
    Senior Member Knotty's Avatar
    Join Date
    Mar 2009
    Location
    Denville, NJ, USA
    Hammock
    DIY Stretch-Side
    Tarp
    DIY Cat Cut Hex
    Insulation
    Phoenix and Nest
    Suspension
    cinch buckles
    Posts
    4,377
    Images
    227
    I'm also from the fold-n-sew camp. Just don't have the patience to pin.

    WV's idea of spot welding with a soldering iron looks like it's worth exploring. WV, you're like an idea factory.
    Knotty
    "Don't speak unless it improves the silence." -proverb
    DIY Gathered End Hammock
    DIY Stretch-Side Hammock
    Stretch-Side "Knotty Mod"
    DIY Bugnet

  6. #16
    Senior Member pedro's Avatar
    Join Date
    Feb 2008
    Location
    Wilmington, DE
    Hammock
    DIY Speer-type
    Tarp
    modded SG 12' x12'
    Insulation
    CCF and DAM
    Suspension
    whoopie slings
    Posts
    816
    Images
    2
    Very interesting technique, WV.

    Now I'm going to open up a can of worms. Has anyone here successfully used a rolled hem presser foot on nylon or sil? I've only recently started messing around with a stock 1/8" rolled hem foot. I've gotten the technique down on cotton. I've seen rolled hem feet for wider hems, which I think would be more appropriate for some of our applications, but I just wanted to hear about any experience that others have had.
    "Interesting! No, wait, the other thing.....tedious!"- Bender Bending Rodriques

  7. #17
    Senior Member Ramblinrev's Avatar
    Join Date
    Apr 2008
    Location
    Milton, PA
    Hammock
    Hennessey Explorer Ultralight
    Tarp
    Hennessey Hex
    Insulation
    HH Super Shelter
    Suspension
    ring buckle
    Posts
    7,945
    Images
    101
    Quote Originally Posted by pedro View Post
    Very interesting technique, WV.

    Now I'm going to open up a can of worms. Has anyone here successfully used a rolled hem presser foot on nylon or sil? I've only recently started messing around with a stock 1/8" rolled hem foot. I've gotten the technique down on cotton. I've seen rolled hem feet for wider hems, which I think would be more appropriate for some of our applications, but I just wanted to hear about any experience that others have had.
    I have never had any luck with a rolled hem presser foot. YMMV
    I may be slow... But I sure am gimpy.

    "Bless you child, when you set out to thread a needle don't hold the thread still and fetch the needle up to it; hold the needle still and poke the thread at it; that's the way a woman most always does, but a man always does t'other way."
    Mrs. Loftus to Huck Finn

    We Don't Sew... We Make Gear! video series

    Important thread injector guidelines especially for Newbies

    Bobbin Tension - A Personal Viewpoint

  8. #18
    Senior Member gargoyle's Avatar
    Join Date
    May 2009
    Location
    Muskegon MI
    Hammock
    G-Bird II/Bridge
    Tarp
    Ogee tarp
    Insulation
    DIY TQ DIY Down UQ
    Suspension
    whoopies
    Posts
    6,686
    Images
    45
    Quote Originally Posted by Knotty View Post
    I'm also from the fold-n-sew camp. Just don't have the patience to pin.

    WV's idea of spot welding with a soldering iron looks like it's worth exploring. WV, you're like an idea factory.
    I second that. Patience and WV, The Idea Factory.
    Ambulo tua ambulo.

  9. #19
    Senior Member
    Join Date
    Jul 2010
    Location
    Memphis, TN
    Hammock
    DIY gathered end
    Tarp
    Cheapo HF camo
    Insulation
    SA down throw UQ
    Suspension
    HF straps w/ rings
    Posts
    164

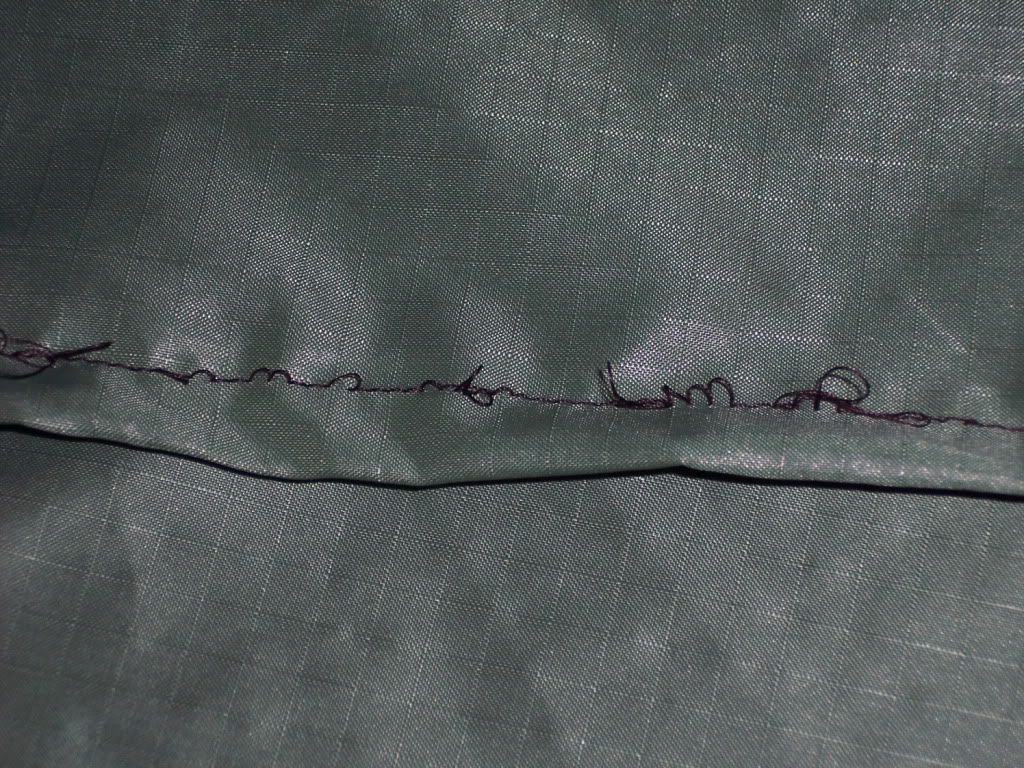
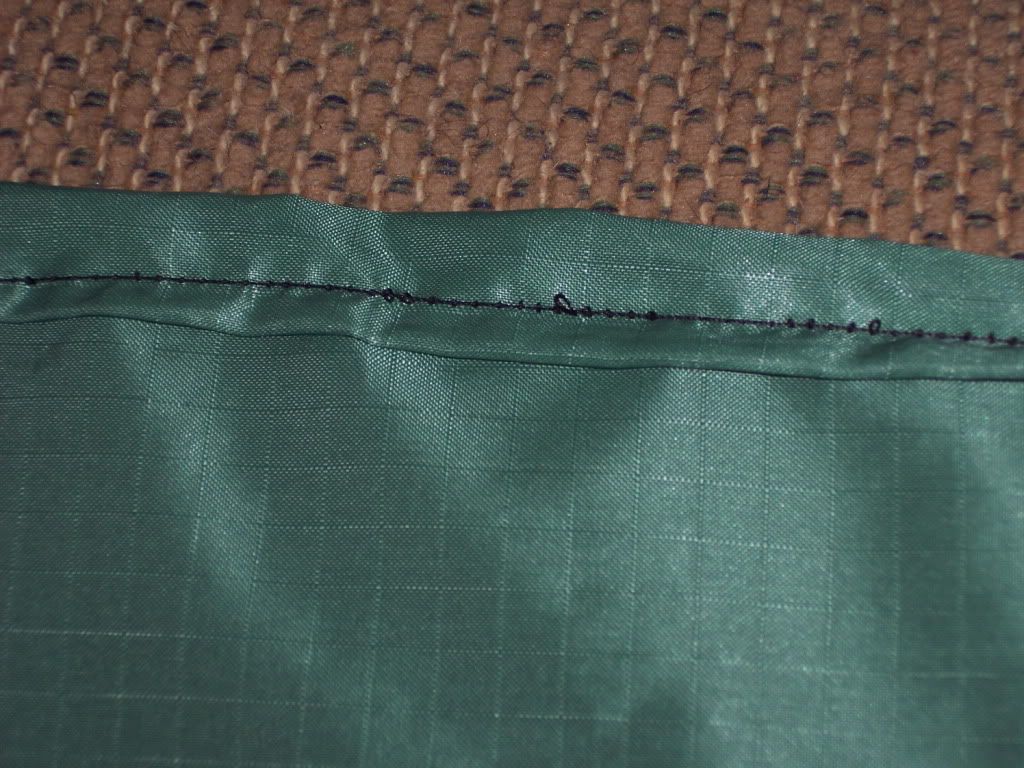
    Well, I messed up somewhere

    I tested on some scraps, and everything went fine. Once I actually started sewing the seam, the stitch is all messed up. I have the tension set to 4-5 (about half). I started on 4, then moved to 5, but nothing changed. Do I need to lower the tension?

    Bottom side:


    Top side:

  10. #20
    Senior Member pedro's Avatar
    Join Date
    Feb 2008
    Location
    Wilmington, DE
    Hammock
    DIY Speer-type
    Tarp
    modded SG 12' x12'
    Insulation
    CCF and DAM
    Suspension
    whoopie slings
    Posts
    816
    Images
    2
    Yes, increase the top tension. DO NOT play with the bobbin tension.
    "Interesting! No, wait, the other thing.....tedious!"- Bender Bending Rodriques

  • + New Posts
  • Page 2 of 6 FirstFirst 1234 ... LastLast

    Similar Threads

    1. Noobie at diy."Rolled seam or bound edges" or different seem styles.
      By buzzbait00 in forum Do-It-Yourself (DIY)
      Replies: 3
      Last Post: 01-24-2014, 17:45
    2. Sewing the edges of differential top quilt
      By All Kinds in forum Do-It-Yourself (DIY)
      Replies: 4
      Last Post: 01-04-2013, 18:47
    3. Sewing seams on cat-cut tarp edges?
      By hikerman2000 in forum Do-It-Yourself (DIY)
      Replies: 19
      Last Post: 08-14-2012, 22:35
    4. Sewing a rolled edge
      By Doubletap in forum Do-It-Yourself (DIY)
      Replies: 6
      Last Post: 01-06-2012, 18:42
    5. Destinctive Rolled Hem Hemmer Foot & Binder Foot & EdgeStitcher Sewing Foot Package
      By Dweller7 in forum [SOLD/WITHDRAWN] Items no longer available
      Replies: 0
      Last Post: 10-13-2011, 20:24

    Tags for this Thread

    Bookmarks

    Posting Permissions

    • You may not post new threads
    • You may not post replies
    • You may not post attachments
    • You may not edit your posts
    •