


This forum hasn't seen a new innovation in suspension systems for at least 36 hours!!! Is everybody out using their hammocks? I guess I'll just have to step up and do my part.
This post does not describe a new suspension system. Rather, with the exception of a hitch, it describes a selection of existing component parts that I find versatile, convenient, reliable, inexpensive, and field repairable.
My goals were to protect the trees, minimize the weight, simplify the hanging process, allow easy adjustment, and preserve flexibility. The arrangement can be used with any hammock with gathered ends, with or without single line suspension to lock-in sag, with or without a bugnet, and still be used for lounging..
The arrangement attaches the hammock to the tree huggers with toggles, allowing quick break-down or detaching one end and hanging the hammock up vertically at the other end to clear space under the tarp, without changing the adjustments for leveling or centering. The bugnet ridge (and/or center portion of a "single" line suspension system) also toggles to the main suspension so it can be easily disconnected for lounging. Those who want single line suspension but want to retain routine adjustability of sag could attach one end with a toggle, allowing lounging, and the other end with a trucker's hitch for adjustability.
The nitty-gritty:
The suspension begins at the hammock ends with an arrangement that is probably not original but that I haven't seen before: Gather the hammock carefully and neatly into a stack of folds an inch or an inch and a quarter wide and five or six inches long, and hold it temporarily with binder clips. Fold the gather around a dowel about 3/8" diameter and about 1/2" longer than the width of the gather and with a shallow saw-kerf in each end. Since the outside of this fold around the dowel will be longer than the inside, fold it so the top edges of the hammock are on the outside. When all is neat and tidy, tie the bitter end to the standing part with short lengths of thread or whipping twine to keep it in place while whipping.
Now starting as close as you can to the dowel, whip the bitter end to the standing part for at least an inch with waxed polyester whipping twine. I use Marlow #4. Whip it as tightly as you can since this is a major component, carrying the full load of the hammock in use. Start at the middle of a 4' length of the twine and tie with a double overhand, which holds well using waxed twine after pulling it as tight as you can. Lead the two ends around to the other side of the folded gather, tie another double overhand, tighten slightly, check that the new wrap is up against the first but not overlapping it, and then pull it as tight as you can. The #4, while quite strong, is fairly fine and can be hard on the fingers when pulling tight. I use a couple pairs of pliers to save my fingers while still getting the whipping as tight as I can. Continue in this fashion until you have an inch or more length of whipping that is hard and round as shown below.

Finish with a square knot on top of the last double overhand. The picture shows the result on a hammock of 1.9 oz DWR ripstop. The whipped portion finished at about 3/4" diameter.
You may find that the dowel pushes back and forth fairly easily inside the folded gather. If you're concerned that it may fall out, temporarily tie a short length of twine around the folded gather and lying in the shallow saw kerfs in the ends of the dowel. After tying the suspension line to the hammock you'll tie a more permanent twine that also keeps the suspension line properly positioned.
Now take a careful look at the work you've just completed and visualize what will happen when the hammock is hung and loaded. Under stress, the standing part will tend to move in one direction while the bitter end will tend to move in the opposite direction, around the dowel. Any slippage will pull the whipping in opposite directions, no longer perpendicular to the line of stress, thereby tightening the whipping even more. This does more than just make the arrangement somewhat self-tightening; it also gives you a visual check whether slippage is taking place, so you might want to consider re-doing it, more tightly. In actual use I have found no movement at all.
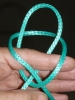
When both ends of the hammock are whipped, you can proceed to the first part of the suspension line. For this, I wanted a hitch or knot that would apply force directly in line with the centerline of the whipped end, i.e. not tending to cock the end sideways putting more stress on one part of the hammock material than on another. So I journeyed to Pennsylvania to retrieve my copy of The Ashley Book of Knots from my son (and incidentally to celebrate the first birthday of our first grandchild.) Unfortunately, I found nothing in Ashley to suit the purpose. So I took a piece of suspension line and started leading it in the directions that I wanted to apply force and came up with a hitch that is probably not original but was fun to reinvent anyway. Basically, the hitch functions like two toggle hitches coming from opposite sides but tied with a single length of line and with both ends loaded. The first few times I tied it I simply led the line along the route of the original but then I noticed that it seemed to resemble a clove hitch in some ways, and sure enough it was a clove hitch applied in an unconventional way. I now tie it as follows:
1. Tie a clove hitch in the hand; first one loop, then the second.

2. Insert a finger between the two loops.
3. Pass one of the loops through the other.
4. Insert the hammock end through both loops.
5. Pass the ends of the wrapped dowel through the openings held open by the finger.
6. Work it down tight.
You'll find that the hitch does not hold itself very tight, especially with slippery line like the 7/64" Amsteel Blue that I use. I suggest hanging with it for a few hours to allow everything to settle into place and then binding it as shown below, replacing the temporary tie holding the dowel in position.
I see the slipperyness of the line as an advantage in this application. It allows the the hitch to tighten fully as force is applied, increasing the compressive grip on the folded gather. I wouldn't be surprised if it would hold the hammock without the whipping, but I'm not going to try.
Some of you have probably noticed that I have said nothing about the length of line to tie to the hammock ends. That length is very important but I can't give you a dimension; it depends on your hammock, whether you use single line suspension, and other preferences. The length of that line, together with the angle of the lead, determine the height of the two descending rings above the hammock. Further, the angle of the lead depends on the amount of sag that you prefer, so it's all very subjective. If you're experienced, and know your preferences, you can figure out the proper length. If you're new to this addiction, or aren't sure, leave extra length and use knots that won't become so tight that you can't untie them. Whichever the case, keep in mind that there are three connections to each of the rings: the suspension line to the hammock, the trucker's hitch to the tree hugger, and the ridgeline of the bugnet and/or the middle portion of the single line suspension. Once you know the appropriate length and are ready for a more or less permanent attachment, keep in mind that the two leads from the hammock should be evenly loaded. That consideration suggests that the two leads be tied together and hitched to the ring using a hitch that allows enough slip to equalize the load. To achieve this, I join the ends of the two leads with a fisherman's knot (Ashley #293) placed so it will come about midway between the hammock and the ring. (In actual practice, I tie the fisherman's knot with the opposite lead running through the middle just to keep the two leads bundled somewhat together.)

I then tie the loop to the ring with a ring hitch (Ashley #1859) which will allow the requisite slip to equalize tension with today's cordage.
Since two leads share the load from the hammock to the ring, 7/64” Amsteel Blue is quite adequate. Since the final link in the load transfer from hammock to hugger is a trucker's hitch, which also shares the load between two leads, I can comfortably use 7/64" Amsteel Blue there as well. (Those of you who raised an eyebrow when I mentioned using 7/64" can now relax.)
The final link just mentioned is a somewhat unconventional trucker's hitch. The fixed end of the hitchline at the ring is tied with an unimaginative two wraps and a double halfhitch. From there it leads around a toggle inserted through a loop sewn into the end of the hugger as shown here.
From the toggle it leads back to the ring and is adjusted at that end, and tied off with a half-hitch and a slippery half-hitch. A comment or two about the toggle at the hugger is in order. I wanted a quick-connect/disconnect at that point; I wanted to minimize friction in the trucker's hitch as much as I could, and I wanted to avoid scrunching the webbing together in a way that loaded the fibers in the webbing unequally. When this method of doing it occurred to me I was a bit uneasy about it, fearing that it could fall apart when unloaded, but I decided to give it a try. For fifteen minutes I tried to shake it loose and then lay down in the hammock to rest my tired arm. It comes with no guarantee but it works for me. The toggle, like others in my setup, is made from a scrap of a very hard, strong wood that has been floating around my shop for decades. (I won't tell you what it is, but the black color that shows in the picture is it's natural color.) To keep it from getting lost I drilled into the end, squirted in a bit of cyanoacrylate glue (SuperGlue) and stuck in the end of a short piece of tightly braided utility cord. I then laid the other end of the cord along the center of the webbing (where it's doubled for forming the loop) and sewed it in place with wide, short, zigzag stitching.
My huggers are short, 60" after sewing 2" loops in both ends, barely long enough to go around a tree 18" in diameter. The end with the toggle passes through the loop in the other end. If the tree is smaller and the distance between trees is short, I wrap again around the tree as many times as necessary. And if the tree is more than 18" in diameter??? Then I skip the toggle routine, pass the trucker's hitch line through both hugger loops and then back to the ring, spanning the gap between loops as shown below. I'd rather carry extra Amsteel Blue than longer huggers; it's more versatile.
The final element is the span from ring to ring. For a bugnet ridge I attach one end with a toggle as shown below.

With a fairly light load like a bugnet ridge it's possible and more convenient to use a long toggle and toggle directly to the ring. I tried that first. The ease of connecting was nice but the toggle tended to fall out, and for a heavier load, like adjusting sag, the bending stress on the toggle would be great. I've settled on toggling back to the line itself as shown. Loop the other end of the line through the opposite ring, and tie off with a tautline hitch for adjustment, an arrangement that users of Speer hammocks are familiar with. Those who want fixed sag achieved by single line suspension will use structural cordage from ring to ring. I suggest tying one end more or less permanently and using a loop and toggle at the other end so it can be disconnected for lounging in the hammock. If field adjustment of the sag is wanted, one end can be a trucker's hitch and the other end toggled.
In practice:
1. Put up the canopy.
2. Wrap a hugger around a tree and pass the toggle end through the loop in the other end; position as desired and pull tight.
3. Put the loop in the end of the hugger through the loop in the trucker's hitchline left from the last hang and stick the toggle through the loop in the end of the hugger. If you find it easier to insert the toggle first and then loop the trucker's hitch around it, make sure the cord on the toggle is not pinched.
4. Repeat steps 2 and 3 at the opposite end, loosening the trucker's hitch if necessary; then eyeball the setup, and adjust as necessary with the trucker's hitches at both ends.
5. If used, toggle the bugnet ridge to the ring OR untoggle the single line suspension or bugnet ridge to lounge in the hammock.
6. For added space under the canopy, such as for socializing with Bre'r Bear, untoggle an end from its hugger and hang it up on the other side. (Since this could be a bit difficult if the hammock is hung bowstring tight, it provides one more in a long list of reasons not to be so uptight in hanging (oops, my prejudice is showing.))
And that's how I do it....for now. By tomorrow, or the day after, I will have learned better from others on this splendid forum.
Weights of components as implemented here:
Hammock end dowels, 2: 0.25 oz
Whipping: trivial
descending rings, 2: 0.8 oz
60” Huggers, 2: 2.5 oz
Hugger toggles, 2: 0.35 oz
7/64” diameter Amsteel Blue: 0.048 oz. per ft.
Hammock to ring: 3' x 2 = 6'
Trucker's hitches: 12' x 2 = 24'
Total: 1.44 oz
Bugnet ridgeline: 16'; 0.29 oz
Bugnet toggle: 0.05 oz
Total weight of complete suspension: 5.68 oz


 Reply With Quote


Bookmarks