


 Description for World's simplest treeless hammock stand

Description by 3club
World's simplest treeless hammock stand
Materials: two 10' 2x4
Four wally world aluminum tent stakes
1/16" (1.75mm) lash-it
my hammock and tarp (DIY)
suspension straps and buckles from warbonnet
Tools used:
shovel to dig 6" hole
hammer or rock to beat stakes in
No cutting or drilling of wood required.
Tested for one week
-
#1
Re: World's simplest treeless hammock stand
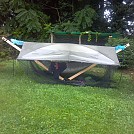
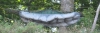
I am visiting a friend in the hills of Tennessee, and brought my hammock, but she has no suitable trees, and I needed a low cost, temporary solution. The only materials I needed to buy for this project were two 10' 2x4s from Lowe's. This was the first step. The next step was to dig a small hole in the ground, just about the size of a large coffee can. This is just something for the ends to sit in. Alternatively, I thought about cutting a 45 degree angle on the ends so they would bite into the ground, or you could nail or bolt the two together I suppose. But I chose the hole. I laid the boards by the hole, and got out my tarp. At this point I need to describe my tarp: At the ends of the ridgeline, I have loops, and to those I have a length of Lash-It a few inches longer than the tarp, so that the tarp and Lash-It form a loop which can be carabinered. The Last-It acts as a gear storage line, and as the Nylon tarp stretches in rain/etc., the weight of gear on the line functions as a trap tensioner. In place of a structural tarp, you could just use an adjustable length of string tied to the far ends of the boards. Basically, the boards rest in the hole in the ground, and the tarp or other guy line keeps the far ends of the boards from falling away to the ground. Once you get into the hammock, the tarp or line no longer provides any structural purpose until you get out again. I attached the tarp simply by wrapping the warbonnet strap around twice at the far ends of the boards and clipping it with a carabiner. That has been good enough to keep it from slipping, even on the smooth boards. Also at the same end I attached the tent stake guy lines. I simply tied a small loop in the end of the string, and pulled the string through the loop to make a larger loop that tightens on itself. Because this string will be pulled perpendicular to the board, it never slipped off once everything was set up. So at this point, each board has three lines attached: two guy lines on each that will go down to the stakes in the ground, and one (the tarp, in my case) that goes between the two boards. For the next step, it is most convenient to have a couple helpers. They should be easy to find, as everyone around you is wondering what the hell you're up to. When I told them I was going to make an entire hammock stand out of two boards, without cutting, drilling, or nailing them, I heard a lot of "I've got to see this!". Place the bottom end of one of the boards in the hole in the ground, lift the other end up about six feet, and ask a helper to hold it there. Repeat with the other board. Then adjust the tarp or center guy line so that the boards maintain this configuration on their own, and the helpers are just there to balance it, to keep it from falling over. The angle from the ground to each board should be between 30 and 45 degrees, slightly wider than the angle you normally hang your hammock at. The idea here is that when you get in the hammock, the force on the hammock straps will pull the boards almost straight into the hole, but actually a little towards each other because the angle must be wide enough that your hammock and suspension don't hit it. So for example, if you normally hang your hammock suspension at about a 30 degree angle, and you make the angle between the board and the ground about 40 degrees, then there will be about a ten degree angle between the board and your hammock when you have it done. While your helpers stabilize the boards, drive the stakes into the ground and attach the guy lines. I try to get the lines to pass through the plane that is perpendicular to the end of the board, with the two lines about 90 to 120 degrees from each other. One purpose of these lines is to provide the lateral stability to the structure, and to balance it while you're not in it. When you do load the hammock, the lines keep the boards separated, pulling them down to the ground. Without them, the load in the hammock would cause the wide V formation to snap together like scissors. Once three of the stakes are in the ground, your helpers can let go as the fourth stake is positioned. Then each stake can be pulled up and fine tuned. You want to try to get the structure as vertical as possible when viewed from the ends, and symmetrically balanced when viewed from the sides. Nothing needs to be precise. I didn't measure anything, just eyeballed it. I double checked the alignment just by reaching down once I was in the hammock, and feeling if the boards met directly beneath me. I found mine to be a little off, but didn't fix it until the next day, and it held fine. The forces on the strings actually aren't that great, as most of the force of your weight is directed along the board into the hole in the ground. The strings compensate for the small difference in angle between the hammock suspension and the board, and provide lateral stability. It has survived an entire week of use, me getting in and out many times each night as is necessary after drinking many many beers with my friends, which I think was an important part of stability testing. When I leave tomorrow, everything will pack back up, I'll just fill back in the small hole in the ground, and my friends can keep the undamaged 2x4 boards. My total cost for this project was less than $10. I think I'll try to set this up at the fall hang and chili festival next month.


Comments for World's simplest treeless hammock stand (1)